Walkthroughs
- by maltz
Mission 4 - The Brothers
Map Size: Normal
Carry Over: Wulfstan, Duncan
Level Cap: 26
Difficulty Index: 2/5
Primary Objectives:
- Wulfstan must survive
- Meet Duncan's army
- Seize Tor Hrall
- Repulse Rolf's attack
- Reinforce the army with Dwarves

As the mission name suggests, you are going to fight Wulfstan's half brother, Rolf. Is Rolf going to be as tough as Lorenzo and Andreas in mission 2, and Andreas and valeria in mission 3? No. The main objectives can be completed in several days, but the sidequests can drag on for quite a while.
Start by picking the 6 Thanes as the bonus. They have good speed, initiave, defense, and gropu attack power.

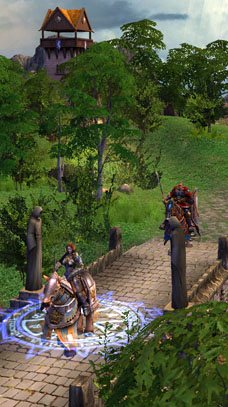
Wulfstan starts in the NE corner (1). Your eventual goal is to take Town A in the opposite corner. The game designer probably wished you to spend time picking up Fortress units, but your starting army is already quite powerful. If you have a good Wulfstan build by now, it is totally plausible to rush straight to the end without picking anything up. Let's talk about this fast route first.
Follow the main road west, and turn south. As soon as you reach (2), Rolf teleports in. Rolf is relatively the weakest mid-mission boss in the Fortress campaign. A few fireballs are enough to send him packing.
After taking care of Rolf, keep going south and you will hit a large stack of Champions. 10 Thanes + Fireball + Resurrection = perfect victory. (You can hide a stack of shooters in the corner to enjoy the "right-between-the-eyes" accuracy.) Keep going south, and you need to face a large stack of Fallen Angels. 10 Thanes + corner shooters + Fireball + Resurrection = another perfect victory!

Even 3 Rolfs can't beat valeria in mission 3. Shame on you... Nival!
Keep going south and you can see a Witch Hut (yellow W). This is the first Witch Hut of the Fortress campaign, and there are only three in total. Follow the road west and north. As soon as you hit (3), an old friend - Duncan rushes in a join you!

Duncan has a powerful Haven army with him, and a lot of them are shooters. Give all shooters to Wulfstan (or Duncan if he is a better hero), and run straight for Town A. Mission ends right here!
If you wish to fully explore the map, there are a lot more to do. Right after taking Duncan, back track to the last intersection, and go east (where the Observatory is). If you gave Duncan enough fighting experience back in C1M5, Duncan is probably level 26 or above already. You only need to work on Wulfstan's experience gain. There will be enough experience points to level Wulfstan to the cap as well, due to the sidequest that I am going to describe next.
Try to flag all mines, and pick up every single resource you encounter, because they will be needed in the sidequest. You can buy a mission map with 4000G at (4). You can not only see where the roads are heading, but also spot something out of place at the NW corner of the map... Nice smoke effect, by the way.

When you approach a neutral Dwarven stack, they will either join you for free, or ask your to pay a welcoming fee. The request can be any of these: 25 Wood, 25 Ore, 15 Mucury, 15 Crystals, 15 Sulfur or 15 Gems. If you don't have the requirement, or don't want to give, choose Cancel. The creature will then ask you whether you want to fight them; choose Cancel again. Now you can approach the stack once more, and the creatures may ask something else.
I have marked the neutral Dwarven stacks on the map with yellow buttons (hopefully I didn't miss any). The larger the button, the bigger / more useful the stacks. In order to complete this sidequest you need to gather a total of 10 stacks, which is not difficult at all. (The largest button actually contains 7 stacks.)
You can also make Duncan to visit these stacks and make deals. The Fortress troops will automatically go to Wulfstan. This is very convenient, except that Spearthrowers don't mix with Skirmishers, and Wulfstan already reaches the stack limit of 7. You can always temporarily swap army between Wulfstan and Duncan to create rooms.
After buying the map, head east and then south. On your west you can see a Red Keymaster Tent. Grab the key (important), and continue south. You will soon see a a Two-way portal (green I), which connects to the west side (green I'). Don't take the portal now becuase you still have important business down south. Keep going south, and look carefully, there is a hidden pine trail of the forest! At the end there is... a sun-sweet berry of the earth, in the form of... a good stack of Thanes join you for free! Wohoo!
With this large stack of Thane you can now tackle a large dragon stack on the road side, and the Dragon Utopia close by. With resurrection, the tactics are basically the same.

Now take the two-way portal (I) (and pick up a large stack of bear blocking the portal). You are now on the other side, at (I'). Go north first to collect more troops and visit a Witch Hut (yellow W).
If you were too weak to handle the tier-6 Champions south of (2) at the beginning, you will end up being here first. You can now use the portal I' to go to the east side for the Red Keymaster Tent. The rest of the walkthrough should be the same. You may want to pick up Duncan as early as you can, so he can visit stat bonuses as well.
Next, come back to (7) for the Mage Vault. Further south there are some Godzillas (Magma Dragon) guarding a gold mine at (8). You can buy them as you do to any other Fortress creatures.
From the gold mine, follow the road south and east, and you will see the Red Gate which you already have the key for. Pass the gate, and you will hit the Million JACKPOT of this mission at (9) - with a total of 8 neurtal stacks (7 for purchase and 1 for free), 3 stat boosts, and a Hill Fort to spend all of your now-useless cash! At this time, you must have collected more than 10 neutral stacks. Your get a nice EXP reward, which pushes Wulfstan to the next level.
When you rob this jackpot area clean, take the one-way-portal at II, and emerge back on the main road at II', just like Rolf did earlier. You can now finish this mission - taking Town A. The AI garrison in Town A was already weak at the beginning, and now your army has grown 10-fold. So...
Yes, there is no mission boss. Yes, this mission is way too easy. (Still, congratulations!)

Rolf was actually part of the Jackpot on Day 1. It will be more fun that way...
| Comments (9) |
- by maltz
Mission 2 - The Ambush
Map Size: Normal
Carry Over: Wulfstan
Level Cap: 16
Difficulty Index: 2/5
Primary Objectives:
- Seize Asbrand within two weeks
- Liberate the Dwarven dwellings within two months
- Repulse the Imperial attack
- Wulfstan must survive
- Seize all (4) gold mines
If you like the gorgeous Treasure Hall hidden underground in Freyda's mission 5, you have an entire mission made out of it now! The Ambush features a large and beautiful Dwarven macro-structure, containing mines, creature buildings, even a five-story-Fortress town in the middle. The town is not even 1/5 as tall as the wall!

So far, we have always recommended taking the creatures as starting bonus, but we will make an exception here. Although 10 black bears sound good, they are insignificant compared to your large starting army. They also don't merge with your existing Bear Rider stack, thus leaving less room for your 1-defender stacks. The less 1-unit stacks, the more casualties you take! You will be better off by taking the Armor of Valor artifact, which offers 1 point of defense (about 5% reduction in damage), and 1 point of morale (extra 10% high-morale bonus).
Your first objective is to capture the the only town in this mission (A) within 2 weeks. This deadline is very easy to meet, since Wulfstan has the logistics skill by default, and the road leads to the town is very straight-forward.
From Wulfstan's starting location (1), pick up a small stack of cannon fodders, and follow the snowy path south. Three stacks of wolves are mandatory, and their number may pose a threat. If you can't kill a wolf stack completely (which is very likely since HoF Dwarves are bad in the offense department), when the wolves' turn comes up, they will run beside your stack, call forth the same number of wolves, and attack you simultaneously. This can be devastating if a large stack does that to you.

If you have built Rune Shrines back in mission 1, you probably have learned the Charge rune magic. By using up one unit of Wood, your unit doubles its speed (traveling distance, not initiative). You can use this Rune to enable your Bear Rider units to reach enemy shooters in round one, for a cheap price of 1 wood!
The Berserk special ability of Berserkers is quite powerful. All you need to do is to pull Berserkers away from your other stacks (start off the battle with them in another corner). When the Berserks are closer to an enemy stack (within striking range) than a friendly stack, choose the Berserk command, and the Berserkers will attack with greatly-enhanced power. The more defense they have, the more attack points they gain by sacrificing all defense points.

This virtual studio set is also used in a spider chase scene in "A Bug's Life 2".

The garrison at (2) is manned by some long-ranged Renegade units. Try to use your Bear Riders to rush the shooters, so you won't lose many vulnerable Berserkers.
Right after the garrison, you can see another stack of wolf in the west. This stack is larger than the previous, and it guards an artifact Boots of the Open Road. This artifact is not very useful for Wulfstan, though, because Wulfstan already has the Path Finding (-50% movement penalty) feat. Also, in this mission you will spend the majority of time on paved ground, which does not impose any movement penalty anyways.
Once underground, you have to fight a Necro stack, consisting of Wraths and Archliches. Note that the battlefield contains a 2-tile narrow passage in the middle, so you don't want to have your units stuck for good and make them easy area targets for the Archliches. Fortunately, the Archliches love to waste their turn casting Weakness on the Berserkers. I don't need to tell you how to kill 6 Wraths with 2 Defenders, right? Plus you can instantly reach the Archliches with another pile of wood. Nice!
After the liches are taken care of, follow the path south to enter the magnificent hall. Keep going west towards Town A. On your way you can easily flag an Ore Pit, and rescue a stack of Skirmishers from Vindicators. The Gem Mine is guarded by Crossbowmen. If you have the Rune of Charge, this is a perfect time to use it.
Town A is guarded by a Renegade hero with a familiar name - Lorenzo. Lorenzo has gained some levels in the meantime, and his army is also quite large.

If you have conserved troops well up to this point, you can win this fight even on Quick Combat. However, you can cut the loss down significantly fighting it yourself. The Zealots will blind your most powerful stack (bears). You can dispel it with Wulfstan's Cleanse, if you acquired it from mission 1. Don't let your Berserkers cross the half-field too fast, or they will suffer huge losses from Lorenzo's Zealots and Crossbowmen.
If you are low on mana, and have quite a few good difference-making magic to cast (such as Igniting-Fireball, Mass Haste / Righteous Might / Deflect Missile), there is a mana well at (3), with a easy-to-flag Sawmill half way. You only need to defeat a small stack of Zealots to gain access to it. Alternatively, you can directly go north after the Ore Pit on your way in. After flagging a Dwarven Warren, go west and you can see another mana well, plus a hidden boost at (5)... more on that later.
These round trips cost you several days, but you can still meet the 2-week deadline easily. Another good news is that Lorenzo will not hire from the town at all, so you can attack him after Day 1, Week 2 and still hire two-week growth of troops afterwards.

After taking Town A you get a new objective - to liberate all Dwarven creature buildings within two months. They are the little squares on the minimap, except the Dwarven Warren (to the north) is actually a random-resource mine.
Starting from your town, you now have two months to explore in different directions. You can probably get everything done in just one month, though. Here comes a list of the more important things to do:
- Hire lots of Skirmishers and (Black) Bear Riders. They are very useful in this mission. High-tier creature buildings are nice to have for the mission boss. You will have more than enough cash to hire them all.
- Flag both Sawmills and both Ore Pits. You may as well flag all the other mines on your way. The Crystal Cavern is useful for Thane (tier-6) building. You will be short of Sulfur, but there is no Sulfur pit. Hope for the best on the random-resource mine or trade for it.
- Build a Capital ASAP (requires lv-15 town), gives 4000G / day.
- Flag all gold mines. There are 4 in total, marked by yellow Gs above. There are no sweet reward for completing this side quest, but more cash is always welcome.
- By the end of the mission, try your best to advance your Light and/or Destructive magic schools to Expert level (Rune Magic as well if you can), and max your Magic Guild. 50% you can get the Resurrection spell, plus Armageddon or Implosion.
You will see nothing but Renegade units guarding the creature buildings and mines - Zealots, Battle Griffins, Vindicators and Crossbowmen. Zealots give pain, but Crossbowmen are relatively easy when you rush them with Bear Riders + 1 wood. Griffins can be easily blocked with a bunch of 1-unit Shieldguard stacks. The slow Vindicators are ridiculously easy.
In the NW region of the dungeon, there is a skeleton lying on the snow (4). You might pick up something interesting, or nothing at all.
There is a well-hidden chest lying in the middle of some strange murshroom landscape at (5). On my way there, Wulfstan was suddenly surrounded by mysterious green gas. I thought he was poisoned, but he didn't lose troop or anything. On the other hand, his Morale and Luck are all boosted to 5, and the effect lasted through the entire mission !! This is some crazy boost!
If you feel like trading troops for an artifact, there are optional surface areas blocked by nasty creatures. The two-way portal at (6'), which links to a small opening of (6), is guarded by Fire Elementals (shooter). The two-way portal at (7'), which teleports you to (7), features Water elementals (caster). The stairway at (8') takes you to 8, leading to a Tomb of Warrior (temporary morale penalty for one artifact), but you have to bear through Phoenixes. They are all completely optional.
Steadily build up your town, gathering troops and learning new Runes and Magics. As soon as you occupy all creature buildings, a new objective is triggered - to defend against another Red Hero. (guess who? Hint: These are only two full-time Renegade heroes so far.)
Andreas' army actually grows weekly, roughly at the same rate of a full Haven town's weekly production. For example, you will face 16 Champions by spawning him during Week 4, but you will see 20 Champions when he spawns in Week 5. Fortunately, Andreas has been demoted down 10 levels since your last encounter with him in the Freyda campaign. There will be more powerful Andreas and Lorenzo coming ahead, though.
By the way, the level cap of this mission is set way too low. I reached level 16 just two battles after defeating Lorenzo!

Gimme back the innocent (and not so bright) Lady Isabel!
| Comments (13) |
- by maltz
Mission 5 - Choices
Map Size: Large
Carry Over: Freyda, Duncan
Level Cap: 29
Difficulty Index: 3/5
- Liberate Duncan
- Seize the port town and set sail for Talonguard
- Freyda must survive
- Duncan must survive
February 11, 2007, Patch v2.1

The new Haven campaign finale is quite a standard build-up-and-conquer scenario, but there are a few interesting twists in it. Let's start by picking the 2 Champions. There are hundreds and thousands of gold involved this mission, so the cash bonuses do not make a real difference.

The Town Portal and Summon Creature spells save you a lot of time in this mission.
Escaping from the snowy territory of the Dwarves, Freyda starts in the NW corner (1). The Paladins featured in the cutscene will join you. There is a random, low-quality artifact just south of Freyda. On your way to it, though, you receive an ambush warning. The ambush consists of elementals. I got Air Elementals here.

Go east a bit and you can see an Abandoned mine (Crystal Cavern) to your NW. Flag it or not - you should soon take the lightly-defended Dwarf town (A) and start the cash flow. Take the stairway at (2) to wave goodbye to the snow!
You are now in the underground passage (2'). Follow the path south, and you will see the exit (3'). However, to your NE there hides a gold mine, which is quite worth the extra days of travel, since you probably won't come back here for a while.
The exit (3') takes you to the ground level (3). As soon as you emerge, a Teal hero attacks you, but his army is laughably weak. There is a Teal town (B) just south from here. You can either take it now or rescue Duncan (4) first. There is a medium-sized garrison holding Duncan. If you have a well-built Freyda by now, you should be able to break it with Freyda's starting army.
As soon as you rescue Duncan, all Teal towns (B, C and D), buildings, and heroes will convert to your blue flag. Therefore, you should ignore the various mines surrounding Town B and rescue Duncan as soon as possible.
Duncan: *Cough* Okay, okay, I will come out! Don't need to release that tear-gas!!

Duncan joins at level 23. His skill choices are quite standard (and slightly boring) for a Might hero. I would have swapped Defense for something much more aggressive (and thus useful in a campaign), such as Luck or Dark Magic. Logistics is good for a supprting hero, but there are plenty in the Tavern.
Note Duncan knows almost no spells at first and he does not have the mighty Master of Wrath. Make that a priority for subsequent level-ups.
Since Duncan is still weak, you probably don't want to split any army to him at first. It will be nice to level Duncan a bit before the mission ends, though, as both Freyda and Duncan will show up in future missions. Unfortunately, it is impossible to level both Freyda and Duncan to the level caps here, due to the relatively small stack sizes for a mission finale. Where is our friendly Sylanna's Ancient level-up tree?
Now all the Teal buildings and heroes are yours. There are a few things you should pay attention to:
- Build structures for Cavaliers and Griffins, which are all you need to dominate the map. You only need one upgrade center, thanks to Caravens.
- Build better castle walls to increase unit production.
- Flag as many gold mines as you see, and hire all the Peasants (using Caravan) every week. Hire Ellaine if she is available (double tax from Peasants). It is possible to have 2000+ peasants under her by the third month.
- Go to the Tavern (in any town) and see if you can hire high-level Haven heroes you just defeated. In my game I was able to hire two level-20s heroes, who became a huge help in logistics.

Watch out for the red hero Andreas. He is usually roaming around in the former Teal territory. AI heroes love to chase your army-less hero around, so you can use them as the bait. Take out Andreas as fast as you can, so you can freely explore the map to flag mines and pick up stat boosts.
Andreas' starting army is not very powerful (but Andreas and his killer Ballista are tough), so you should gather everything you have, and defeat him before he goes back to a Red town and replenishes his army.
Your next goal is to take out one of the two remaining Red towns (E) as soon as you can. If you have sent Andreas packing already, Town E should be guarded by a very low-level Renegade hero, Lorenzo. You will be surprised how he bites dust without a scream, even though his army overpowers you 5 to 1!
The Red AI should have built up Town E very well, so you can immediately learn the precious Summon Creature and the Town Portal spells. Your traveling efficiency has just doubled!

This Town E is also the only town in this mission that allows you to hire Angels. There are two Haven Angel buildings around Town B, so you can hire quite a powerful Angel army by the end. You can find a Hill Fort at (5), which allows you to upgrade Angels to Archangels. Great!
After owning all five towns, you can take your time building up and exploring, since the Red AI is again dormant and will never come out from the garrison door. There are a lot of stat boosts (R) on the map, netting a total of 16 points! (Just for your information, the current single-mission record of stat boosts is still held by C5M4 in the original HoMM5, 21 points.)
When you feel powerful enough, venture down the stairway just south of the Hill Fort (5). The Succubi Mistresses at (5') yield quite a few resources. The Archdevil further inside the cave guards a two-way portal (6), which leads to a small, isolated floating land mass (6'). You can pick up a nice artifact there, but nothing else.

North of Town E is a stairway (7) that leads to another small underground area (7'). You can find a Green Keymaster Tent (Green K) nearby. If you go north from there, you can pick up an interesting artifact. In my game there is a Markal's Skull (yack) glowing and floating around! It is not really useful for a Might hero, though.
The Green Key is part of the Key trio required to unlock a HUGE Treasure Hall underground. You can find the Red Keymaster Tent SE of Town B (red K). The Blue Keymaster Tent (Blue K) is just NE of the stairway 7, in the middle of the river.
After collecting all three Keys, go downstairs through 3 (where you came from at the beginning) and unlock the Red Gate (red G) to the east and subsequently the other two gates (green G and blue G).
The treasure hall is a spectacular eye candy, but does not really contain anything wonderful inside. The chests are not any larger than the regular ones (not like those huge chests in C5M4 of the original game). The tiled floor somehow consumes a lot of movement points as well.
Behind the Blue Gate you can find a two-way portal (8'), which takes you to a small, isolated island at the SE corner on the surface. A pack of Fire Dragons would like to join you!

When you are done with exploring, gather all the troops from your towns, upgrade them properly, and march towards the Port town (yellow P). You need to pass a garrison, which is more powerful than anything you have seen in this campaign. It consists of:
- 25 Fallen Angels
- 50 Champions
- 75 Zealots
- 160 Battle Griffins
- 250 Vindicators
- 400 Crossbowmen
After facing the huge garrison, you would probably expect some serious campaign finale battle. However, the defending army in the Port Town is extremely disappointing. Somehow the AI stops building at tier-three, even when they get Andreas back. Hopefully, this will get fixed in a subsequent patch.

After taking the Port town, build a Shipyard, and purchase a ship. You are not done yet - there is one last battle. As soon as you board the ship, the mission boss Irina spawns, sails forth and attacks you. Irina is a powerfully-built Haven hero at level 24, almost as good as my never-miss-a-stat-bonus Freyda. I would happily trade Duncan for Irina on any day! Irina leads an army that is about half as powerful as the garrison(s) you just defeated.
However, if you have spent time visiting the stat bonuses, your army should be able to sink Irina's ship in 6 moves (1 move = 1 stack down). Just for an example, the Imperial Griffins' initiative is improved from 15 to 25 under Freyda's (Lv 29) Mass Haste. Factoring in the frequent high morale, that's more than 3 actions per hero's turn!
Winning the battle brings you the final cutscene, which justifies Duncan's jail time. Congratulations for finishing this interesting and not-very-difficult Haven campaign. Next, we will move into the new race of the expansion, the Dwarves.

Deeply irritated by Duncan the dirty-minded, Freyda is about to burst again! See the distortion of space-time?
| Comments (25) |
- by maltz
Mission 4 - Negotiations
Map Size: Normal
Carry Over: Freyda
Level Cap: 27
Difficulty Index: 3/5
Primary Objectives:
- Talk with dwarven garrison
- Carry out Dwarves' demands
- Reach Tor Hrall
- Get away from the Dwarves' territory
- Freyda must survive
- Kill wolves
- Take care of Hydra
- Elminate rebels
- Find dwarven mithral helm and greaves
- Collect resources, enough for Keymaster's requirements
February 11, 2007, Patch v2.1

There will be plenty of nice artifacts in this mission, so the Champion bonus seems to be a good choice for a reasonable boost at start.
This mission is clearly divided into two parts. The first half is a brief, standard conquer and build. As soon as you meet the requirement, you should move on, since you will lose all the leftovers anyways. The second half is all about solo sight-seeing, but there are a few side quests to pursue in between.
Part I: Preparing for the Snowy Mountains
Freyda starts in the SW corner (1) with Town A already under her command. Haven towns (after so many patches) now require a lot of Wood and Ore, so you can start by flagging the nearby Ore Pit and Sawmill (yellow O and W). There will be no secondary hero in this mission, so Freyda has to do everything by herself. You will be able to reach the level cap quite easily in this mission, so you can skip a lot of optional neutral stacks, such as the group just SW of Town A.

Resurrection = Successful Campaign!
At this stage, all of the neutral Renegades will join Freyda. Pick up the better ones as soon as possible! If you venture into the NW region from the Saw Mill, you can flag two more mines and pick up a small stack of Fallen Angels, which are essentially super-sized Vampires. There is also a Witch Hut nearby.

Before visiting the Dwarf garrison (2), keep going east to defeat the Rebels stationed inside Town B. Don't miss out on the Sulfur Pit (yellow S) on your way and flag the Sawmill and Ore Pit there as well.
After flagging more mines and visiting the stat boosts (blue R), you can approach the dwarf garrison at (2). Freyda can only pass the garrison if she:
1. Owns more than:- 15000 Gold
- 15 Crystals
- 15 Sulfur
- 10 Gems
- 100 Conscripts
- 80 Marksmen
- 50 Squires
- 30 Imperial Griffins
- 15 Inquisitors
- 5 Paladins
With both Haven towns under your control, the requirement is not hard to meet. In the meantime, while cranking out these units, also build up the Mage Guilds to maximum (level 5) for a chance to get the ultra-useful Resurrection spell. If you also picked Dark Magic for Freyda, you may get the tide-turning Puppet Master and Frenzy as well. Nice!
There is no return after passing through the garrison. After you have done everything meaningful, lead the specified army and go straight for the dwarf town Tor Hrall (Town C). You will see a Red Keymaster Tent (red K) on the left, but it is now guarded by legions of high-tier dwarfs. We will come back later for it.

ROFL, oh wrong, ROLF, co-chiefs the Dwarf tribe with Wolfenstein, I mean Wulfstan.
Part II: Greetings from the Dwarves
As soon as you reach Town C, a cutscene plays and you have lost everything in your home base - and your bank account gets reset to 0 as well. Your new objective is to escape the dwarf territory. Your way in is now blocked by hostile and huge garrisons, so you have no other choice but to take the one-way portal at (3). Before entering the portal, you can pick up a nice Dwarven King artifact (blue D1). Similar to Findan's last mission, all four in the set will be available for collection!

You emerge in the very NW corner of the map (3'). Immediately to your south and northeast are another two pieces of the Dwarven King artifacts (D2 and D3).
Sometimes, you can get neutral, lower-level Dwarf units to join you. They are quite powerful units, and I would trade my fat and lazy Conscripts for them on any snowy day. By the way, from time to time you should pick up some Crystals, Gems, and Gold. They will be needed in an optional sidequest. Cash the chests as well. You will have lots of EXP from quests.
When you go south, you can see two stacks of Wolves in the forest (red W). The beasts seem to be missing a victim to be rescued by you, so it is better not to kill innocent wild animals, right? Actually, no. Video games never teach you to save wildlife, humanoids, or humans.
If you don't kill the wolves now, later on you will be blocked by three dwarf stackc at (4). They will ask you to defeat these wolves. As soon as the wolves are gone, these blocking stacks also disappear. There are three stacks of wolves in total.
SE from the wolves is large stack of Phoenixes. There is no need to waste your precious troops on them, because there is a very nice detour. Follow the path SW and not far ahead lies the last piece of Dwarven King artifacts (D4) and a stack of Squire reinforcements as well. Keep going south, and you can visit a Stable and pick up a very useful artifact - Boots of the Open Road, which eliminate the movement penalty on snow.
Note: The game hints that Rolf is going to chase you around, but I have never seen any trace of Rolf.

Follow the road east, and you can pick up a stack of Conscripts and *Inhale* Imperial Griffins! Cast a Divine Strength on the diving Griffins (using your Inquistitors) and enjoy some landslide success.
There is a Hut of Magi at (5). The Hut asks you to give up a Dwarven artifact and it will show you some interesting places. No, it does not show you Rolf ROFL or Wulfstan return to Wolfenstein. It only shows you the places I just described above. Don't waste your valuable artifact on it.
Now follow the road north and, look, you have bypassed that large Phoenix stack! There are some well-hidden Marksmen willing to join you just SE of the Phoenixes.
Next, turn east, and you will be blocked by the Dwarfs who ask you to kill wolves, if you haven't already done so. Keep going east, and you will bump into a little stack of Dwarfs hiding in the wood. Someone begs you to rescue his sister (who is also bearded, you will see), by defeating some Hydras. You can find a large stack of Hydras just NW from here (7). Note the path is not really obvious.
After defeating the Hydras, you can "enter" the mine. The mine works like a two-way teleport and you will come out at (7'). This is a shortcut to the end of the mission, but by taking it you will miss a few nice features in between.
If you are interested in what you might have missed, backtrack to (6) and follow the road SE then SW. You are back at the Red Keymaster Tent (red K), but this time the guarding stack is much weaker. You can trade for the Red Key with:
- 10 Crystals
- 5 Gems
- 5000 Gold

That's why there are lots of Crystals and Gems around. The Red Key opens the Red Gate (red G) in the east. Go there, pick up the Inquisitors, visit the stat boosts, and you are now back to the Dwarf Mine exit (7'). Keep going east, and you can see a stack of Shadow Dragons guarding a high-quality artifact.
You are now very close to the end of the mission. The mission boss is blocking your exit. It is -- a large stack of Godzillas !!... also known as Fire/Magma Dragons.
The Fire/Magma Dragons are essentially slow versions of Phoenixes. You receive fire damage from hurting them in melee and when you face such a large number, your losses will be significant. The Dragons are also immune to mind control spells (such as Frenzy and Puppet Master), so there is no trick to this battle. Just throw in whatever you have and Mass Haste your own side to shorten the pain.
If you are not powerful enough to take on the Godzillas, you can go SE a bit to visit a Prison (8). The Prison holds no hero, but offers you an optional sidequest. By submitting two pieces of Dwarven artifacts, you get a large stack of Paladins to join. In my game I got 45 -- this was more powerful than my entire army combined! The exchange is well worth it. Besides, there are also a group of Paladins to be picked up further east.
Behind the Fire Dragons, there is a new and very nice stat boost (+2 spell power and +2 knowledge) guarded by a very small stack of Phoenixes. Finally, enter the stairs and approach the portal to trigger the end-mission cutscene. Well done!

The most intelligent woman in the original HoMM5 has returned!
| Comments (2) |
- by maltz
Mission 3 - Duncan
Map Size: Small
Carry Over: Freyda
Level Cap: 21
Difficulty Index: 2/5
Primary Objectives:
- Seize all the (4) towns of the rebellious Stag Duchy
- Take Duncan prisoner
- Freyda must survive
February 11, 2007, Patch v2.1

Pick the 15 Vindicator starting bonus. They are very useful, but not in battles.
This is a straight-forward mission - there are four Haven towns (marked in pink A to D) to be occupied by Freyda. As soon as you take the last one, the mission is accomplished. You can develop towns you capture.

From your starting position (1), head straight to the first town (A). A stack of Peasants vaporizes in front of your eyes, but nothing else happens (a script failure?) There is a free stat boost (R) on the side of the road and a Witch Hut to the east (2) that you can visit now or later. Take Town A from Teal as soon as possible and start building. You receive a small stack of Renegade reinforcements as a reward.
Before or after taking Town A, you can flag a Barracks at (3). Normally Footmen and their relatives are not really useful, but they are very important in this mission. All of the mines you flag will be recaptured by spontaneously-spawned Teal units within a few days if you do not put at least 10 units of Footmen (or better units) to garrison the mines. (The game will also tell you about it when that happens.) However, once a mine is properly guarded, it will never be attacked, and therefore will remain safe forever.
One of the new features in the expansion is the Caravan system. If you are not familiar with it from HoMM4, you can think of it as ordering pizza. You can place an order from home and the pizza will be delivered to your house after a short time or it is free. In the game the units are the pizza and the Caravan is the delivery guy. The only difference is you always have to pay first, despite the possibility that the delivery might fail.
To start a Caravan delivery, you can go to the creature purchase interface of any town. You can purchase (order) creatures from another town or from a creature building. As soon as you pay, the units will be packed into a Caravan outside the town or building. The Caravan starts moving towards the destination town when you hit End Turn.
The game also tells you how many days it takes for the caravan to arrive. Generally speaking, Caravans move faster than heroes, but they are not very good at avoiding obstacles. One of my Caravans actually got stuck in front of a garrison, and blocked my access to it as well. Another strange thing is that you cannot package already hired troops (inside a town) into a Caravan. You have to hire them fresh from reserves.
By the way, you might have noticed that un-hired creatures can now accumulate in creature buildings, so even if you forget to hire them for a week, you can always hire them later. This is a very considerate design!

Three kinds of resources are usually in shortage in this mission: Wood, Ore and Mercury (the corresponding mines are marked with yellow W, O and M). Fortunately, none of the mines are guarded, so you can send out a low level hero to flag them one by one (don't forget to leave 10 Footmen in each).
From Town A, head east to then north to take your second Town (B). There is a Trading Post (4) on your way. The Trading Post offers a discount in resource exchange, equivalent to having three Market Places. In the meantime, send a low-level hero to flag mines in the opposite direction. The two Sawmills are especially important. AI heroes here are again dormant in this mission, so feel free to flag mines just outside their castle gate, as long as you have enough Footmen.
After taking Town B, you receive another small stack of Renegade reinforcement as a reward. That's all the Renegade units you have for this mission, though. Flag another Sawmill, and you can now enter underground from the stairway at (5). Follow the paved road south and you can take a side step to flag a Gold Mine (6). Then, follow the road all the way south, to take the stairway at (7). You emerge just beside the third Teal Town (C). That was some underground shortcut!


Now you own three towns and the Teal AI only owns one. Your victory is just a matter of time. Unfortunately, you cannot build the towns all the way up to the maximum. Your Mage Guilds are capped at level 3 and you can hire only up to basic Tier 5 (Priest) and 6 (Cavalier) units. 
In the meantime, you can collect the rest of the stat boosts marked with blue (R), while watching your Caravan ship units around. You only need to have one Griffin upgrade facility first, since you can easily gather the basic Griffins with Caravans. The only Alchemy Lab is beyond the garrisons (marked with G). However, by the time you break through the garrison and flag this Alchemy Lab, you may as well challenge Duncan in Town D and end this mission.
By the way, the Training Ground mechanics have been adjusted as well. Now you cannot train as many Peasants to Archers as your bank account allows. There is a pitiful limit on the number of units you can train per day. This number slowly grows.
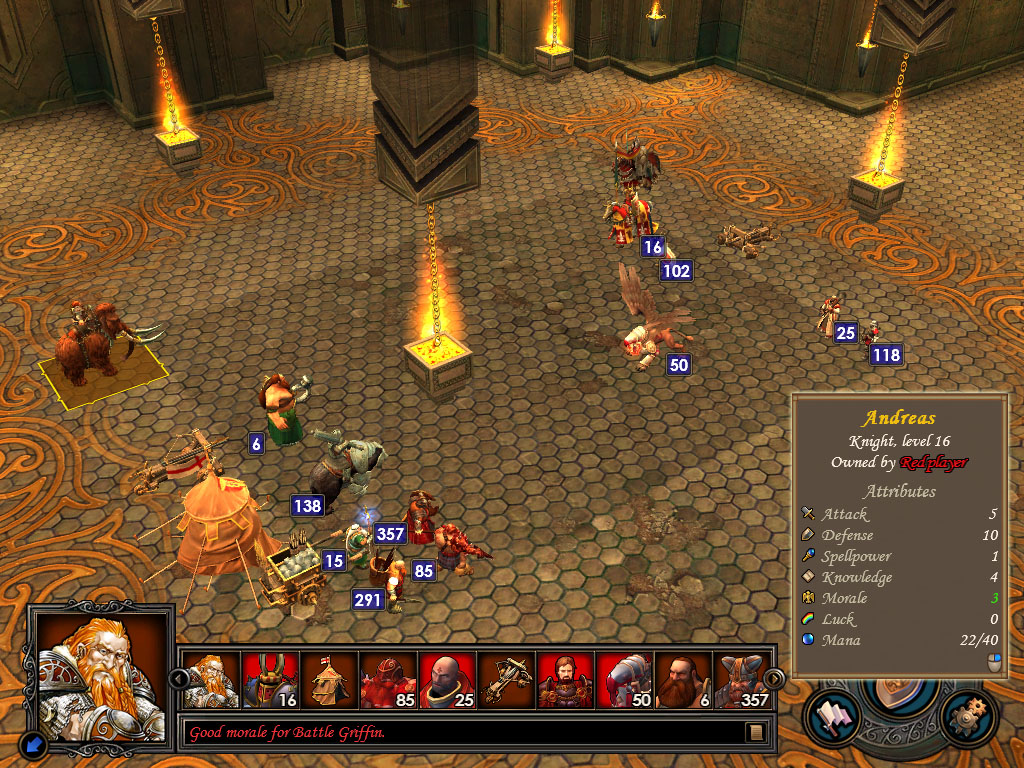
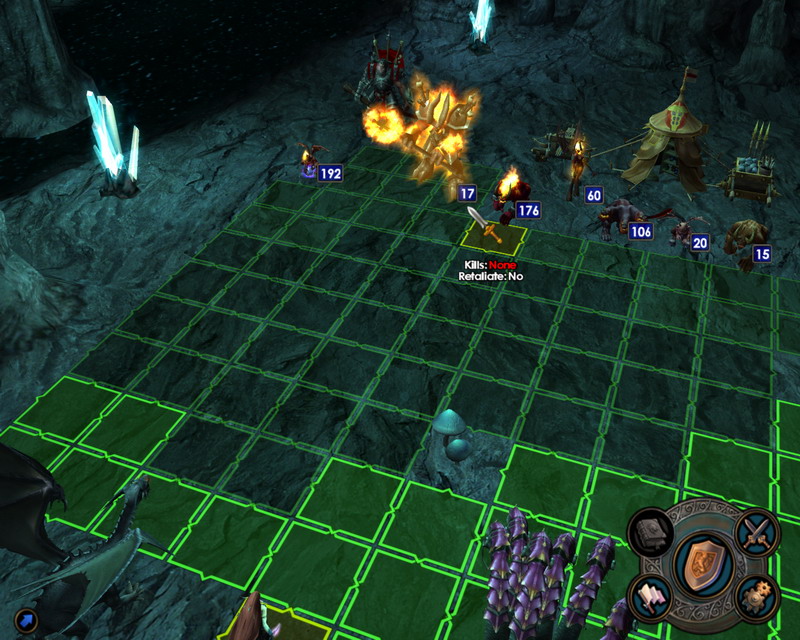
When you feel ready, grab all units you have, break the garrison and siege Duncan's castle (D). The weakest garrison among the three is located underground. When you take the stairway at (8), you will emerge right in the heart of Duncan's quarter. Duncan is quite powerful as the mission boss, and his diving Griffins might be able to wipe out your Marksmen before they get a chance to move away! (Now high morale also happens on Battle Dive, making Imperial Griffins deadlier than ever.) You may need to split up the Marksmen stack like me (shown in the picture). This way, at least you can keep half of the stack alive.
If you tried to gather all units available, you should have some ranged advantage here after your own Imperial Griffins dive out Duncan's Marksmen. It is better to wait for the defending units to come out. Freyda's specialty is the improved Haste spell according to her level. By now, you should be able to cast some nasty Expert Mass Haste to keep the action going. Ths mission ends when you defeat Duncan!

Duncan: I'll have your gold by tomorrow!
| Comments (8) |
- by maltz

Mission 2 - Suspicion
Map Size: Small
Carry Over: Freyda
Level Cap: 16
Difficulty Index: 1/5
Primary Objectives:
- Eliminate the (4) rebel towns
- Destroy all (14) peasant huts
- Freyda and Laszlo must survive
- Save the (5) innocent peasants
February 11, 2007, Patch v2.1
The 2nd mission of the new Haven campaign is fairly easy and short. There are four Haven towns to be destroyed (marked with pink letters A to D). None of the towns feature significant garrisons and the enemy heroes inside (if any) are completely dormant.
Instead of flagging Peasant Huts, now you need to burn them down. Compared to the last mission, you need to burn nearly twice as many - 14 huts to be torched in total. They are again marked in yellow P on the map.
To add some spice to the mission, you are given a strange secondary objective - to save (pick up) the "innocent" peasants (Enforcers, marked with red letter E). You still torch their huts to the ground, though. In order to complete this side quest, you need to pick up about 5 stacks of Enforcers. The reward is really nice - Freyda gains 1 point in each of her 4 stats.
Personally, I picked the Blind spell as the starting bonus, because it is the only bonus that carries over to future missions. The spell helped me reduce losses in a few battles. This mission is quite easy anyway, because you will pick up fairly large stacks of Renegade units throughout the map. The 10K gold bonus is actually a little bit "too generous", because you won't have enough places to spend it.
Freyda starts in the SW corner (1). Laszlo is still around, but now he has his own mind. Laszlo follows Freyda closely (he can act even before his turn comes up), and from time to time, he gets rid of neutral stacks lying ahead. Laszlo can also pick up your Enforcers (required for the sidequest), so as soon as you see an Enforcer stack or any Renegade stack (which always joins you), rush for it before Laszlo does!

Laszlo might help you pick out a few Peasant (Inferno) stacks, but nothing bigger.
Proceed to the east to pick up your first stack of Enforcesr, and burn down two Peasant Huts. When I tested difficulty on this first stack of Enforcers, I got 81 Enforcers to join on easy, and 51 on heroic. So it seems that difficulty does play a small role here. The Peasants in this mission usually turn into low-level Inferno creatures. These Imps and Familiars never hesitate to suck your mana dry.
Follow the path north to flag an Archer Tower (2). You can see the first Teal town (A) immediately to the west. Take it! Too bad you won't be able to keep and develop any town in this mission. From Town A, if you proceed further west, you can pick up a fairly scary stack of Vindicators (V) inside. They are very useful cannon fodder against various high-tier, neutral stacks guarding stat boosts and artifacts.
Come back to the crossroad (2), and this time go east. With the Vindicators you can now easily hack through the tier-6 stack guarding another opening to the north. There you can pick up a big stack of Crossbowmen (C), and visit a Hill Fort (3). This Hill Fort only converts basic units to regular upgrades, so they still cannot be merged with your Renegade units. At least you can Battle Dive again!
Next, follow the path south, you will see 2 more flammable Peasant Huts and 3 juicy stacks of Enforcers. On your NE you can attack the second enemy town (B). Don't miss the large stack of Battle Griffins (G) on your east! They are very useful in subsequent battles, especially sieges. If you have to throw away a stack at this point, discard the Squires.
Again, backtrack to the crossroad (2), and this time follow the pavement north (4). Three more Huts are scheduled to be demolished, plus yet another Enforcer stack. If you have picked up all Enforcer stacks up to this point, it is likely that you can finish the secondary objective here, and claim your 4 points of bonus stats on Freyda. Nice!
Next, take the NW route and siege Town C next, followed by a small deadend to the north for yet another Enforcer stack begging you to burn their house. There is a Trading Post just south of Town C. Feel free to convert all your resources to gold (but you probably have no place to spend it). South of the Trading Post is a Mana Spring, where you can double Freyda's mana.

Are you thinking what I was thinking? -- Where is the "Nuke" button?
Proceed to the east and you will soon see a bridge leading to the north. There is a Witch Hut (5) just south of the Teal town D. Wipe this last Teal town from the map and follow the paved road to torch yet another Peasant Hut. On the south you can see a Tomb of the Warrriors, where you sacrifice 3 points of morale in the next battle for a random artifact.
Finally, cross another bridge to see the final batch of huts. Right after burning down the last, 14th Hut, the sky turns dark and stacks of demon armies warp in! You should have more than enough leftover units to send them packing. Mission accomplished!

Hopefully there won't be any more Peasant Huts in the next mission.
| Comments (2) |
- by Infiltrator
Map 3 - The Cultists
Size - Very Big
Level Cap - 26
Carry Over: Raelag & Shadya
This is a rather straight forward mission in the Warlock Campaign. Basically, you need to completely clear the map of the enemy SoulScar clan. Unlike the previous mission, this one puts you in a much more subdued position. You start out without a castle, and the enemy has seven (yep, seven). Obviously, it all boils down on how well you built Raelag in the last two missions. If you have leveled him nicely and have high Spell power with Expert Destructive Magic (and learned the high-level spells), Empowered Spells, and even Warlock's Luck (highly recommended for patch 1.3), then you will have a good time wiping out the enemy with Raelag's special ability.
Well, maybe not. On heroic, this mission is widely regarded as one of the toughest among all, simply because the AI heroes are bumped up a lot after patch 1.2. Fortunately, there are a few things you can do to survive. If you are playing on patch 1.3, your mana runs out twice faster, but you might get a Warlock's Luck on your first Empowered Meteor Shower, saving your day. Resurrection s extremely helpful. Although it has been toned down in patch 1.3, you can still save up to 2/3 of your casaulties if you cast it at the right time (which is near the end of the battle).

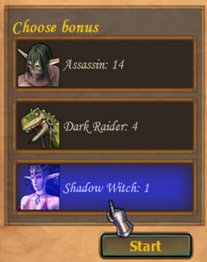
Let's start from the beginning. As always, three bonuses are available - 14 Assassins, 4 Dark Raiders and one Shadow Witch. I strongly suggest you pick the Witch as even though you start out with 1 Matriarch, the Witch will be useful as a secondary spell caster and as such be an easy choice amongst the three bonuses.
Shadya starts out with Raelag as well, and thankfully she has reinforcements. The Shadow Matriarch I mentioned above is just in front of you, so pick her up. Don't be too hasty with the Blood Furies, as they are hostile. Clear the Blood Furies now, such a waste. :( On post-1.2 heroic, especially 1.3 (where you use up mana very quickly) you probably want to fight them with Shadya, to save Raelag's mana for the real fight on the end of the day.
Transfer almost all units from Shadya to Raelag. You probably won't need her power for the first week at least (simply because you don't have enough troops). Your total army with Raelag should now consist of: ~80 Minotaurs, 30 Blood Maidens, 1 Shadow Witch, 1 Shadow Matriarch and 24 Assassins. Not much, but most of the damage output will be done by Raelag, if you intend to win this scenario.
Above you is a Hut of the Magi, which will reveal a small portion of the Surface. The war you are fighting will only take place in the underground, so why reveal a part of the surface? As you may have noticed, the Soulscar clan is aligned with the Demons, and they will continually send heroes (with increasing strength) to fight you. There will be a total of three waves, spawning as soon as you own 2, 4, and 6 towns. The demon Heroes will have to take the path which is revealed by the eye of the Magi, so this will serve as a warning system to you. The Demons will invade strictly from Point D marked on the minimap.
The enemy Warlock has 7 heroes who are relatively strong. Depending on difficulty, they will start with a moderate army with lv 18-19, or with a big army (which enables them to crush you on quick combat) with lv 22-23. Sooner or later they will come after you. On heroic, rest assured at least 6 of them will show up during the first two weeks, and the first one attack you on the end of Day 1, and the second on attack you on the end of Day 2!
Start by taking Castle #1. The enemy hero stationed here will come after you sometimes. Hopefully you'll fry everything else with Meteor Showers or Chain Lightnings before your units are killed off. Note that the units you deploy on the battlefield decides the random seed how the battle will go, so if you definitely cannot win a certain battle, try to hide some stacks, and maybe luck will come to your side. You should be able to take Castle #1 by the end of Day 2.
Now that you have one castle; it's essential that you secure the other one who lies just north-east in close proximity. Undoubtedly the enemy will have another high level hero waiting for you there as well. (or come to you directly when you hit End Turn this time) Hopefully you have enough mana left. You can quickly upgrade the wall and pray to Asha, if that boosts your confidence. If you are playing on a lower difficulty, then you actually have about a week of free time now. You can use Raelag to flag all mines to the south, and then take Castle #2 before the end of Day 1, Week 2 (so you can hire the fresh units from it).
From now on, every castle assault will look similar. You just need to feature some high-hp units to soak up the damage, while quickly use Meteor Shower and Chain Lightning to paint the floor with their blood. Once you have these 2 castles, you have a bit of breathing space, as the small peninsula is under your control.
Well, hold your breath on heroic. Your nightmare just started! There are still a handful of powerful heroes rushing straight to you, and they are not less powerful than the ones you've just beaten. The first wave of demon army will knock on your door on the third day as well! It is very likely that you cannot hold out both towns, even if you didn't really lose any significant army yet (learned Resurrection from mission 2?). You might need empty up Castle #2 and focus on defending Castle #1, which is much better built and profitable (as you should have put a capital in it). The demon army will take Castle #2 (and build it up a bit, until you take it back later rather easily).
On heroic, don't even think of going out with Raelag before you take out 6 mighty heroes (there are 7, but one usually gives up the entire army to another and go back to recruit.) Don't even think of flagging mines that are deep east. These powerful heroes are coming to you in a stream, and they will use up your mana (especially on patch 1.3).
The toughest hero is usually Lethos. His army is bigger than the others, and he likes to pay a visit to the Dragon Utopia on the way here. He'll usually get Implosion there, plus a handful of great artifacts to make him even harder to beat. If you are lucky, though, you can get the Emerald Slipper from him (50%+ on your Meteor Shower and Implision, can't beat this deal). Generally speaking, unless you can't make it back in time or you have no mana, always fight with Raelag. You will lose much less units with Raelag (because of his Intimidate special). <[>Your hard days will be finally over when you take care of the initial wave of assault. There won't be anymore in the short term.
If you are not playing on post-1.2 heroic, then take over whatever mines and resources lie around. Though you are separated by water, there are two portals (marked by red lines) which lead to your way, on the far corners of the peninsula. I strongly suggest you use Raelag for the conquest out there, but not give him all the troops. Raelag will gain troops from the castles he takes over, whereas you need a lot of defense for Shayda.
If you rush out with Raelag rather early (i.e. not on post-1.2 heroic), then whichever portal you take with Raelag, you can expect mighty heroes to come out of the other route. Another problem is the demons assaulting your towns. They will always teleport in the bottom-right corner, so your first two towns will be in danger. More reason to keep a good amount of forces for defense.
What is done and how it's done from here is almost just like in a normal scenario. You have to take over every castle. I marked the way I took on the minimap numerically, but depending on the AI decisions that may or may not be the best way. There are two "outer" castles on the edges of the map, two "inner" ones, and one stronghold in the northwestern corner. The stronghold is protected by a garrison, which should again, be no match for Raelag's magical arsenal even on heroic (where you will see a few dozens of Death Knights). Alternatively, if you are confident enough, just to a grand counter-clockwise tour of 6-3-7-4-5. On 1.3, your mana will run out after the garrison, so you probably have to take Castle #4 before #7.

Before you finish the mission, there are quite a few stat bonuses scattered around. There are five islands on the ground level; each can be accessed by a two-way portal in the underground level. Each island contains one stat bonus. One of them has a Witch Hut and another contains a Sylanna's Ancient (level up tree). There is also another confined underground area accessible from another two-way portal; there is a witch hut inside.
By the way, the Inferno heroes tend to ignore town 1 and 2 when Raelag is not around. So once you've secured one side of the portals, you can also send Shadya out to the other direction to capture towns. You should be able to squeeze the blue to only 1-2 towns left in the first month.
Once you have taken control all castles, victory will be yours! Congratulations if you beat it on post-1.2 heroic!
| Comments (30) |
- by Maltz
Map 5 - The Vampire Lord
Size - Very Big
Level Cap - 40
Last Updated: October 14, 2006 to patch 1.3.
Welcome to the Night of Ashan, the final showdown with Nicolai the Vampire Lord. This mission is probably one of the most, if not THE most intimidating in the entire campaign story, as Findans around the world are crushed by tens of thousands of skeleton archers without a chance. Indeed, the necromancers continuously gather masses of skeleton archers from the zounds and legions of neutrals surrounding their towns. You can't wait too long... or you can't wait at all.
There are eight towns, all in all, on this map, six above ground and two underground. You control two Sylvan towns at the beginning, starting in the NE corner. Nicolai controls six Necro towns. There is only one entrance to your base, and the Necro towns are rather spread out. For the rest of the map, you should be able to conquer the Necro towns one by one, without having to worry about the safety of your base.
Other than the useful "Summon Creature" spell, another very handy spell here is "Town Portal". Town Portal + two-way portals = very fast fresh troop supply. As your town number grows, you will be able to Town Portal back home (to upgrade troops, complete quests, etc.) from places far away, and come back after only a few days.
Please note that the surface and underground maps are actually overlapped when considering which is the closest town for Summon Creature and Town Portal. Even if you are underground, you might portal to an ground-level town because it is more or less directly above you. To see which is your closes town, you can just cast Summon Creature which will give you the name of the nearest town. In this walkthrough I will mention a few useful Town Portal spots.
Throughout the map you will find a lot of decent artifacts, and two artifact merchants. The Unicorn Horn Bow (negates all ranged units' over-range penalty) is undoubtedly the best. Another artifact that might save the day is Sandro's Cloak, which allows a hero to cast mind-affecting spells (such as Frenzy) on undead units (the hero has to know these spells already, of course). This might be the only way to beat an army that has grown impossibly large - but you can prevent that happening by moving quickly. In addition, a Sandro's Cloak Expert Mass-Confusion (no retaliation, no ranged attack) may be extremely effective against an extremely huge, but still slow undead army.
You can also attempt to dig up the Tear of Asha, which is NOT required to complete this mission. Prior to patch 1.2 there are three obelisks on the map, and more after patch 1.2.
Some people have reported that they have seen a bugged 20K spectral dragons in Nicolai's army. Not sure whether this is fixed in the patch, but it doesn't hurt to have the latest one installed (currently 1.3). Personally I have never seen this bug (used patch 1.1 and 1.3).
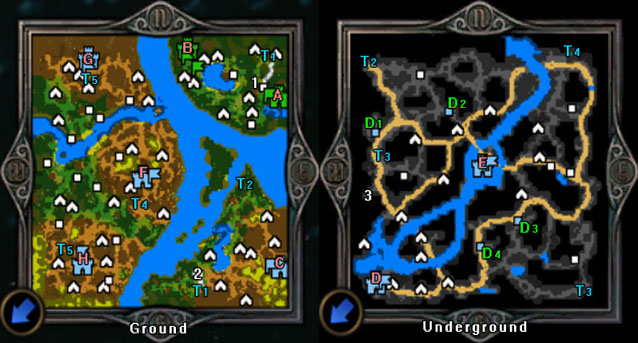
In the following walkthrough I will call the towns by an assigned letter: town A, town B... etc. (the pink alphabets on the map). Here is a list of the original town names:
Town A: NargoradTown B: Rael
Town C: April-S n
Town D: Shagarakti
Town E: Nabu-shuma
Town F: Eriba-ishkun
Town G: Nabu-shuma (Er... that's same as town E!)
Town H: Abi-libur
The map has two undocumented side quests: Defeat Shadow Dragons, and Dig up the Tear of Asha.

Part 1 - Isolated HQ
You start with town A and B. If your Findan knows the Resurrection spell, you really don't need to pick the green dragon for the bonus as you can pull out every single fight here unharmed anyways.
The town Hall bonus, which is to be built in town B, would cost 5000G if you build it yourself later. Although this is clearly not as economic as the 7500G bonus, you will end up with one more creature building when the second week comes. As you need more creatures than money, the Town Hall bonus seems to be better.
Your home base is a long way away from the evil Necromancers. There is no place for a ship to dock (in fact, no sailing at all in this mission), and the only entrance to your isolated HQ is a garrison north of town A (1). Findan starts with the two heroes he rescued back in mission 3. They both carry the Ranger's ultimate skill, which is very handy in this mission.
The female hero, Dirael, is a Summoning Magic grandmaster. Prior to patch 1.3, if you've given her Expert Light Magic (with Resurrection spell) and possibly Enlightenment, then you've got yourself a perfect solo mine-flagger. Just give her all your treants to soak up the damage, and instruct her to summon an endless supply of fire elements to wear down the neutral creatures, all the while resurrecting your treants. (Note: Patch 1.2 removes the stacking nature of summoned elementals, so every time you summon again, the new stack replaces the original.) If you are playing on patch 1.3, then you can still use Dirael on some easy tasks. Just give her a few sprites (to flee around the map), and let the two dozens of fire elementals to do the job (give them a Mass Haste).
The male hero, Talanar, is a typical might hero. He is best with a huge army. However, your huge army would probably go to Findan. Don't feel bad if you are not going using Talanar at all, because he will be very busy shuttling troops back and forth town A and B. On patch 1.3 Talanar still suffers from poor ATK and DEF, so even with Nature's Luck he is not as devastating as Findan.
Your top priority is to flag the mines, and send Findan, or your best hero, with a good army to conquer Necro towns. Cash all treasure chests as you really need the gold to quickly build up. Your most scarce resources is ore (up to patch 1.2) or wood and crystal (patch 1.3); thankfully there are more mines coming ahead. A neat combat trick here is to split up your hunter stack into two or more. Not only you waste less arrows on smaller stacks, but also you multiply the chance of warding arrows (pushing back the target's action).
The garrison at (1) consists of wights, (regular) vampires and plague zombies. You can conveniently make them all your favorite enemies by building an Avenger Guild in town A on Day 1, Week 2, and beat the garrison on the same day with the new troops from both towns. A lot of players have complained about the difficulty of this mission, mainly because they push out way too late. If you've built a good Findan, you should have no problem to flag all mines during week 1. Unfinished local business can be left to Dirael and Talanar. Resurrection is definitely NOT your only way to pass this garrison early, but it is the most straight-forward. Resurrection will save you numerous hunters in subsequent castle sieges, though.

It is a little tricky to ship troops from town B to town A within a day. You need a mule hero who knows both Summon Creature and Town Portal. Let's have an example:
1) Before a week ends, this mule hero should be somewhere between town A and B, but closer to town B.
2) When Day 1 comes, buy troops from town B.
3) The mule hero cast Summon Creature to gather troops from town B.
4) Move this mule hero towards town A, and cast Town Portal. (Don't leave Findan at the town gate, as that blocks Town Portal for the mule hero.)
5) New creatures arrive at town A!
By the way, there is an obelisk (Magenta O1) in this area, revealing part of the puzzle map for the Tear of Asha. The grail helps a lot in this mission, but it is not required to win. I dug the grail up twice, and they are both located beside the sulfur mine west of town C. More on this later.
If you visit the Hut of Magi just south of town A, you will see six groups of shadow dragons. (Yellow S1-S6) This is another optional side quest. By defeating all six groups of them, you restore light to the world (and your eyes will hurt because they left lamps on!). This enables you to directly defeat the mission boss - Nicolai.
Before rushing out with all you have, you really want to come back to town A and target skeleton archers as your favorite enemy. You will be fighting tens of thousands of them. On my heroic 1.3 run, I battled more than 20,000, maybe 30,000 of them in total. Spectral dragon is another nice victim if you wish to complete the dragon side quest. When you are ready (perhaps get rid off some stackgins blocking the two abandoned mines), enter the two-way portal (T1) which leads you to the SE portion of the map (look for the other T1).

Part 2 - On to the Necro Towns
Findan emerges at (T1) of the SE land mass. Directly north of you is a Seer Tent (2). Findan's visit to the tent triggers a side quest. In short, there are four Dwarven King artifacts in this mission. You have to collect them all, and hand it back to the Seer by Findan himself. (You can collect the artifacts with another hero, but you have to let Findan give them back.)
Being a Vampire Lord, Nicolai always respawns after being defeated on the battlefield. There are two ways to stop his resurrection and win this mission (either way is fine):
(Option A) Collect all four Dwarven King Artifacts (Green D1-D4), put them in Findan's inventory, and visit the Seer Tent. You will receive five phoenixes. Bring them to fight Nicolai, and survive the battle with at least one phoenix alive.
(Option B) Destroy six designated groups of spectral dragons (Yellow S1-S6), which are revealed by the Hut of Magi just south of town A. Then defeat Nicolai.
Either way, you win this mission and thus the campaign.
Now head straight to town C, probably hitting the obelisk (O2) and a sulfur mine along the way. You should be able to reach town C before Week 2 ends. The enemy hero there, Raven, will have a pathetic little force if you rush out this early. On patch 1.3, Raven is scripted to rush to you no matter how good her chance is, making the issue even simpler. If you have trouble winning the Raven battle, you come out too late.
Note: Just NW of the Seer's Tent, you can find a Sylanna's Ancient. There are two of them on this mission.
Sooner or later, you can kill the first group of spectral dragons (Yellow S1) west of the Seer Tent. You can pick up two relic artifacts there. I'd give this job to Dirael prior to patch 1.3. If you are lucky, you can pick up one or two very useful artifacts here already.
 On the way to Town C, you will see the "Tear of Asha" Sulfur Pit that I just mentioned. Now if you check your Puzzle Map, you might accidently see your trail show up... You know what to do, right? :D Now who needs the rest of the Obelisks?
After taking town C, immediately march Findan towards the next two-way portal (blue T2) in the north, flagging the long-waited ore pit on the side. On patch 1.3 don't miss out the crystal mine at the river crossing. After entering the portal, you will emerge... err, submerge, in the NW corner of the underworld. The underground portion of this map is large, but relatively simple. When I say simple this time I do mean it is easy! Just note that there are several passages across the underground river that are not quite visible.
Since you are now on the NW portion of the map, you can summon creatures directly from town B. Also, some point in the near future you'll want to swap your army for the upgraded version. (By the way, to save resources, you only need to build the upgrade facility in one of your starting towns.) You can Town Portal Findan back to town B from this spot, and make him come back a few days later through portal T1. Alternatively, instead of going back yourself, you can use your secondary hero to swap Findan's un-upgraded army with some fresh upgraded ones. Then you can send this secondary hero back (with the Portal spell), upgrade the army, and catch up Findan in just a few days. As explained above, you can check where you are going by casting Summon Creatures first, which reveals the destination.
Now go straight south as you want to recover the first Dwarven King artifact (D1), as well as the Unicorn Horn Bow (3). Moreover, there is a stat +2 arena on your east down the road, which is definitely worth a day's travel. There is another two-way portal (T3) on your way down, leading you to the SE area of the underground (T3). Nothing critically important is to be found there, except another stat +2 arena and an artifact merchant nearby. It is going to cost you more than a day, so I would leave it till later.
After taking the Unicorn Horn Bow (3), you have a choice of heading towards town D, which is located on the SW corner, or town E, which is right at the center. Since your exit to the ground level is a two-way portal at the NE corner (T4), you will save a few days by taking town D before town E. You can also defeat a group of shadow dragons (S2) close to town D.
Normally, there are two good Necro heroes roaming underground, but if you get here quickly, they shouldn't pose any threat. They will either try to have a run at your undefended new Necro town (thus you must try to intercept them), or hide in their own castle. After taking town E, it is time to push on and leave the underground.
On patch 1.3, a roaming Necro hero is scripted to attack you when you are in sight, no matter whether he has a chance or not. This Necro hero may already carry more than 3,000 skeleton archers, so if would be safer to start exploring when you are confident. Later on I met another one here some time during Month 3, and she has a whopping 9,700 skeleton archers!
Now go straight east and make a turn north at the end. Take care of another group of shadow dragons (S3) along the way and head for portal (T4). Just before passing this portal, you are actually directly below your Sylvan town A. This is another good place to Summon Creatures!
Note: Don't worry if you haven't had Findan collect all four Dwarven King artifacts by now. You can leave the job to Dirael, or do the alternative quest by defeating three more groups of spectral dragons, which actually saves you some travel time.
Part 3 - Showdown with Nicolai
If you made it this far before Month 3, then you should pat yourself on the back.
The fourth pair of two-way portal (T4) lands you right in the middle of Nicolai's territory. There is town F just north of you, which is usually an easy target if Nicolai is not around. If Nicolai is blocking your way, then you have a choice whether to take him down, or avoid him by taking Town G and H first.
There is also the fourth group of spectral dragons in the east (S4), and the 3rd, final (before patch 1.2) obelisk (O3) somewhere to the West. You will also see an artifact merchant nearby that the rich AI loves to visit. If you have lots of cash, send a secondary hero here to see if there is any good deal.
Now be prepared to see armies having more than 3K skeleton archers following any major Necro hero. However, you should be more than capable to handle them because you haven't lost any single hunter so far due to your mighty Resurrection spell, right? :) If you come here really late, then you will see much more skeleton archers. If your feel completely powerless, and you don't have Dark Magic and Sandro's Cloak, then your last hope is to outgrow Nicolai with your five towns versus their three. Hire undeads to boost your army (such as skeleton archers). Theoretically, you will outgrow these necromancers eventually.
N ote: On patch 1.3 heroic, the AIs were smart to pool all of their army into one place. Some time in Month 3, I had to assault a castle with Nicolai and 8,000 skeleton archers plus other huge numbers of undead creatures. The game becomes quite challenging now.
The only trouble here is Nicolai. Before patch 1.3, Nicolai really, really likes to Phantom Force his strongest stack, and that usually means his skeleton archers. Try to kill his skeleton archers as fast as possible, and use a direct damage spell (either from your hero or the druids) to make short work of the clones. If you come here very late, Nicolai might have a huge number of skeleton archers that makes him almost impossible to defeat. However, if you happen to have Dark Magic and collected the Sandro's cloak artifact somewhere, you can really do some nasty tricks (such as Frenzy) to his skeleton archers, and the clone of them, too!
Note: Nicolai never casted Phantom Force on my patch 1.3 game. He casted Puppet Master (which is really nasty on patch 1.3) on my Emerald Dragons! Luckily Findan's Mass Cleanse took care of it. Nicolai also casts Confusion and Circle of Winter.
If you have successfully taken town F, you must decide to take either town G or town H next. The catch here is to avoid facing the little iron man Nicolai as he will respawn to some annoying spots (such as the entrance of town E) with an army about 5 weeks of a fully-built town production. If you have fought Nicolai and he has respawned away already, then feel free to grab both town G and H, and leave Nicolai busy underground. (He'll never walk pass portals that transport between the surface and underground, but he can Town Portal up and down just "by accident".) Town G can be easily accessed by the final pair of two-way portal (T5) NW of town H. Be prepared to fight thousands of skeleton archers again, too. Should be an easy job for you now, right?
With your hard work, Nicolai is finally catching his breath in his last town somewhere. Your rush is done! If you want to finish this mission as soon as possible, then kill off the final 2 groups of spectral dragons (S5 and S6), and then Nicolai. If you want to take your time, then you can bring your secondary hero here, swap an army to take on the defense job, and let Findan visit all the stat bonuses around the map. Findan is going to play a part in the next, final campaign, so it might be worth boosting him. By the way, there is another Sylanna's Ancient on the surface, roughly in the middle of Nicolai's continent. It is located with other stat bonuses. You can level up Findan to 32 in this campaign, possibly the highest level ever reached by a campaign hero!

You can also attempt to kill the insane number of Wights (700+) just south of town C. It guards a Vitality Ring that gives +2 health to all troops. This ring is far less impressive than the Wights.
If you have collected all four Dwarven King artifacts (D1-D4), then you can give them all to Findan, and let him visit the Seer Tent (2). You are going to lose these great artifacts, but you will get 5 phoenixes. If you don't kill all spectral dragons, you can also win this mission by bringing these phoenixes to fight Nicolai, and survive the battle with at least 1 of them.
Town F is located in an interesting spot. First, you can summon troops easily from town A, by entering the portal (T4) down the road. You can also Town Portal back to town F in the NW portion of underground, some distance south of the (T2) portal. This means that you can make a quick round trip back to the Seer Tent:
Day 1 -- Start from town F, head South towards portal T4.
Day 2 -- Enter portal T4. Cast town Portal to return to town A.
Day 3 -- Enter portal T1, run to the Seer Tent.
Day 4 -- Visit the Seer Tent. Cast town Portal to town C.
Day 5 -- Go north towards portal T2.
Day 6 -- Keep going.
Day 7 -- Enter portal T2, go south, and portal back to town F.
Congratulations for winning this long and difficult campaign! Now if you look at your last autosave, you can see an easter egg - a funny typo of somebody's name (still there in Patch 1.1).
By the way, some people like to mix necro troops (usually skeleton archers) in their army. By providing some extra ranged power you will lose 1 point of morale for the Sylvan units (so they get high morale 10% less of the time). If you rush this mission, you probably won't have enough undead units available to make the trade worthwhile, though.
| Comments (92) |
- by Maltz
Map 3 - The Defense
Size - Very Big
Carry Over - Findan, Talanar and Dirael
Level Cap - 24

Spoiler: view a screenshot of the surface
Although the map size says "very big", this map is rather simple. When I say simple, I mean the landscape is not complicated; I don't mean the mission is easy. It is far from easy on heroic, especially after patch 1.2. You start the mission with a mandatory siege battle, defending the Sylvan capital. This is the only battle in the entire campaign story that you are supposed to lose.
However, before your troops die, you can make good use of them. Concentrate your attack on the skeleton archers, and you should be able to wipe this stack out. Your castle moat might also do you a favor by killing one or two high level creatures.
After this, it is Findan's turn to assault the castle. They AI's will concentrate their fire on your sprites, and then the dancers, so keep them defending all the time to delay your hunters from being the next victim.
If the enemies stay inside the castle wall, you will have a very difficult time especially after patch 1.3 toned down the ranged damage from outside the wall. Fortunately, the AIs are scripted that when it loses its ranged force, its melee units start to rush out (and get ganged up by yours). The key is DO NOT rush any unit in before that happens, or they will never come out. You know they are coming out when their melee units start to move. This may happen only after the AI loses a fraction of their ranged power.
 It helped me a lot to march my treant forward, blocking the castle gate to take the heat. The AI units will come out to attack the treants from multiple directions. Then, our other units can now mop up to get rid off them. Try to conserve your emerald dragons as much as you can (don't fly them in!), because you won't be able to replenish them for a while, and they are very useful elsewhere.
This castle assault is very important for the entire mission. If you fight it well, the subsequent battles will become much easier. If you learned Resurrection back in mission one, resurrect your sprites back before the end, as they will save your most-valuable-hunters in the coming battles.
Now you have the capital back, which is good. Let me explain a little what lies ahead. You are up against the teal player, who owns two towns, one Sylvan and one Necro. The Sylvan town on your SW is relatively close to your Sylvan capital, so it is a good idea to rush it with Findan. This is particularly important on heroic.
The bad news is purple heroes are coming to attack your capital constantly (similar to mission 5 of the Haven campaign). In fact, the next purple hero has already spawned while you are celebrating the liberation of your Sylvan capital! It only takes two days for them to start the siege. You get no more chance to retake the capital. You lose this mission as soon as you lose the capital the next time. In patch 1.3 you will see 3 more purple heroes in the first week, so it is possible that your low-level hero cannot survive, and you will have to keep Findan home to defend for the first week.
After the first week, you can expect one purple hero every one or two weeks. The strength of the attacking armies grows slowly, too. If you are playing at a high difficulty, you really don't want to keep Findan in the capital, because the purple heroes never stop coming, while the teal AIs never stop building until you force them to. ;) Here is what I recommend:
On Day 1, hire a new hero, swap his army with Findan's, and send Findan on the boat with the new hero's little army. You will use this new hero and 100% of Findan's leftover army to defend the first few purple heroes. The key here is to leave ALL your shooters (hunters and druids) with the new hero or you will lose simply too many melee units from their liches. Findan does not need the hunters to take towns, but you need them to defend towns.
 You might also want to hire yet another hero to sail out to collect debris and chests. There is a bunch on your east, and after passing the whirlpool there are two more piles nearby. You can collect a couple dozens of logs from the initial investment of 10.
When the first purple hero comes, try to kill them off as soon as you can, even if it means losing a dragon. Ancient treants are excellent at blocking a breached wall, while the unicorn takes care of any enemy unit trying to get inside. Sprites and war dancers will become your damage sponge. Without them the enemy will target your hunters, so don't feel bad about their loss. After patch 1.2 the AI hero might drop some mighty spells (such as chain lightning) on your hunters. Too bad - there is no way to avoid it. On 1.3, though, the AIs seem to lost the ability to cast these spells, possibly due to the 200% mana cost.
After the first defensive battle, you can set the favorite enemy for your defending new hero. You can "update" your favorite enemy list whenever a new purple hero spawns (right click on it to check what it carries). I would highly recommend liches, and possibly vampires. They are very hard to kill.
The initial waves of assaults are the most difficult. If you have lost almost all of your hunters and druids (which happened to me every week after patch 1.2, but not 1.3), you might need to use Quick Combat at some point to save an otherwise impossible battle. Just to stay alive - your pain will be over soon.
 Meanwhile, quickly sail Findan to the west and then south after you see the lighthouse. Your goal is to land at the shipyard at (1). Then, the Sylvan town is only two day's travel to the west. Now it is the time for Findan to summon all emerald dragons. These flying units are excellent for a quick siege battle. You should be able to take the Sylvan town with minimal loss before the first week even ends. Also, you will see an undead teal hero hanging around. Your emerald dragons will make sure they stay dead this time. If you don't see this hero around, be careful that he will try to make a run at your new town. Hunt him down as soon as possible.
Now you have two towns, and the teal player only has one. You can finally flag mines, so your victory is coming slowly! Your next goal is to get a lv 5 mage guild in one of your towns (better at the new Sylvan town, because Findan is nearby). Since patch 1.2, heroic, you have few starting resources and you don't really want to waste any of them on the buildings. Patch 1.3 made some adjustment to the resource requirement, but you are still very short on the rare-material side. If you haven't got it already -- you are shooting for the Resurrection spell. If you get Word of Light, which is almost useless, then try the other town. If you don't get it in either town, too bad. (I would restart the mission right here, but you can certainly press on and see what you can make out of it. You get 2 more chances to learn it in mission 5, but you can't get it early.)
On higher difficulty your capital is probably falling apart, so you may want to start rush Findan back to accumulate some army. It would be a really good idea to ship the new Sylvan town's growth back to the capital. In addition, there is a landing dock at (2), and a hunter's cabin nearby. If you are patient and would like to have 7 more hunters per week to defend the city, you can hire another hero to ship hunters to your Sylvan capital weekly. The teal heroes might be chasing after your low level heroes, and they will try to summon a ship if you leave one hanging. Better be careful than sorry.
Once you have Resurrection, you have successfully turned the tide of the entire campaign. Your emerald dragons, or everything Findan carries rarely dies from now on. Now Findan can break through the two garrisons (3 and 4) with a dragon-only army and laugh at the defending stacks.
 After passing both garrisons, you have a choice of taking the remaining teal town or rescuing one of the two Sylvan prisoners in the jail at (5).
Note: One obvious change of patch 1.3 is that the two heroes you are about to rescue will have a pre-set level of 28, and 5 skills paths pre-developed (see the attached pictures). This means that you no longer have the freedom to develop their 6th skill, unless you happen to grab something useful from the Witch Hut underground in this mission. The two heroes also have very miserable stat point distribution -- highest spell power for a hero who knows little magic, and lowest spell power and knowledge point for a hero who use exclusively magic. Good job, Nival. Or maybe that's why they are incompetent and ended up in prisons.
The jailed hero at (5) is Talanar. He is a typical might hero, with no magic ability at all. He suffers from some low ATK and DEF stats, but he is still an awesome hero due to his Nature's Luck ultimate ability, which makes all physical attacks lucky (rainbow).
If you choose to rescue Talanar first, you can send him directly back to the capital to defend, and watch rainbows fly to the moon. If you are playing at a lower difficulty, or you have seriously messed up Findan's build, it would be nice to give Talanar Enlightenment or Light Magic to fix his weakness. Otherwise it doesn't matter -- you won't bother giving Talanar any army in the last mission because Findan is simply a better army leader. Make sure that Talanar learns town portal and summon creatures in this mission, though. (requires lv20 hero & lv5 mage guild)
The teal town is manned by a moderately powerful Necro hero. If you are fast enough, you might have scared him back to his castle by now. If you are slow, then he might have attacked you already. At this point you are definitely more than capable of disposing him without losing any dragons.
 After wiping out the teal player, you need to rescue another hero, Dirael, a summoning specialist. She is held in an underground prison (6). The stairway leading to it is SW to the Necro town. Prior to patch 1.3, Dirael also starts with Nature's luck and does not give up a precious skill slot for the now-redundant Luck skill. For the 2 skills you can customize for her, I would highly recommend Light and Enlightenment, which boost her mana (Intelligence) and spell power (many more fire elementals), as well as giving her the precious Resurrection spell. She will become very useful in the last mission. Dirael is an army by herself!
Note: Patch 1.2 and 1.3 seriously toned down Dirael. Her Nature's Luck special ability is removed since 1.2, and in 1.3 she does NOT receive any extra stat point from her preset Expert Enlightenment skill. Combined with the removal of stacking elementals, she is now much less useful in mission 5.
Once you rescue Dirael, take your time to level the two heroes up (not necessary for patch 1.3) and explore the map. Your only remaining objective is to stock up enough troops in the garrison. (See the in-game mission objective to reveal the exact numbers you need.) If you have been buying units there, then you might have already fulfilled this objective unwillingly. To avoid the frustration of not being able to level up everybody to the cap before the map finishes, do not stock emerald dragons in your capital (you only need shooters for the defense, anyway).
When you are done exploring and levelling, take both heroes back to the Sylvan capital, swap them in and out the town, and the mission should be completed.
Note: Some people have reported bugs that the mission cannot finish, even if they have done everything required. If this happens to you, try this: Move Findan inside your capital, and the other two outside. Then purchase a new hero from the tavern. Also, you might need the latest patch (1.3 when this article last updated).
| Comments (33) |
- by Psychobabble
Map 5 - Zehir's Hope
Size - Big
Level Cap – 40

 Bonus
Bonus
Finally, a set of bonuses which are somewhat worthwhile. I picked the titans because they're awesome creatures and they go in Zehir's army, which is the one which most needs a boost. However the Dragon Scale Shield is a very powerful artifact and if you feel like a spellpower boost then feel free to grab it.

Walkthrough
In my first run through this map, on hard difficulty, I found this map particularly difficult. This map involves a series of fights with each of your heroes and all of the fights were easy, except the ones with Zehir who was definitely the weak link in my chain. This was probably because I rushed through the early maps as quickly as I could, not taking any time to pick up stat boosters, hit the level cap on level four or find the summon phoenix spell (I did try with the latter; it just wasn't offered to me). My second time through, on heroic difficulty, it was much easier, attesting to the usefulness of hero development through the campaign.
You start the map with four heroes at the ends of the four long pathways. Each hero has to take on a garrison (the orange squares) and these battles should be done with the aim of taking almost no casualties. There's no need to converge all your heroes onto the town at 1 because sending one hero in will trigger a battle with all four.
The battle for the first town (Biara) is tougher and you should expect to take some casualties, although these should obviously be minimised as much as possible. Biara (heroic 1.3) casts a spell called "Inferno Chain" when she gets a turn. This spell is similar to Chain Lightning that it hits four units in a chain, but its damage does not reduce through the jumps -- each hit deals full 820 damage. You might resist this magic if you have magic resistance (unicorns, or the Luck feat) If you hide a lot of stacks, Biara might refrain from using this spell, probably because she would hit her own units with it!
You have to cycle through all four heroes to defeat Biara, in the order of Godric, Findan, Zehir and Raelag. Towards the end of battle, remember to use the archangel's Resurrection ability and the hero's Resurrection spell with any heroes that have it. These battles will give you a taste of the style of battle on this map which involve a lot of creatures getting summoned, both at the start and as you kill certain entire stacks.
Out of these four battles, the one involving Zehir will be the easiest as you can simply "Banish" (gained through the Summoning Magic Feat) almost all stacks of Inferno units. It is so cheap that you would think it is not fair for Biara. In addition, Raelag will have an easy time as his meteor shower can make short work of the closely packed summoned enemies, and his black dragons are immune to Biara's spells. Be careful with Findan and Raelag's dragons, as the AI is smart enough to trigger their counter attack that will also plow through your own units. Try to isolate them from your other units.
Once you win the four battles, which isn't too difficult, all your heroes will be teleported to 2 to prepare for the final battle. All units lost are lost, though.

If you have used any spell points in the previous battle there is a magic well at 3 which can replenish them. The final battles are for the control over the shielded town at 4. There are two phases to the battle, each fought by all four heroes in turn, for a total of 8 battles. There are no rest in between, so if you lose, you have to restart from the beginning.
The first round ends when you destroy the magical wall which is a central feature of this battlefield. The wall usually takes three catapult shots to destroy, though this will be less if you have war machines or get a successful luck roll on your catapult's attack. Your objective in this first battle is not to kill all the enemies, it is to defend your catapult because if it gets attacked by an enemy you will lose the battle. So hang back and keep your creatures positioned so that a large sized enemy (eg. bone dragons) can't attack the catapult because they seem to do so if they get the opportunity. You should also, obviously, try and keep casualties to a minimum because there is one more battle before you finish the map and the campaign.
If you feel like your creatures are dying more and killing less than they normally would, then take a look at the demon sovereign's stats, which were all in the mid 40s. This is the reason that the second round of the battle can be a bit difficult for Zehir and Raelag. Fortunately, Zehir can always Banish them in one go, and Raelag has powerful spells to achieve similar effects.

I think I found a combat set up which should be able to get you through the final battle no matter how weak Zehir is, just in case you cannot Banish. As I noted earlier, Raelag has the easiest time of these battles with his powerful direct damage spells. He also happens to have an army which can take a lots of beatings, with scores of hydras and almost 50 shadow dragons. So for starters, switch Zehir and Raelag's armies, but make sure there is one space left in Zehir's army (leave the blood furies out if anything, they die very easily). I found the key to keeping Zehir alive, on top of this, was Findan's 50+ Ancient Treant stack, so fill up Zehir's final slot with them. You should now be able to win the final battle. In each round, place the treants in the corner and do nothing with them except hit defend. Their special ability gets them unlimited retaliation if you do this which is great, because you'll likely have poor morale and so otherwise would almost never get a chance to attack with them. In the first round, place the hydras and black dragons on the two slots next to the catapult to defend it (I found the hydra stack usually died, this didn't matter too much). In the second round, do as much damage to the Cerberus and Succubus stacks with your dragons and other creatures before they die (them being the only creatures your treants can't retaliate against). Then use raise dead to keep your treants healthy and summon elemental to do some extra damage. You should be able to win this battle by doing this. If you don't, then the strongest stack behind the shadow dragons is either the titans or archangels, depending on how many casualties you took in previous battles, so add them in, though the morale penalty will be pretty annoying with three alignments in the army.
Once you win, then that's all, there isn't anymore... except one last round of bad voice acting and another 'unexpected' twist in the final cutscene :). The HoMMV campaigns are finally over and hope you have some favorable moments along the way!
| Comments (42) |
Page 8 of 23