Walkthroughs
- by maltz
Kiril returns in a long Mission 2 to combat Necromancers and Necropolis creatures in the fearfully symmetrical Heresh. The mission starts quite linear, but suddenly expands to give you a lot of freedom of what to do next. You will also unlock the tier-4 and tier-6 Inferno creatures within the mission, although you probably have guessed that only the basic version will be available. Since Life Drain does not work on undead, you have to rely on Reinforcement and Regenerate to conserve units.
The ultimate goal of the mission is to defeat the Spider Queen (Mother Namtaru) frequently featured in the Necropolis campaign. Since this mission is quite long, by the time you finally reach the boss, it will be more than a reverse of the final fight of mission 1. You will have a bigger army and much higher stats than Xana, while the AI-controlled Spider Queen is not smart enough to run away from your loyal two-headed friends.
Dynasty Traits: You will be again swimming in resources and gold in this mission. So you can mostly ignore economic bonuses and go for +3 Core creature growth. Hero +3 movement bonus is also nice. Despite the relatively high level cap of 19, you will still fight enough battles to reach the level cap long before the mission is over.
 Inferno Campaign Mission 2
Level cap: 19
Difficulty Index: 3/6
Last updated: December 18, 2011
Kiril starts without a town at (start). The east is a dead end (looks like Kiril was air-dropped to this location). Follow the road west and cross the bridge. In my game, there was a Druid's Bracelet just down the road. It is by no means a powerful artifact, but it offers one free Regenerate per battle, which comes in very handy against Necro heroes.
 Soon you will be able to take over Town A owned the Red Haven player; it is even defended. The AI is so nice that it builds up the town for you, so don't feel too rushed as long as you take and convert it before the end of the first week. Take some time to collect resources nearby. You won't have a crystal mine until quite a bit later, so try to pick up all crystals and save them up for more important buildings.
When you have run out of things to flag and collect within Town A's borders, you should be powerful enough to take on the next Haven town, Town B. There should be an aggressive Haven hero who goes after Kiril, but it is a Haven army, so Mass Life Drain works. Take Town B, which the AI also builds up for you. If you have yet to build up Town A to level up, maybe the AI gives it to you here! You will almost always inherit a highly upgraded town from the AI in this mission.
After taking Town B, the gate at (1) is opened, but don't pass the bridge yet. To the northwest there is a Fort C, which governs a creature building and a Sawmill. This area is like your backyard, so you may as well make a round trip and grab things from the floor. There is an artifact merchant at (2) to burn some cash, as you will have way too much of it.
When you have done everything north of the bridge, go south and challenge Necropolis' Town D. From now on, almost everything you fight is undead, so you can switch your Dynasty Weapon to something other than Arache. The Angelic Alliance from the Haven campaign mission 4 is a good choice as at just level 3 (only requires 1M EXP), it provides a free Celestial Armor that absorbs a few hundreds of damage.
 Before taking Town D, you probably need to face a Necro hero. While his army isn't particularly big, remember now your Life Drain does not work, so you have to really be careful to avoid losing units. You can use gated units to distract the last remaining units of the AI - so the battle drags longer and you will have more time to slowly Regenerate back lost units.
After taking Town D, you will be attacked every now and then. There could be as many as three roaming Necropolis heroes coming at you at the same time. They will attack your closest undefended town/fort, but will not hesitate to escape from Kiril by Town Portal if they sense danger (and unfortunately, they will come back in just a few days through a one-way portal (2)-(2'). They can reach Town D three days after coming out from (2'). It will be still a while until we can swat these flies for good.
Your strength might not be enough to produce a perfect victory against the first counterattack, so you might consider defending in Town D. But the subsequent Necro heroes will be progressively harder to "catch". In the meantime, you can flag your first crystal mine northeast of Town D, and visit the first stat boost (s) of the mission northwest of the town.
 Around this time, you should be given the quest (capturing the next town) to unlock the tier-6 creature, Juggernaut. With poor movement range, their special attack is not very useful. But you can still practice their placement to avoid hitting your own units on the battlefield. In general, they should start a battle very far away from other friendly units.
With the crystal mine in production and some additional trading, you can build an Advanced Town Portal in Town D. Now you can freely explore and portal back when there is any threat. Then you can cast Basic town portal to some front-line town or fort to continue your expansion.
Not very far south of Town D, you can see two braches off the main road at (1). It is better to go west first to unlock the Breeders. Follow the winding path to take Fort E, and then south to take Town F. It is also a good idea to take Fort G early to give you an early warning of the Necro hero's presence, although the invaders then tend to go after Fort G, which gives you even less reaction time.
In my game, I parked Kiril in Fort G, and three Necro heroes stopped their turn just far away enough from Kiril so that Kiril cannot reach them on the next turn - at least they thought so. I then used a second hero to carry Kiril's troops, so Kiril can save up some movement points and have just enough movement points left to swat three heroes all in one turn! I did not see the next invasion for a long, long time.
 Upon your capture of Town F, the game spawns a relative weak (level 1) Necropolis hero at (3). After defeating the hero, you can recruit a friendly stack of Breeders, and unlock their buildings in all your towns.
In Town F area you can find an underground entrance at (4), but it only leads to a disappointingly small and dull area at (4'). There is also a one-way portal entrance at (5), exiting at (5') so you can return to Town F a little sooner. This swamp area really does not hold anything valuable.
Now you should be powerful enough to put an end on the Necropolis invasions. Take Fort G if you have not already done so. In this area, you can find a pair of two-way portals (6-6'), but they do not serve any important purpose. Cross the land bridge, pass the portal exit (2'), and continue northeast towards Town J. This town could be a little too tough for you if you arrived here too early, but now it should not be difficult at all.
 There is a Fort I just east of the land bridge. In my game, it was strangely undefended, so I captured it with an army-less secondary hero. Northeast of Fort I you can find a friendly and large stack of Cerberus at (7). Suddenly you become Xana in mission 1!
Now nothing should be able to stop you. Destroy everything on the way south and take Town K. The portal entrance (2) beside Town K is the source of all annoying invasions.
Keeping going south and grab Town L, the last stand of the Necropolis faction. There is another group of friendly creatures (Demented) at (8) in the middle of a narrow, dead-end path.
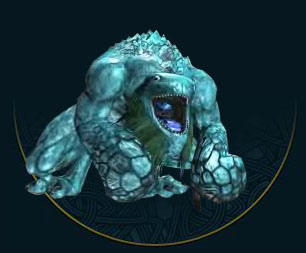
Now there is only one task remaining - gather all units you have and travel east from Town L. You will eventually see the stairs at (9-9'), leading to the Spider Guardian at (10) and the boss of this mission, Mother Namtaru. The boss has an odd HP of 87035, a quite-powerful attack that damages and disables multiple stacks in contact with her. But she does not retaliate attacks, and she does not avoid the dogs! Just look at how much the dog bite hurts her! Just like the Azkaal vs. Xana's dog battle, my dogs also hit more than all other stacks combined! Terrible creatures! (bug or feature?)

By the way, various spirits dotted the battlefield of the boss fight, but you cannot attack them. You will receive an achievement if you do not allow the boss to "consume more than 3 spirits". As long as you end the battle quickly enough, you should have no problem with this one.
| Comments (14) |
- by maltz
 Kiril: "I should not never trust a demon!... just occasionally."
Welcome to the Inferno campaign. Some may find the orange-red theme a little overused; some may be simply excited about playing the bad guys, although Kiril is probably the most harmless among Slava's kids. Even after finishing the campaign I had little idea of why Kiril does this and that.
Demons are not the only race that wins by conquering everything, but it does accomplish it with a unique style - by bringing in lots and lots of helpers through Gating. Each mother stack can support one gated stack. There are three general uses of gated units:
(1) Block enemy shooters - you must have seen the AI faithfully doing this to you. They also create a good sacrificial distraction and allow you to deal more ranged damage before melee takes place.
(2) Absorb counterattacks - in this case you gate in the highest-initiative units, the Ravagers, and hope that it acts before the mother stack. They also have an aura that attracts nearby enemy attacks.
(3) Contribute to ranged damage in a castle assault - Lilim.
The Gating meter is filled up by each lucky attack, so to maximize our Gating efficiency, we need a (1) full 7 stack roster (if you don't have seven, split the Lilim into multiple stacks of one) and (2) high Destiny, which happens to be Kiril's specialty. There are various artifacts that increase Luck (such as the golden Horseshoe, Destiny +8). The chance of getting lucky is capped, but so far how high the cap is and how the cap is achieved is still unclear. There is also a unique building in towns, Heart of Urgash, that increases the Gating meter.
 Kiril: "You molesters! Oh wait, I still have my clothes on."
PLANNING
Might or Magic, Blood or Tear? How would you like to play this game? A cliche analysis would sound like "do you want to play by force (Might) or by brain (Magic)?" But in Hereso6 we are really talking about "do you want to be careful and take one step at a time to face only inferior enemies (Might) or over-achieve, and fight unnecessarily difficult battles (Magic)?"
Certainly, only a Magic hero can defeat an army 10 times larger. However, Blackhole is not so mean to make the missions so difficult on Hard that only a Magic hero can succeed. In fact, the Inferno campaign is so relaxed (except for one battle unrelated to Kiril) that you can easily cruise through with a Might hero and use fingers on one hand to count battles where you actually lose units.
So let's go with the game's default Kiril (Might). Might goes well with the Inferno army, where five out of seven units deals Might damage. Even if the only two magic users happen to be the only two ranged units, Kiril will end up with very high Magic Power thanks to various stats boosts.
In the Haven campaign, we went for Blood with the reasoning that increased damage is converted to increase healing by Arache. This time we will go for Tear (Hellcaller) and enjoy free extra Gating (Tear I passive ability) and a "Plan B" healing (Tear II active ability) using gated units (throughout this campaign I only used it once). Kiril is able to cast Mass Life Drain, so he doest not have to wield the Arache.
 Kiril: "I must chase down Sarah... to give her a new hair cut!"
Here comes the list of abilities recommended for a Hellcaller Kiril:
Daily unit conservation: Reinforcement I (higher level is not necessary), Tactics II, Mass Life Drain, Mass Regenerate
Close fight tide turner: Mass Heroism (more morale and luck = more lucky attacks = more gating opportunities), Mass Weakness, Mass Stone Skin
Passive abilities
- Logistics, Path Finding. To speed up the expansion.
- Archery I, II, Counterstrike I, II, III, Giant Slayer, Rampage, Cleave. Increase damages dealt.
- Parry, Resilience, Toughness I, Defense I Reduce damages taken.
There are still plenty of ability points to distribute. Please feel free to experiment with other builds!
 CREATUERS
Maniac/Demented (tier-1). Average melee unit with average initiative and damage. Their attack drains the target's power. But due to their low initiative, they are not the most active units on the battlefield. They are immune to morale effects, which works against you.
Hell Hound/Cerberus (tier-2). Extremely high offence at the expense of defense. Attacks multiple enemies at front (no more friendly fires like Heroes5!) and always retaliates. Look no further - this is your primary damage dealer throughout all missions! The AI loves to focus on them, so you will almost always start a battle with Reinforcement I on the dogs just like you did to Liches, Griffins, and Kappa before. And then you will use them to lead the attacks to fulfill the "primary damage dealer" prophecy.
Succubus/Lilim (tier-3). Your more realizable ranged unit. The upgraded version has one very good ability - enthrall, which Blinds a stack for a couple of turns. However, from experience, sometimes the enthrall effect stays even after damage is taken (like Time Stasis). Very useful.
Breeder/Breeder Mother (tier-4). Your less reliable ranged unit that looks like stage-IV anal tumor. The Imps that come out from the hole don't have eyes, so they have very poor aim (like Skeleton spear throwers). Even with a bow artifact (Unicorn/Emerald), they still don't deal impressive damage. They do suck mana for Kiril, and they do it very early due to their high initiative. The upgraded version comes with a free Reinforcement every battle, but the AI always hit the dogs.
 Tormentor/Lacerator (tier-5). Their special attack hits all adjacent enemies without getting retaliated. Due to their high initiative, it is possible to avoid casualty by moving them to stand beside multiple enemies at the end of one turn, and release the powerful special attack at the beginning of the next turn. Other than this, they are just another melee unit.
Juggernaut/Ravager (tier-6). The highest initiative creature on the demon roster. Their special attack is to "run amok", damaging everything on their path (friendly fire possible) without attracting retaliation. It is quite an effort to plan their path in advance while avoiding damaging your own. The upgraded version attracts enemies' attacks in a 2-tile radius. So you will have to either Reinforcement I the dogs and heal them, Reinforcement II them and heal the dogs, or like me - let the dogs and Cleave do all the work.
Pit Fiend/Lord (tier-7). Although their hit-all special attack and counterattack is quite weak, their regular melee attack inflicts a "Frenzy" effect that consumes the target's next action to randomly attack a neighbor, friend or foe, or doing nothing at all if there is no neighboring unit. So we can use Pit Fiend/Lord in a supporting role - to make them wait first, go in and attack and frenzy something at the end of the turn (and hopefully avoid the counterattack), and pull out at the beginning of the next turn.
ARTIFACTS
You will be able to collect three artifact sets from this campaign, the Warlord Set, the Trickster Set, and the Magister Set. But it is always better to forgo the insignificant set bonus and pick the best artifact for each part.
 Inferno Campaign Mission 1
Level cap: 10
Difficulty Index: 2/6 (boss battle extra, see below)
Last updated: December 18, 2011
INTRODUCTION
Mission 1 is mostly easy for Kiril - the neutral stacks are small, and the AIs are a lot more handicapped than you, so they are doomed to fail. But there is a very nasty surprise at the end, something completely unrelated to what do to Kiril. We will discuss that when the time comes.
 Dynasty Traits: Mission 1 is all about Core creatures, so core creature +3 would be very handy. Any economic bonus would soon be completely useless, since you will have so much unspent resources at the end due to building (spending) restrictions.
Kiril wakes up at the middle of the map (start) to build up Town A from scratch, with a few free creatures to pick up nearby. There is no hurry to rush out, so you can take some time collect everything around here. A hero guarding the gold mine below will point you to the east. After this simple quest, you can recruit hellhound from towns.
With Week 2's new creatures, proceed to (1) and defeat a scripted demon hero. The reward of the fight is the might-oriented Dynasty Weapon Soul Drinker. This weapon has a "Life Drain" ability at level 4, but it is not as powerful as Arache. If a battle is not particularly difficult, you may as well equip Soul Drinker for its Destiny bonus.

Note: Patch 1.2 vows to fix Dynasty Weapon bugs, including permanent bonuses on a previously equipped weapon. So switching between Dynasty Weapons should become a viable strategy.
After defeating the hero, you can take Town B, the crystal mine, and nearby resources. You can solve a quest to recruit Maniacs by collecting a decent helmet set artifact (enemy morale -6) at (2). If you follow the path to the northeast after Sarah, you will eventually hit a temporary dead-end. There is another route to the north that leads you to the Orange territory, but it is probably a little too tough for you now.
With Week 3's new creatures from both Town A and B, you should have no problem pushing west and take Town C. At (3') lies the exit of a one-way portal. The red hero that you just defeated will invade you again and again by entering the portal at (3) to the north, so it is a good idea to setup an Advanced Town Portal in Town C in the near future.
You now have a choice of where to go next. You can continue attacking the Red faction to take Fort D and Town E to permanently stop the invasions, or go for the Orange faction, who owns Town F and Town G. In my game, I went for Town F first, then came back for Fort D and Town E. Strangely, I was not invaded by the Red before stepping into Fort D's territory.
No matter what order of conquest you decided, eventually you will have to take them all. This completes one of the primary objectives and opens the gate at (4). A quite-powerful hero roams the eastern territory, but you should be strong enough to crush it. Continue up the linear path and take Fort I, Fort J to eventually assault the last town, Town K.
Before you attack Town K, just north of the castle lies the last stats boost (s) of the mission that can be easily missed. The defending army inside Town K is more powerful than anything you have fought so far, but this is the last battle of the mission that uses Kiril and his army.

Winning the final town fight gives you a set artifact (boots), but it is handed to you after you receive a few (in my game, 3) other non-set artifacts from the opponent hero. If you do not have at least 4 empty slots in Kiril's top-3 rows (one of them is pocket, so in reality there are just two rows), you won't get the set shoes at the beginning of mission 2. To make sure you do get the shoes, remove whatever boots Kiril is wearing now, so the new boots will be equipped on Kiril and survive the mission.
Now let's talk about the real boss fight of this mission. After finishing Necropolis, Haven, and Sanctuary campaigns, I feel this particular fight is the hardest mandatory battle so far. I fought this battle on hard 6 times, but only managed to win 2.

BOSS: Azkaal vs. Xana's Dogs (Difficulty index: 6/6)
OK, a demon that has only 75000 HP. Shouldn't be too hard for Xana's huge army, right? Let's take a look at Xana's spell book... hm, how come we can't open it...
You ARE Azkaal, the Prince of Destruction! Do you stand a chance against 1120 dogs (on hard), often hitting for 10K+ damage each bite? If there is one sentence to summarize this battle, it is "avoid dog bites". Xana's dogs frequently escapes your hit-all counterattack fire damage (probably from its natural fire resistance), and they also damage you more than all other stacks combined. If you can avoid dog bites, you win.
 Azkaal has two actions each round. Here are the options:
(1) Regular attack - very weak. But if you can hit something after teleporting, you may as well swing.
(2) Teleport - The only purpose of moving is to run away from the dogs. But Xana tends to increase the dogs' morale, so they might catch up with you anyway (fortunately dealing only half damage). A much better way to avoid the dogs is to let Xana's other melee stacks block the dogs from Azkaal, and to stun the dogs with the Frenzy attack (see (5)).
(3) Hit-all fire attack - (3-turn cool down period) A powerful attack that reduces all Xana's stacks' size. The faster you reduce the dogs' health with this fire attack, the more likely you are going to win.
(4) Mark for double fire damage - Starting with the dogs, mark all of Xana's real stacks so they will go down more quickly with your fire-based attack and counterattack. Whenever you are safe from the dogs and can't use (3), mark some fat stack.
(5) Frenzy+ - This ability is better than the regular Frenzy, for it will stun the target for 2 turns ONLY IF they have no neighbor to frenzy attack. The only stack that you need to Frenzy is the dogs - but for the sole purpose of stunning them for two turns. If they actually have something to attack, they are only stunned for the current turn.
Xana tends to give the dogs Life Drain. That's a very good reason that you don't want Frenzy to hit the dogs when the dogs can actually frenzy attack a friendly stack. Not only you lose the chance to stun them for one more turn, but you also help them heal thousands of HP! This only leads to your own demise! Besides, Xana has a disproportionally big dog stack, so chances are your hit-all attacks will eventually kill everything but the dogs.
p.s. On the bright side, if the dogs' frenzy attack does wipe out a friendly stack, you receive an achievement for it.
Your counterattack also deals hit-all fire damage, which is less powerful than (3). So it is a good idea to get hit by Xana's weaker melee stacks every round. Your personal luck is also very important - you might be unable to block the dogs with Xana's own units, and the dogs may keep getting high morale and hunt you down no matter which corner you hide in, and escape your fire damage again and again.
So... good luck! You will need plenty.
| Comments (3) |
- by maltz
Mission 4 has a simple layout - all towns but no fort, all surface but (almost) no underground. You are up against two factions, Haven and Inferno. Both send heroes to invade you from their respective bases. While this sounds easy, many people have reported problems in this mission even on normal difficulty. The first wave of invasions from each faction could be especially difficult while Irina is still weak. To make the matters worse, the invasions tend to arrive all together.
 Fortunately, we also have full control over when we receive the shock - until we have what it takes to crush them. For a magic hero, this could be as early as Week 3-4 of the first month.
A second, more unorthodox challenge of this mission is that the scripted armies could be... I am out of words. We have seen some large scripted army in Necropolis mission 4. Here, one Inferno town will be particularly hard to conquer early on, but it is at least possible. However, two Haven towns will field stacks that show 5 digits well over 65535. How about 90000 in each stack?! Fortunately, they are optional, and Gelhart is never smart enough to withdraw just 1% of that army to kick our little ass. With that army, we have to wonder why Gelhart has not conquered Asha himself (or more logistically, how does he manage the salary and ration?).
By the way, there is a bizarre side quest that requires you to avoid occupying any territory owned by the Wolf Duchy. Taking Haven towns controlled by the Orange Inferno player or getting neutral Haven towns from quest do not fail this quest, so Blackhole probably specifically refers to Haven towns controlled by the Red Haven player - if you can somehow defeat those monster stacks.
 Sanctuary Campaign Mission 4
Level cap: 30
Difficulty Index: 5/6 (*6/6, if counting the optional battles)
Last updated: December 5, 2011
WALKTHROUGH
Dynasty Traits: As usual, free first generic hero really helps. I also lean towards +3 core and +1 elite creatures, but money is again the bottleneck in this mission. Technically, when you start feeling the money restrain, you should be far enough in the game and have won the most difficult battles. These traits still help at the beginning and middle, which are the most important anyway.
 Irina starts in the southwest corner with Town A. She has quite a bit of resource buildings to flag to the south and north, so let's get them done as soon as possible. Your free hero should be Might to get the daily +1 Wood and Ore bonus. Don't worry that you have no priestess - simply sweeping the area with Earth Elementals, Phoenixes, and other powerful spells. The size of neutral creatures rises pretty dramatically in subsequent areas.
North of Town A is Town B, an Inferno-controlled Haven town. Needless to say, the resistance there is very weak there. You should be able to take Town B very soon, which also completes a side quest. East of Town A is Town C, a neutral Haven town. You can either attack it (blood path) or solve a simple quest (tear path) to let it join for free. The quest involves cleaning some inferno creatures on the Lighthouse island of (1), after which the town joins you immediately. There are also quite a large number of floating resources on the sea, worthy to send a hero after them.
Before we go further, let's look at the layout of towns, so we can avoid facing powerful invasions too early. Town D, E, and F are controlled by the Inferno Orange player. Town G, H, and I are controlled by the Haven Red player. The AIs will invade you if you take a town beside one of theirs (except for Town A at the very beginning), and the first invasion comes immediately. For example, if you own town B and C, you can expect invasion from the demons only. If you own town D, you can expect invasion from both human and demons.
 In my game, I stole Town D quite early - at the end of Week 2, and had to face three to four quite powerful invasions from both enemies all during Week 3. This made my game very difficult (I was able to drive them off only if Irina turtle inside Town D's level 2 wall). For a Might Irina, it is probably better to delay Town D as much as possible. But as Magic-Tear, you may as well give these 5:1 battles a shot and show the AI what humans are made of. By the way, the Inferno AI in Town D does not invade Town B even if it has the army to. So it is possible that AI is scripted to ignore Town B (not sure about Town C).
So what should we do if we run out of things to kill in the starting area? Actually, there is a secret recruit island waiting for Irina on the very northeast corner of the map. This island isactually part of the mainland if you look it up on the Ashan map (provided on the top of this article. Kudos to Blackhole, for they really make an effort to match up mission maps and the campaign map terrain). On the "island" you will see numerous passive sanctuary creatures, which may join you for free or for money. The four whirlpools on this map (all marked by (2)) are inter-connected. Entering one of them will randomly transport your hero to any one of the other three. Eventually, you will emerge from the whirlpool close to the recruit island at (3).
In my game, I did not visit this island until mid Month 2. The stacks have grown very much due to neutral stacks' natural growth. Therefore, if you are confident about your Irina build, there isn't any need to get to this island in a hurry - let the stacks grow a bit so by the time you harvest them, you get more free units. At the end of the recruit island there is a one-way portal (4), which will send you to the other side of the straight at (4'). Not particularly useful.
 One of the initial demon invasions is actually linked to a quest. You will receive the unimpressive shoulder piece of the Prophet Set. The hero is not really more powerful from the rest, but could be still deadly enough so that you have to defend in a town.
Once you own Town D and have driven off the first wave of Inferno and Haven invasions, it is time to think about counterattack during the intermission. The Inferno faction owns Town E and F. While Town F is a lot easier, taking town F will further expose us to inconveniently quick Haven invasion from Town H (and they come quite frequently). On the other hand, if you take Town E, there will be no more demon invasions! So it is strategically sound to take Town E first. It won't be easy - but possible for a magic hero. (If you play Might, you might have to wait a lot longer before marching toward Town E.)
On your way to Town E, you will see a two-way portal (5), which takes you to the east at (5'). This no-man's area also has a number of neutral buildings to be flagged, but you can do it later.
 Town E seems to be scripted so that it has to be defended by just creatures (no hero allowed). So even if there was a garrison hero, as in my game, I ended up facing the hero's army first, then attack the castle's creatures. Heroless creatures defending towns doesn't sound very hard, but in this mission they could reach astronomical numbers. I understand that Blackhole wants some challenges for us, so let's take it!
The picture on the right shows how much I had to fight in Town E at the end of Month 1, Week 4 on hard difficulty (I skipped Town C and went straight for A-B-D-E), with an army about 1/10 of it. My strategy of this 37-turn drag involves using Serenity, the cheapest stack-disabling spell, to block the action of AI shooters, while my own shooters destroy other melee stacks, starting from the fastest (and most dangerous) Pit Fiends. This way, the AI was probably fooled to think "we still have superior ranged power, so we don't have to storm out." For many turns, all AI units just defended behind the walls, allowing my small shooter stacks to slowly scratch them to death (Archery II works really well here).
 However, at turn 25 or so the AI suddenly woke up, attacked its own shooters to break Serenity, and charged out all together. I was careless to allow my 28 Kensei to fall in the range of the 883 dogs, which were still in the castle, but the wall has been demolished by the catapult and they have high movement range) and the Kensei were instantly wiped out for good (can't resurrect as Sanctuary). Fortunately, I already scratched 3 stacks to death at the point, so the situation was still manageable with an emergency Time Stasis, Tsunami, plus the usual Serenity and Petrify. I came out of this fight losing nothing else. Lesson learned for you: focus on stacks with high movements first and don't leave anything in their range. Pit Fiends and the dogs must go early.
After taking Town E, don't go down stairs 6 first - you are not powerful enough for the boss yet. Good news for us - the Inferno Orange have turned dormant for good. But there is still a weak Inferno hero camped in front of in Haven Town F - might as well end their embarrassment. Once you take Town F, Red Haven will invade you immediately, and after that, quite frequently. But nothing can stop you at this point.
Now there are no more towns you can conquer - Town G and H are defended by ridiculously large armies, and the gate leading to Town J is closed. It is a good time to collect the neutral stacks on the recruit island if you have not done so, and to visit various stats boosts (s) on the map. When you have enough power to win all the harder Arena fights, you should be ready to take on the second last boss in the underworld. Descend the stairs at (6-6') and kick its mouth!
The Breeder Queen is a very unique boss. Its information lists that it has a weak magic power of 250, but it probably only applies to its regular attack, where an Imp flies out just like the normal version's magic ranged attack. However, the Breeder Queen's special attack is actually very deadly if you are not prepared - it attacks a wide area in front of her for thousands of damage on each stack (so don't crowd in front of her, spread to the sides and back if possible).
p.s. There is an achievement about not allowing the Breeder Queen to use her Imp attack. However, I don't see how it can be done, as she does the "ranged" attack even if she was in contact with multiple stacks of Irina.
 Apparently, you can cast Time Stasis on the boss, but it will have no effect. The best way to win this battle with minimal loss is to recite a Mass Life Drain scroll on Turn 1, wait for the boss to act then attack (so you avoid the special attack in Turn 1 and heal back the damage), followed by Mass Regenerate and all-out-assault on Turn 2. Then keep healing until the boss dies. Your reward for killing the boss is a Tear of Asha!
After killing the Breeder Queen, the cut-scene suggests that the Haven army "is leaving". Actually the only Haven army left is the one behind the gate between Town H and I, roughly at 7'. (The number marks the exit of a one-way portal, which opens just south of Town I, at 7. I guess Blackhole left the portal there so the Red Haven AI would use the portal to launch its invasions, but I found the AI prefers basic Town Portal.)
Anyway, the gate is now open - one boss fight remains. The final boss in Town I isn't really a 4x4 monster like the Breeder Queen, but a regular hero who commands an OK army - about more than 1000 of core units, hundreds of elite, and dozens of champion when I fought him at the first week of Month 3. Very easy. If he uses just 10% of creatures stocked in Town H (that would be 9000 of each), Irina would have been floating on the sea. Congratulations for winning the Sanctuary campaign!
Finally, let's discuss how possibly we could win the fight in Town G and H on hard difficulty. Since the stacks are so large, if we are ever touched, our stack is gone with the Naga. The key is to avoid all melee contact and counterattack whenever possible. The following abilities therefore are keys:
- Artifact Shadow Comb (1-shot Puppet Master - 2 turns if our spell power is high enough)
- Petrify, Serenity, Time Stasis, Time Stasis (about 5-6 turns at this point)
- Blind (about 2 turns)
- Robe of Sar-Issus (1/2 mana cost) + Dragon Nexus (2 times max mana) + Meditation: so you can last more than 100 turns if required

With these preparations, my Town G battle (the easier of the two, against 45000 Imperial Griffins + 9000 of tier 1-3, but only a few hundreds of tier 4-6) was looking very good. Theoretically, we could PM the Griffins to kill everything else big (tier 1, 2, 3 in the two precious PM turns, as the Praetorians will go down with whatever it protected). Then, we can use Serenity to control the Griffins while shooting it for two rounds every 4 turns (the cool-down time for Serenity). It is even more straight forward than the Town E fight.
I have got some good start in Town G this way, but due to a 100% reproducible game-crashing bug (I have been mentioning this in other walkthroughs), I can't continue the battle. The bug (v1.1.1) is triggered whenever the AI has to act immediately after its PMed stack attacks and kills a lot of units. Well, at least I managed to take a screen shot (see above) 1 second before the game crashed again. The Griffins dealt 194225 damage to the Vestals to wipe them out, and 185509 damages to the Praetorians protecting them. Oh yeah.
How about Town H - 90000 units of tier 1-6? There is some hope. I was tracking the number of creatures inside these monster towns, and found that the garrison does not grow! So if you just keep hitting end turns, you will theoretically outnumber them in the far future. Good luck! Unfortunately, you won't get the 25th year anniversary achievement in campaigns (bug or feature?), or the math will work out just right (100+ creature each week x 52 x 25 = 130,000+)!
- by maltz

In this straight forward (surface only) mission, Irina needs to stop the Necromancers from taking over four towns. But there is really no rush in doing so. Three of the towns will fall immediately after the start of the mission; so there is nothing we can do. But then the Necromancers will ignore the final town. So we don't have to rush there, either. The Orcs are mostly our friends, although you can make some Orcs angry to your benefit.
There are not many towns and forts in this mission - well, there is only one fort. The Necromancers are the bosses, so artifacts that reduce morale will be useless against them. Just to keep the pressure on you, the AI will invade you through a one-way whirlpool; however, in my game, there was only one invasion near the beginning. You will also fight a large number of large neutral stacks. Tsunami is a great battle opener. Mass Regenerate during Time Stasis on the last enemy stack makes it much easier to achieve perfect victories in boss fights.
 Sanctuary Campaign Mission 3
Level cap: 24
Difficulty Index: 3/6
Last updated: December 5, 2011
Dynasty Trait: My picks were just like before: free first generic hero, +3 core creature and +1 elite creature. In later missions, the first is still an excellent pick, since new heroes are way too expensive (and way too effective). On the other hand, I started leaning against +creature growth traits because I always run out of gold before I run out of creatures to hire. Unfortunately, there aren't more powerful +gold Dynasty Traits for higher Dynasty Ranks.
 Irina starts beside Town A of the southeast corner. There is a Sawmill to the northwest and an Ore Pit to the northeast. You can make a round trip using any of the two paths leading to the west (as they will converge). The observation tower north of Town A reveals the exit of a one-way Whirlpool (1). Necro heroes will invade through here. If unchallenged, they will reach Town A two days after coming out of the whirlpool. That's pretty quick!
When you have finished business around home, head west to cross the straight at (2). The paved path to the north is blocked by Orcs, so head west first to face two Necro heroes. One will fight; one will run (you will see him later). Beat the Necromancer and take control of Town B without another fight. In my game, after about one week I was invaded by a weak Necro hero through the whirlpool at (1).
The "Free Orc Prisoner" quest should be activated now. The map will reveal the prisoners' locations, which are marked by PR on the map. The prison guards could be a little too tough for you. So don't feel rushed. You can tour Irina through Town B's territory to fight for resources and flag more buildings. The observation tower northwest of Town B will reveal a shipwreck-filled bay and a Blue hero at (3).
 Soon you will obtain one of the four Moon Fragments in this mission marked by MF on the map. With all four fragments on the same hero, the game will reveal the location of the Tear of Asha (Tear), which can be installed inside your capital for nice effects. A reasonable time to get to the tear is after you finish freeing the Orc Prisoners. Neutral creatures guarding the later fragments could be quite a bit bigger than those prison guards.
Once you take care of the prison guards, you can earn Blood or Tear points by choosing whether to let the prisoners join (Blood path) or let the prisoners take over the city directly (Tear path). The Tear path saves work! After the Orc Towns (Town C and Town D) join, you can freely build them up, but can't convert them until you have freed both towns. It is a good idea to upgrade the money-making buildings right after receiving the towns (Level 3 Town Halls, Market) for profit.
As soon as you convert one of the Orc Towns (C or D), an angry Orc hero will turn aggressive at (4). He has a fairly powerful army, so it is better to postpone the town conversion until you are powerful enough to handle him. Practically, you can set Irina on a moon fragment-collection trip for the two northern fragments. By the time Irina reaches (4), convert the towns and send the now-angry Orc hero packing before his turn even turns up.

There is an optional Fort E still north from (4), controlling a rather large territory with a creature building to the very northeast and a gold mine to the west. When you are on your way to collect the moon fragment in the shipwreck bay, you can talk to a Blue hero at (5), but he only gives plot-related information.
 You can now take your time fighting neutral stacks and collecting stats boosts (s). The remaining enemy's number grows much slower than yours due to the power of the Tear of Asha. The fourth town to reclaim, Town F, isn't heavily defended, but the challenges that follow will be a little more difficult. You will notice a threatening fleet of Necromancers at the shore of (5), but they won't actively attack you. You can find another set artifact at (6).
After you own Town F and convert it, a Sea Dragon is summoned and the Necromancer's fleet at (5) is largely destroyed. There will be only two ships remaining for Irina to sink manually. Cross the straight to the northwest and enter another Necro faction's territory, where you might see additional Necro heroes roaming around. In my game, I even saw one Necro hero with no army (so that battle was instantly over).
The final boss is significantly more powerful than the rest of heroes you have seen so far, but he should not be even close to threatening your perfect victory. Before the final fight, remember to re-arrange your inventory so all your set-artifacts are in the first page (no scroll bar required), and you still need two 2 holes left. This is because you will be given two artifacts after the final fight (although only one is part of a set).
| Comments (9) |
- by maltz
INTRODUCTION
Mission 2 is actually a recycled and expanded map 1, while Irina has to work on the reversed order.
Setting on the Sanctuary "Ha island" ("shima" means island in Japanese), this mission has a lot of neutral Sanctuary creatures that has an attitude of Passive (instead of the usual Hostile). If your army overpowers them, they often join for free or for gold, which you will have plenty. You can beef up your army significantly through collecting these neutral creatures.
Dynasty Traits: Free first generic hero is always good as it provides extra creatures to start a mission. Another very good trait is "Core creature +3", as Priestess and Kappa will be your main damage dealers (now it has become a self-fulfilling prophecy).
 Sanctuary Campaign Mission 2
Level cap: 17
Difficulty Index: 3/6
Last updated: December 5, 2011
You start outside the last town of mission 1 (Town A), given four weeks to prepare an army to capture Fort C to the south. Before you start picking up resources, hire a new hero, who preferably has Coral Priestesses and Kappa and give them to Irina. You can make the pair flag the Saw Mill and Ore Pit. The creatures surrounding Town A is weak, but don't touch them yet - rush Irina to capture Fort B as early as possible.
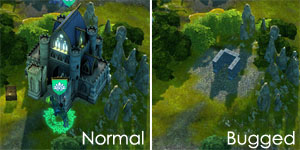 Currently (v1.1.1), there is a bug that makes Fort B disappear (into a "C" shaped remain, see picture to the right) if you do not occupy the neutral fort early but fight the nearby neutrals instead. This happened to my first run of this mission as well. If this bug occurs to you, you won't be able to complete the quest of "capture the eastern fort" and receive the additional units from the tier-6 creature building south of Fort B.
Now we can sweep clean the surroundings of Town A and Fort B. You can send another secondary hero (there will be lots of resource gathering on the sea) to the ocean north of Fort B. What the map above reveals is a good indication of the range where you can find floating resources - everywhere.
A good time to finally push south is to wait for your Week 3's creatures. Defeat the army guarding Fort C and convert the creature building just beside it. You will see the second closed gate (GA1). They won't open yet.
 Kill and collect everything in the area and continue south. You will see a group of Sharks standing in front of Town D. As soon as you talk to them (you can use any other hero who leads at least 1 creature) to do the conversation, a Haven hero spawns northwest of Town D. This Haven army will land on one of the two beaches north of Town D to fight Irina. This fight shouldn't be difficult if you did not push south too early. (As usual, Blackhole likes you to finish one area before moving to the next.) After the battle, Town D is your reward.
Getting Town D also activates quite a number of new quests. Your ultimate goal is to go to Town J and replace Hiroshi, the Teal Sanctuary faction. But you have to first solve a bunch of quests. Let's start with the most important quest - Kirin.
The Kirin quest takes place southeast of Town D at (1), and is essentially two sub-quests combined, the Spring Spirit quest and the Snow Maiden quest. When you complete both sub-quests, the Kirin quest is completed automatically. Completing each quest enables you to build their corresponding structures in towns. Completing the Kirin quest also enables you to skip the last battle of this mission.
 Also, since we are going on the Tear path, these quests do not really involve any mandatory fighting. So you can bring a secondary hero along to run errands and eventually pick up scattered resources. However, the quest givers (the Kirin, the Spring Spirit, and the Snow Maiden) have to talk to a hero who leads at least 1 creature. It just does not have to be Irina. (On the other hand, Heroes travel a lot farther per day if they do not lead any creature.)
The Spring Spirits are behind the two-way Portal (2-2'). Their request is very simple and easy - just march some hero north and cross the stream. This is where you started mission 1! Now you only need to donate 20 wood for their home renovation project. You should naturally have a large excess of Wood at this point, since Sanctuary buildings use lots of Ore.
The Snow Maidens are behind the two-way Portal (3-3'). This one involves a little bit of walking - you have to make somebody walk all the way east to the two-way Portal at (4-4'). Then go south a bit to locate the lost priestess. There are also many resources to be picked up in this area.
There are a few changes happening in the world at the same time. First, two closed gates (GA1) are opened, leading to hostile Teal territory. The invasion never came in my game, but I have heard people complaining about them. Second, there is a one-way portal exit (6') just east of Town D. The entrance of that portal is south from here at (6), east of Town E.
The under-volcano passage (7-7') to (8-8') has also been opened (as there is no longer gas coming out of the dragon's mouth.) If you feel like adventuring, you can use the passage to ambush the Teal faction. But the garrison could be too difficult for you at this point. (Remember what Blackhole likes you to do - finish one area before moving to the next.)
 Town E is the closest and most reasonable next target, but it also guarded by quite an impressive army. The enemy hero there will punish an ill-prepared Irina. I took it with an army including almost 200 Pearl Priestess, some good artifacts and scrolls from Advanced Market, and a secondary hero that bait the garrison hero out of her town. This is probably the most difficult battle of this mission (the rest of the garrisons aren't much bigger compared to this, but Irina will be.) If you find this battle too difficult, wait for another week or two until you are powerful enough.
You really don't want to see the AI's priestess cast Wave of Renewal on themselves or anybody else - they revive a truck load. A useful tactics to disable enemy priestess at a low level is to use Serenity on them: (You need some artifact that boosts your initiative ahead of the enemies'. The Soulreaver staff on level 2 will do the trick.)
Turn 1: Our priestess shoot enemy priestess. Irina casts Serenity on enemy priestess, who loses turn. Turn 2: Our priestess wait, the enemy priestess loses turn and recovers from Serenity, our priestess shoot enemy priestess Turn 3: Our priestess shoot enemy priestess.
Now if you have a blind scroll, you can disable the enemy priestess for two more turns. And when Blind is over, your Serenity can be casted again. Later on, your Serenity is extended all the way to 6 turns, making it extremely powerful against a single horror stack. If you don't give the opponent's priestess a chance to act, you will have a good time breezing through these siege battles. After level 15, you can pick Petrify and use it on those immune of Serenity. In the meantime, the enemy melee will storm out, and you will have upgraded Snow Maiden to setup a perfect trap at the castle gate (grin).
Taking Town E also opens another gate (GA2). But you can't go anywhere meaningful from here, since the other two gates are still closed. There is a Seven Dragon's Shrine (SD) just northwest of Town E. Same as mission 1, there might not be enough enemies to fight to push you to the level cap of 17.
 No matter whether you have taken care of Town E or not, it is a good idea to finish the Ronin quest early on, as the enemies are very weak there. You can go through the whirlpool (works like a reliable two-way portal) of (5-5') to take Fort F and its surrounding buildings. You might recall this
island as the "treasure island" back in mission 1. You should receive a free secondary hero, who will be carried over to later missions. If you have extra ability points, you might consider the Mentor ability to make this guy (a might hero) a very effective side kick.
No matter whether you have taken care of Town E or not, it is a good idea to finish the Ronin quest early on, as the enemies are very weak there. You can go through the whirlpool (works like a reliable two-way portal) of (5-5') to take Fort F and its surrounding buildings. You might recall this
island as the "treasure island" back in mission 1. You should receive a free secondary hero, who will be carried over to later missions. If you have extra ability points, you might consider the Mentor ability to make this guy (a might hero) a very effective side kick.
If you can beat the hero defending Town E, your army should grow fast enough to take down Fort G, Town H, and Town I in the following week or two. The game gives you free hero for occupying Town E and Town I (you have to go to a Tavern to claim your free hero). So you can again send them out to gather resources. There are plenty on the water.
After taking Fort I, which is partially revealed during the Snow Maiden quest, the gate close by (GA3) will open. If you have completed all other primary quests up to this point, the final gate (GA4) will also open, giving you the chance to finish this mission immediately. If you have previously defeated the Necro stacks in the sea south of the final gate, you can just walk up and win (otherwise Hiroshi will ask you to, thanks to Naki).
But you may as well take some extra time to visit the stats boosts (s). By the way, finishing the mission grants you an interesting artifact - the helmet worn by Hiroshi. However, since it is not a set artifact, it does not carry over. The same nonsense will happen again at the end of mission 3.
It is a good idea to save a few ability points before hitting level 15. Irina will be able to defeat enemies many times of her size with key spells like Summon Earth Elemental, Time Stasis, Petrify, and Meditation combined with her Tide Master's Serenity and Tsunami.
- by maltz
Welcome to the Sanctuary campaign. While the "nature & harmony" theme is not a new concept in the series, in Heroes6 we get to see an east-Asian (specifically Japanese) based faction, at least name-wise. Shogun is literally "general"; Kenshi/Kensei is literally "swordsman/sword saint"; Daimyo is literally "big name", or the lord of the region. Kappa and Snow Woman are both Japanese folklore monsters. Kirin is a holy legendary creature of eastern mythology and of course, a beer brand.
Sanctuary appears to be a very defensive faction. Its racial ability, Honor, increases defence but never heals even on the highest level. It functions like a good mass defensive buff (like Mass Stone Skin but covers both Might and Magic Defence). Its units gain defence in the next turn if they do not attack this turn. These are probably the least aggressive racial abilities among all.
Sanctuary heroes have the unique ability to walk on water, only if leading nothing or nothing but Sanctuary creatures. The scenario designers are nice enough to litter the waters with lots of recyclable garbage. There might be hidden "treasure islands" on the sea, too!
There will be just two artifacts sets that you may be able to complete, the Prophet Set, and the Guardian Set. The Trickster Set will be missing one piece so don't bother looking for it. Some of the parts are very useful. Remember to leave them in the top three rows of Irina's inventory when you finish a mission.
PLANNING
 The game by default makes Irina a Magic hero, although the loading scene (the picture above) suggests that she is a Might hero. Her specialty is improved Heroism Warcry, which I used only once in the entire campaign! This walkthrough will walk Irina on the path of Magic + Tear (Tide Master) for two reasons:
(1) While the sanctuary creatures contain 4 Might & 3 Magic, the only two shooters (tier-2 and tier-4) both use Magic attacks.
(2) A Tide Master has two extremely useful hero abilities: Serenity and Tsunami. Serenity is essentially an improved Blind - it becomes available at a lower level, lasts longer (Blind is a Blood spell, in end-game Serenity can reach 6 turns), costs fewer mana points, and has a cool down of only 4 turns. Tsunami not only looks great, but also imposes a 2-turn Mass Time Stasis (in end-game it can reach 3 turns) on all stacks that occupies only one tile (giant creatures are not affected).
Going Magic means that we will be able to defeat enemies ranked as "Severe", "High", or even "Deadly" threats. This also brings us into danger territories before we are ready. It is still better to play a little conservative. Blackhole rewards players who take time to mop up all neutral creatures in an area before moving to the next.
I also recommend the following abilities:
Troop conservation: Reinforcement I, Regenerate, Mass regenerate, Heal, Tactics I. In general, we have to avoid large-scale melee, since Irina can't cast Life Drain, the most powerful healing spell.
Level 15 burst to invincibility: Summon Earth Elemental, Time Stasis, Meditation, Petrify. Petrify lasts very long for a Tear hero, and it applies to almost every creature. It also can't be easily dispelled (by friendly fire) like Serenity.
Passive abilities:
Logistics, Path Finding: faster expansion
Counterstrike I, II, Archery I, II, Giant Slayer: to increase damage dealt
Parry, Toughness I, II, Defence I, II: to reduce damage taken - low priority, but eventually you will have the extra abilities points for them.
Thundercap: Pearl priestess's (air-based) attack has a high chance of reducing the target's initiative by 10. Very useful to delay a key enemy stack's action.
Tactics II: Kappa leaps back-row enemy shooters on Turn 1. Useful for routine encounters.
Please feel free to experiment with other abilities. There are many ways to win battles with style - although the general consensus is that a Tide Master is extremely good at it (due to Serenity and Tsunami).
 Sa... May the tide be with you.
BUILDINGS
Sanctuary lacks Ore more than Haven lacks Wood. But same as Haven, the Sanctuary towns are blessed with an Advanced Market, which sells new items whenever a new game save is loaded (cough). You may be able to find many great artifacts from it, just to name a few:

- Emerald Yumi Bow (off-hand, 20K). Ignores shooters' obstacle penalty. Very handy during a castle siege.
- Gauntlets of the Cyclops (hand, 16K). +8 might power. Exactly what you need for melee.
- Shadow Comb (head, 20K). +8 magic power and one Puppet Master per battle. Useful before level 15, or for the seemingly impossible optional battles in mission 4.
- Summon X Elemental Scrolls (one-time, around 750). Useful before level 15 - ties up enemy shooters.
- Mass Life Drain Scrolls. They appear very frequently in the markets. Great for boss fights.
Besides the advanced market, Pagoda of the Master Duellist increases visiting hero's damage output by 10% for the next battle (although I didn't see any sign that this actually works). Since you only need one Master Duellist building, you can build the alternative Shrine of the Celestial Waters for better Air and Water magics, which are used by Priestess and Snow Maidens/Woman.
CREATURE
Shark Guard/Wanizame (tier-1). High-output melee unit but with very low initiative. Their attack can reduce the movement of enemy melees and cause continuous damage. Not very active due to their slowness, but since they are Tier-1, you will have lots of them. And they will deliver the fatal blow when they are given the chance.
Coral/Pearl Priestess (tier-2). These are your primary healers (or regenerators) before level 15. (After level 15 you hardly get touched.) Since each stack only has two shots of Waves of Renewal, in daily encounters, you might want to split them for better regenerating and shooting coverage. Their long-ranged magic attack is air-based (lightning), and most Sanctuary creatures are weak to air. Great damage to their own kind! The top priority core creature.
 Kappa/Kappa Shoya (tier-3). Japanese folklore monster "river child" but looks more like frogs undergone brain autopsy. Every two turns, they can perform a medium-long ranged no-retaliation attack, which is more powerful than a regular attack and damages nearby enemies. Since Kappa has very high initiative, against weak opponents, you can guess the location of their ranged units (usually on the 4th tile from the lower edge, or 5th tile from the upper edge) and leap them immediately. Most of your Reinforcement I should go to Kappa since they will act first to take the counterattack. Since most battles are against neutral creatures, Kappa usually tops your damage chart at the end of missions.
Spring Spirit/Mizu-Kami (tier-4). Looks more like Winter spirits than Spring spirits. They also have identical models and portraits as Water Spirits (the upgrade version is exactly "water god" in Japanese). So what do they do anyway? They can spirit link to another friendly stack and share their buffs such as Pain Mirror. Essentially a mediocre melee unit, this is the weakest link of the Sanctuary army roster.
Snow Maiden/Yuki Onna (tier-5). Japanese folklore monster snow woman, who now fire ice balls. The Onna's special ability is to create a 3x3 frozen ground that both damages enemies and reduces their movement points (although not by very much). Very amusing against AI melee walkers, as the dumb AI will step on the trap again and again. Once they finally got pass it, try "Call of the Depths" or "Tsunami" for more laughs! This should be your top-priority elite creature both for value and entertainment.
Kenshi/Kensei (tier-6). These snake blade masters are the Sanctuary equivalent of bugged Imperial Griffins (i.e. no battle dive): relatively high initiative, decent health, and unlimited retaliation. You will be able to use them starting at the beginning of the campaign, and will continue to enjoy their supporting role. The upgraded version can hit multiple times if they repeatedly attack the same enemy.
Kirin/Sacred Kirin (tier-7). Throughout this campaign I never had enough cash to hire a good number of them when I need them. When I do get rich, the missions are essentially won. Retaliated tier-7 melee is as effective as low-tier melee - they seldom get a chance to attack in the toughest battles, which are all siege battles. So you may as well save the money to hire as many Sharkmen as you can, and invest the rest in some powerful artifacts in the Advanced Market. The toughest fights are usually in the first half.
 Sanctuary Campaign Mission 1
Level cap: 10 (best guess)
Difficulty Index: 3/6
Last updated: December 5, 2011
Dynasty Traits: You probably have noticed that we are usually restricted to low-tier units in mission 1s. So we can greatly benefit from the core creature +3 bonus. Also, since there will be a large number of resources to pick up on the sea, you may as well get "free first generic hero", and hire yet another one early on to combine their starting armies on Irina (get the heroes with more priestess). By the way, contrary to any other missions you have played, you probably won't reach the level cap simply because there are not many creatures to kill. So feel free to convert some early chests into experience points.
The first part of this mission is about walking around to receive small numbers of units and eventually a free town to develop. Feel free to skip some optional encounters in order to rush to the town. You can always return here later.
Irina begins her journey with a small band of Coral and Pearl Priestess at (start). Travel down the road and you will see a magic-affiliated Dynasty Weapon, Staff of the Tides at (1). The Staff of Tides has a special ability Call of the Depths at level 3 (think of it as Tear II Tsunami minus Mass Time Stasis but plus some scratchy damage). When the staff is maxed to level 5, creatures gain an Ice Barrier which absorbs damage. But of course you won't see it if you play this campaign normally (Killing every thing ONCE will net you 4-5M EXP at the end.) You can also use other staffs, preferably those that increase mana. One more Regenerate/Heal can sometimes be the key for a perfect victory.
By the way, if any of the special abilities does not appear in your spell inventory when you have reached the level for it (as happened in my game), simply un-equip and re-equip the staff.
 Don't be afraid to walk up to the deadly guardian of the weapon - you will be given a quest. As the walkthrough follows the Tear route, Irina has to defeat about a dozen of Fire Elementals at (2). This could be a little too tough for you at this moment. You can always come back when you have enough mana to heal.
Go to (3) first and rescue a group of Kappa from Haven poachers. Next, go to (4) and visit the Dragon Nexus (double mana) structure and the ability to walk on water. There are quite a few floating resources nearby, but you can send a secondary hero to collect them later.
Now you can cross the stream and eventually descend the stairs at (5-5'). The underground portion is rather small, with two stat boosts (s) and some minor artifacts. Soon you will see the exit of the under-volcano tunnel (6-6'). Go east to flag a creature building and receive the free Town A!
The second part of this mission is to outgrow and defeat the Red Haven faction, which owns Fort B, Fort C, and Town D. The AI is completely dormant - you can do whatever you want in front of their eyes. You can probably take Fort B very early. However, Fort C and Town D do have pretty big scripted garrisons, so you need some time to save up an army.
You only have one town, so how do you outgrow them? It would be nice if there is another creature building. Indeed, there is. Travel north (on the water) from Town A, and you will soon see a few buildings to flag on an island (7). More resources floating! Also, it is now a good time to go back to tend to unfinished business from the beginning. If you feel mean, you can park a secondary hero at (8) to block the AI's creature building from beefing up Fort C (which is likely the toughest fight in this mission), and another hero at (9) to steal the AI's Ore production.
When you have run out of things to collect, push north and take over Fort C and Town D. They are all very straight-forward siege battles. If you find one too hard, simply come back later with more units and more one-time combat boosts.
You can also get many great items from the Advanced Market. In my game, I bought a few summon elemental scrolls to pop them up right beside the AI's Crossbowmen and blocked their shots for eternity - all for just a few thousand gold. I also bought Anastasia's Shadow Comb for one cast of Puppet Master per battle (PM an enemy shooter frequently crashes my game, so be careful) for amusing effects, and some other + Magic Power artifacts. I also found a few Life Drain and Mass Life Drain scrolls, but never found the tough situation to use them.
| Comments (12) |
- by maltz

You can tell that Blackhole wants to make this final mission more challenging, but unfortunately it does not quite deliver the thrill. You are up against two Inferno enemies, one on the surface and one below. Only the faction on the surface will invade you. The map maker did AI a favor - the invasions will come right to you through a one-way portal, the exit of which is in the dead center of your quarter. Unfortunately, you won't be able to stop the nuisance for a while. The invasions are too small to become a threat anyway.
Once you start pushing into the Infernos' territory during the intermissions, you will find out that most AI towns don't even have walls, and they are again garrisoned by mysteriously small armies. You easily expand and expand, while teleporting back to swat red flies from time to time. Standing out from the mundane works are two mini-bosses (one is optional, probably unintentional as well) and the (finally) action-packed final boss fight.
Dynasty Traits: From hindsight, this is a mission where extra movement points really help - so you can accomplish more while the AI is not invading you, and reliably catch the invading enemy heroes when they try to run away from Anton. The +3 movement bonus is a nice one. Free first generic hero always helps (hire a Might hero so you get +1 Wood and Ore per day right from the beginning. Wood will be short early on.).
 Haven Campaign Mission 4
Level cap: 30
Difficulty Index: 2/6
Last updated: November 25, 2011
You start in the northeast corner with the same side-kick hero from mission 3. You can dump to her the Regent's artifact set like before - you already have 4, and you will be find 2 more here to complete the set. MINOR BUG (v1.1.1): If you ended mission 3 with some set artifacts NOT in the first three rows of your artifact slot, you are temporarily unable to access them until you acquire enough artifacts to give you back the scroll bar to see the 4th row and below. When this happened to me, I could go back to the last save of the last mission, move up the set artifacts, and finish that mission again. Another artifact set that you might be able to complete here is the Prophet set. However, in my game, I left one piece of it in a secondary hero when a previous mission finished. It was lost forever.
 Go southeast to take over Town A. Like mission 3, it is a good idea to focus on money buildings first. Flag and collect the resources nearby. While you don't have a good army yet, the free Summon Phoenix spell carried over from mission 3 can make things really easy. While the neutral creatures focus their attack on the summoned Phoenix, you can use Anton's regular attack to wear them down.
Soon you will discover the exit of the one-way portal (1'), where the surface Inferno faction conveniently invades you about every two weeks. The entrance of the portal is south from here at (1). However, even if you secure that area later, the invasion will continue. The AI hero will simply walk to you the old-fashioned way.
Grab Fort B and the crystal mine, as well as Fort C and its creature building. There should be some friendly creatures for recruit. Besides, many of the Ruins/Barbarian Camp structures in this scenario give free units, even upgraded Haven units. Next, go west and take over the Inferno Town D and convert it. Part of the main quest is to convert 4 designated Inferno towns, and this is one of them. Now you have your quarter established; the only threat to your home base comes from the one-way portal at (1'). You can build an Advanced Town Portal in Town A ready when Anton goes somewhere far away.
 Now you have some freedom to decide where to expand next. If you take the stairs (2-2') down, you can fight the other (orange) Inferno faction, which owns a total of two towns and two forts. You can also push out west or south. By going west, you can grab two towns and two forts, in addition to completing a side quest to receive a group of reinforcements. By going south, you can eventually grab many towns, many forts, and finally put a stop to the demon invasions. Of course, the south is likely too tough for you now.
Let's start with the easiest and most profitable. The underground orange demons have nothing to do with the surface demons. They don't actively invade you early on probably because they are simply too weak. So let's wipe them out and use their resources and towns to fuel our rapid expansion. Once you are in underground (2'), travel west first so you can immediately take Town E for conversion. The underground quest requires you to convert two towns.
From Town E, you can go counter-clockwise to sweep Fort F, Town G, and Fort H in rapid succession. If the red Inferno invasion comes on the surface, simply portal back to the surface. The invading heroes have a tendency to flag Fort B (if you lose it, there is no point to waste the resources to convert it back to Haven.) Since Fort B is close to the stairs (2-2'), it actually makes your return to the underground faster. In my game, the next invasion came right after I took Town E, so I continued my next expansion clockwise from (2') and worked on Fort H, Town G, and finally Fort F. They are all very easy fights. the Arena fight is probably the most difficult before the mini-boss.
 Besides stairs (2-2'), there are two additional sets of stairs, (3-3') and (4-4'). The AI will not use these stairs, which don't lead to any valuable artifacts, or bypass any tough enemies. After wiping out the orange demons, the barrier (5) to the middle area is lifted. But you don't want to challenge the mini-boss in front of Town U yet - it is intended for later. Since this is a stationary mini-boss who doesn't care about town management (why hold onto the Tear of Asha when you can easily install it in the neutral town one step away?), she doesn't mind if you flag the gold mine and crystal mine right in front of her. Neat!
Now you have the underground secured, and your army grows a lot every week. It is time to beat down the red demons. I suggest that you go west first, since the demons there are also unimpressive. Cross the bridge west of Fort B and take whatever stands in your way. There could be a roaming hero around, but you should be able to crush it easily. Sweep Fort I, Town J, Town K, and Fort L. Town K joins automatically as part of the side quest's reward.
By the time you convert your second designated Inferno town on the surface, Anton's Great Aunt shows up. As Anton's ally, Sveltana is scripted to attack the southeast Town P no matter who owns it. (So it is possible that she takes it from you, if you opt to go south first.) While you think this may put an end to the demon invasion through the portal, the AI will access it from Town M. So she doesn't really help very much. Sveltana will remain dormant in front of Town P, slowly building it up, but not doing anything else. You can actually attack her and enjoy her town when you are powerful enough.
Let's charge right into the red demons' heart land. Go south from Town A and easily conquer Town M. Now you have basically secured the portal entrance at (1), although the AI will still invade you from the west. Grab Fort N and Fort O nearby. Now you should be powerful enough to... borrow your Great Aunt's Town P. This fight could be a little tough (as Arache's Life Drain does not work on undead). However, since you can heal effectively with Guardian Angels lv 4, it is still possible to score a perfect victory.
 Just one more bunch of Inferno towns to crush. March west and take Town Q, Fort R, Town S, and Fort T all together. They are all push-overs. In my game, there is an Emerald Yumi Bow to be picked up in this southwest area. However, none of your subsequent tough battles require you to shoot over a wall, so it is probably better to stay with the Lion's Shield and enjoy the set bonus.
You are now ready to tackle the bosses of the mission. The underground boss in front of Town U is easier, so let's do that first. She is even less powerful than the optional boss back in mission 2, so you should be able to crush her like a bug by now. You get a free Tear of Asha and a... "Haven Town" (what a generic name) from this mini-boss fight. Install the Tear back in your Capital and let the population explode! For your effort, you also receive a Dynasty Weapon Angelic Alliance, a healing Might weapon. It might automatically replace your Arache.
BUG ALERT: To prevent Angelic Alliance from disappearing, it is a good idea to save the game, go back to main menu, and associate this new weapon with a hero in My Dynasty. Under v1.1.1, there is another bug that permanently gives bonuses associated with a currently-equipped Dynasty Weapon whenever you save the game, load the game, and switch to a new Dynasty Weapon. You might not be able to avoid this bug all together, but you can still restrict yourself not to abuse it.
Now we are ready for the campaign's last fight! Make Anton visit all stat boosts (s) you have missed, load him up with all your best untis (let Seraphs in and don't split the Vestals) and walk up the path starting at (6). Break through the easy Fort V and Fort W and receive the last piece of the Guardian's artifact set. Here comes the boss in front of Town X, Falcon Reach!

Ahribban, the demon Prince of Hate, uses a very powerful hit-all Magic Attack (with a terrible Magic Power of 15500), which happens to be Anton's weakness. As a result, his special attack will hit every stack for lots of damage. However, Ahribban only has 80,000 hit points. Even though Anton's units usually can't hit for 5 digits of damage, Ahribban should go down a little more quickly than Uriel. In my game, I even saw Ahribban lost a turn due to low morale (thanks to Arache and Anethema's morale debuff), and Ahribban went down on Turn 2 in a perfect loss during Hour of Judgment. Poor boss.
| Comments (12) |
- by maltz
INTRODUCTION
Hm... Mission 3 at v1.1.1 does not look like a finished product. There are two serious bugs and one obvious flaw. The first bug could get you stuck forever. The second bug usually renders one of the side quests unable to be completed. The flaw? This mission is way too easy. The neutral stacks are usually smaller than those found in Haven mission 1, and of course smaller than those in mission 2. The AI is unable to build walls in all of their towns, which are usually defended with a miserably small garrison. Most bosses, including the last one, do not even have high-tier units!
Dynasty Traits: As Griffins, Blazing Glories and Sun Crusaders take the center stage of your battles, Elite creature +1 growth looks pretty good! Free first generic hero never disappoints, too. By the way, you will still reach the level cap easily, so again all chests can be cashed as usual. There is no need to waste precious crystals at Seven Dragon Shrines.
 Haven Campaign Mission 3
Level cap: 24
Difficulty Index: 1/6
Last updated: November 24, 2011
You start in the northwest corner of the map. A so-so secondary magic hero joins you (she will return on mission 4, too, with the exact same condition that you left her here.) While she looks like a kick-ass heroine, she has no healing spell! But she does have some town-management Realm feats. I used her as a "house keeper", traveling across towns to commission discounted upgrade buildings and ship new units to Anton when a new week arrives. Maybe give her the Regent artifacts (you should already have 2, and you can find another 2 in this mission) to increase her effectiveness in the supporting role.
 Rush northeast and pick up your first town (A). This will be your only town and primary source of recruitment for a while. Next, you need a stable supply of Wood, Ore, and crystals. The nearby Sawmills are marked by (1); Orc Pits are marked by (2); and Blood Crystal Mines are marked by (3). You can't flag the second Blood Crystal Mine to the northeast for a while, but just keep in mind there is one. You can first sweep clean the vicinity of Town A to collect some easy resources. The ruins, pyramid, and barbarian camps on this mission frequently give several Blood Crystals. They are all very lightly guarded.
There are two roads leading to south, which will eventually converge and connect to a neutral Fort and then some enemy Sanctuary territory. While this sounds like a strategic choke point, the Sanctuary heroes will never bother invading you from the south. Their scripted army will come to your east side. At one point, I even saw two heroes coming at the same time. So let's focus on the east first so we can beat the invasion as soon as they show up. Take Fort B if you have not already done so. Immediately to your east is a Sanctuary Fort C that's very easy to conquer - why not?
The Sanctuary invasion lands at (4), which is quite close to both Fort B and C. There is nothing else you can do to stop, even to block the invasion. The Sanctuary heroes can apparently walk on water, so they have lots of options. In the meantime, you can keep expanding, and come back when the invasion arrives. The invasion actually emerges from the one-way portal at (5-5'), and you won't be able to get to (5) until much later in the mission. The sanctuary heroes do like to go straight after your nearest undefended town or fort. If you want to have a one-day warning, get the unique town building Statue of Revelation and reveal the area around (5').
A passive-aggressive strategy is to lure the AIs close and finish it before it can escape. Town E is perfect for this purpose. You can build an Advanced Town Portal here. This was the only Advanced Town Portal I built in my game, and it was handy for travelling purposes later, too. But we can't take Town E yet, since we can't walk on water.
 For now, clean up the neutral stacks, pick up resources, and flag the mines in your territory. Develop Town A well. You can build a Basic Town Portal in Town A and use a secondary hero to ship new units to a nearby fort or town.
It would be a good idea to stay in your northern territories until the arrival of the second wave of invasion. However, if you are very efficient at cleaning up neutral creatures, you might be able to launch the next phase of expansion before the second wave arrives. Your next target is Town D to your east. It is quite a straight walk east of Fort C. This town, like many others you will see, is very lightly guarded.
Before going mad on the resources around Town D, there is a shipyard at (6), allowing you to build a ship and quickly return to Fort B/C area. Chances are some Sanctuary's hero have arrived, or will arrive soon. A ship also gives you direct access to Town E. Now you can go ahead and rob Town E from the imbecile AI! You will also receive a side quest to convert 2 Sanctuary towns.
 BUG ALERT: If you play normally - taking Town E when you can - this "convert 2 Sanctuary towns" side quest is bugged and can never be completed. I once read a work around - you have to trigger the next stage of the main quest (see next "bug alert" section) before activating this "convert 2 Sanctuary towns" side quest. But it is very counter-intuitive. Fortunately, you don't lose anything important for being unable to finish this side quest.
Now you have Town E, and it will serve as your front line from now on. Get an Advanced Town Portal in there as soon as possible. If you see an army coming out at (5'), return Anton to Town E on the same turn, and the AI hero will either charge Anton, or be within Anton's reach in the following turn (don't forget to leave a ship on the shore of Town E). Your territory is from now on forever safe.
Town E is isolated in the middle of a lake, with no associated resource or creature buildings. Let's call this lake "the upper level". The whirlpool at (7) is one of the four in this mission. Entering any of them seems to randomly take you to one of the other three. There is one whirlpool on the upper level, two on the middle level, and one on the lower level at (8), just beside Town F. You can access a number of Forts and Towns from the middle and lower level lakes, including a creature building in the middle level. It is in no-man's territory, so the creature building will remain yours even after you leave.
Let's take Town F just because we can! It just right there begging to join the Light side. Town F is defended by a larger army than you saw before, but it is still very weak compared to mini-bosses in earlier missions. With your superior home production, you should be able to handle them easily with a week or two of fresh units. In the meantime, you can clear the area of Fort C and Town D, if you have not already done so. There is an extended area west of Town D, including a Crystal Mine (3) and some stats boosts (s). You must have seen them from Fort C.

Now is time to progress the main quest, which could be seriously bugged if not done early enough. Before you do anything else, use the Statue of Revelation to reveal the area marked by (9) (reveal the area a little to the south just to make sure it works). You should see an opened gate at (9) and a Sanctuary hero just south of it. When you move Anton (any other hero should work) close to (9), which is just a one-day trip from the middle-level lake, the enemy hero should dock inside the castle, the gate should close, and a dialogue should trigger between Anton and some secondary characters.
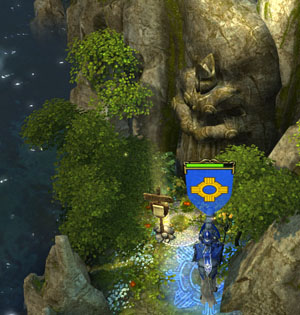 BUG ALERT: The serious bug involves an additional Sanctuary hero blocking the gate and hence the access of the designated Sanctuary hero. Later on, when your Anton gets close to (9), the game freezes up. I read that the only solution to this bug is to prevent it - by revealing the location of the gate beforehand, and trigger the side quest to advance as early as possible (before the game puts a gate-blocking hero there). It is also possible to complete the "Convert 2 Sanctuary Towns" (Snakes in Heaven) side quest if this side quest is triggered AFTER the main quest advances. But that would involving skipping Town E and F and head directly to (9) after taking Town D. How would one know to go to (9) first? This area is not designed to be visited early judging from the increased stack sizes.
Now you have the main quest and the enemies' invasion under control, you can happily work on the rest of the map. Let's dig up the Tear of Asha. All of the four moon fragments are marked (MF) on the map. You should have picked up two around Fort B. If you follow the road south from Town A, you can flag Fort G. There is your third piece of moon fragment directly above it. Keep going south and you can take Fort H from Sanctuary. From Fort H, you can go southeast to (10) to flag a warpath lodge (+3 movements for defeating an enemy) and grab the fourth and final moon fragment in the middle of an isolated area. The location of the Tear is marked on the map (Tear). It is within two days of travel from Town A. Install the Tear in your capital and cheer! What an overkill in this easy mission (but the completely moon shard will save you in early mission 4). From Fort H, you can go north to take over the Sanctuary Town I and Fort J. They should be very easy as well.
You now have everything but one town, Town K, the source of invasions. It can only be accessed with a little quest work. As a Blood-Might Anton, I was told to visit a mansion at (11). After a very relaxed mini-boss fight, I was given an artifact that increases siege weapon's structural damage by 1. Now all I needed to do was to march any hero close to (9) to watch the wall crumble.

When you have finished businesses with your new territories, march a fully-loaded Anton through (9) either via ship or the shallow-water path above the falls, and take Town K like slapping a baby AI. The neutral creatures east of the river finally look a little promising, but the Sanctuary AI was as weak as before. By the way, there is an interesting Easter egg statue and sign northwest of Town K.
Lucky for us, this non-challenge is almost over. Finally, march through the portal at (12-12') to beat the extremely weak boss at (13). Did you expect a boss as powerful as Miranda back in Necropolis mission 3? Too bad.
| Comments (8) |
- by maltz
INTRODUCTION
Mission 1 felt like a tutorial extension, but mission 2 is the real, cruel world. Unfortunately, this map could be very tough if the AI's scripted large armies turn aggressive too early. Fortunately, there is an easy way to avoid just that. However, there are still plenty of challenges in this mission. Neutral stacks in some areas could grow quite large. An optional mini-boss carries an army larger than those in Necropolis mission 4! The level cap at 17 is way too low.
Our Blood-Might Anton build should be quite complete in mission 2 already, with a bunch of useful passive perks plus Cleave and Resilience. Damages are mostly absorbed by the free reinforcement and avoided through guardian angels. The occasional hits can then be healed back by Vestals.
Dynasty Traits: how about "free first generic hero", +5 morale for a perfect victory, and +3 core creature growth. Some extra Marksmen and Vestals are always nice..
 Haven Campaign Mission 2
Level cap: 17
Difficulty Index: 4/6
Last updated: November 24, 2011
WALKTHROUGH
 Anton starts in the east side of the map, with one Fort already in possession. However, a fort alone doesn't give anything good. We need some more units and a town quickly. There is a creature building and gold mine in the starting area that you should flag as soon as possible. You can also pick up a few friendly stacks. Skip everything else - we will come back here very soon.
Your urgent goal is to take Town A to the south before the end of Week 1 - the earlier the better. On your way to Town A, you should still flag a Sawmill, an Ore Pit, and pick up some other friendly units including the tier-6 Sun Riders. You can skip the mercenary Griffins to the west as they are too expensive for you right now. The enemy at Town A is quite weak during Week 1, but I read that after Week 1, this battle will turn very difficult.
After taking Town A, don't forget to convert the creature building to the northeast. Your budget will be very tight early on, even if you opt for cash in every chest. Therefore, get the +gold structures (upper level towns, market place) become a high priority. Try to go to Town level 4 in the next few weeks. The Sisters and Vestals will save your precious mana during most neutral encounters.
While you can already see a corner of your next town (Town C), it is really NOT a good time to take it, even if its defense is laughable. Taking Town C gives AI the green light to march scripted armies to you; however, if you leave Town C neutral, these scripted invasions stay dormant. At this early stage, your army is too small to face the invasions. You need some extra to develop first. Now is a good time to go back to the starting area and the township of Town A to kill/pick up everything. There is more than enough time.

When there is nothing left to kill, head down the stairs at (1-1'). Your goal underground is to capture the Necropolis Fort B at the earliest but safest opportunity. This won't be an easy battle. In my game, I lost 20+ Vestals with 3 weeks of creatures. Then I tried this battle again with 4 weeks of creatures, plus a few additional combat boosts on the surface, and was able to pull off a nearly perfect victory. This pretty summarizes the entire Heroes6 campaign strategy. If we fight every mini-boss as soon as we can win (almost) perfectly, we will do just fine.
 After taking Fort B, convert the Necropolis creature building to the northeast. Your underground base is completely safe. The gate to the next area at (7) is locked and will remain so until the very end of the mission. For now, we can take our sweet time to fight quite a number of neutral creatures in the caves. More resources!
When you again run out of things to do, load up as much army as you can, return to the surface, and finally take Town C. With all your resources, you should be able to quickly build it up. It is a good idea to build an Advanced Town Portal right here, because the AI has nowhere else to invade. Let's take a look at the grand strategy.
From here Anton has to defeat 3 rebel dukes, each hiding in a Haven town. The closest one to Town C should be Town D to the north, followed by Fort E and Town F to the west. Fort G and Town H sit behind Town D; Fort I, Fort J, and Town K (which houses the optional boss) are behind Town F. In my game, I saw an invasion from Town D just a few days after taking Town C. The alphabetical order of the towns and forts is the order of conquest I recommend, although it largely depends on when and where you are invaded by the next AI army.
After beating an invasion, you can launch a counterattack during the same week to take his/her hometown rather easily. An effective way to have a healthy supply of fresh recruits is to have a secondary hero ready in any Town that has all upgraded creature building. When the new week comes, hire everything and cast basic town portal to the town or fort closest to Anton.
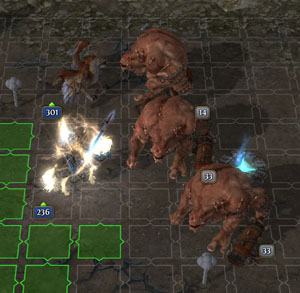 You will have the chance to earn a large number of Blood/Tear points upon capturing a Town. My Anton goes after the Blood path, and he was able to hire a free hero from the tavern for every duke he executed. These heroes don't have any ability points left to assign, unfortunately.
Northwest of Town D at (2), you can trigger a conversation with Anton's ancestor, but nothing else will happen. After taking Town D, F, and H, you can actually keep going west from (2) to finish the mission without fighting the optional boss in Town K.
The optional boss in Town K is all about army strength. While there won't be any additional heroes camped at the gate to negate your one-time combat bonuses, that garrison army is BIG! I looked at its army three weeks in a row and saw 1333, 1500, and 1662 Marksmen. This means that the army's growth is not really exponential, but rather fixed at ~160-170 Marksman per week. Most other stacks grow at a similar rate, too.
It is likely you are not quite ready for Town K yet. While you wait for your army strength to explode, you can visit stats boosts, which are marked by (s) as usual. You can also capture Fort I, Fort J, and their associated creature buildings. The side quest's Dynasty Weapon Heart Tending Song is located at (3), guarded by Celestials.

In my game, I finally mowed down Town K with an army containing 536 Marksman, while I found it still too tough just one week ago. Here are a few tips for winning the Town K fight:
(1) Arache level 4 (constant 15% Life Drain). It is unlikely you have it in mission 2, but if you do, this fight actually qualifies for "just another perfect victory". One exploit to quickly gain EXP with a Dynasty weapon is to save the game without the Dynasty Weapon equipped just before taking the third and final duke's town. Then equip it, use Quick combat earn some massive EXP, and load the game. I got my Arache to level 4 within an hour. You can certainly win without it (just don't expect a perfect victory).
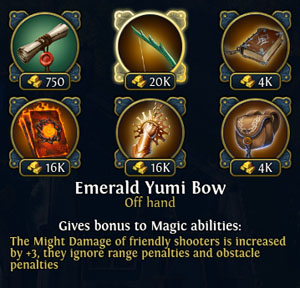 (2) Emerald Yumi Bow and some other top-quality artifacts to fill in your lacking slots. (Set artifacts are mostly of poor quality.) At this point, you should be so rich that you can build an Advanced Market in every town.
By the way, since the hero in Town K is completely passive, you can use some secondary hero to flag a creature building to its north, although I didn't notice any slowing of the garrison's expansion.
Taking Town K also give you a special reward - this is the only town where you can upgrade Glories. However, by now you should be so powerful that you are just going to crush every thing after this anyway.
No matter whether you want to fight the optional boss or not, the story continues. March Anton north, past Town K and enter the mountain path. Fight some creatures, collect artifacts, and enter the cave at (4-4').
Here Anton's mother gives him a series of trials at (5) and a sibling to fight, which are all really easy compared to other neutral stacks (especially if you have beaten Town K). After completing the trials, enter the portal at (6). You are now back to the Fort B region, in a dead-end (6') that at first looks like the developers forgot to put things there. Now you know this isn't gross negligence.
The gate at (7) is finally open! While you can fight more stacks on the way, there is no more set artifact to pick up. You can head straight to Town L to challenge the boss. In my game, the boss actually wondered off with his Trivial army (the biggest stack was 200 Archliches... poor guy) and was easily picked off by Anton seconds after he steps off his first base.
| Comments (1) |
- by maltz
Welcome to the Haven campaign. This could be your first stop if you like to have a natural extension from the tutorial campaign. Just when you were about to build Duke Slava into a beast... In general, the Haven missions tend to be on the relaxed side, with a little, early exception.

Jorgen: "Wait a second... isn't Slava wearing full-plate armor?"
CLASS
While the game intro movie suggests that Anton is a Paladin (Might + Tear), we have the luxury to build Anton differently. Since we already had a good time with a magic Anastasya in the Necropolis campaign, here we will make Anton to follow the Might path, just to try something new.
 The Might path plays very differently from the Magic path. Without those versatile spells such as Time Stasis, Blind, Meditation, Summon Elemental, etc., we will have to carefully plan our expansion path in order to avoid any difficult opponent (and lose a good chunk of our army). Fortunately, most Haven units use Might Power to attack, so the damage output will be quite stellar even if we end up with a smaller army. And if you pick your opponent starting from the weakest, you will hardly lose anything from the beginning to the end anyway.
The Tear path sounds like a rational choice for Anton, since it focuses on defense and healing, definitely the keys for unit conservation, although foregoing the Blood path's damage bonuses also means Anton will more frequently get hit. Besides, Paladin's hero special ability (Martyr and Divine Justice) are not very useful (if you find them useful, you are taking too much hits!).
This walkthrough will actually make Anton a Vindicator (Might + Blood) on hard difficulty. While forgoing Counterstrike III (counterattack before being attacked for up to 3 turns) is disappointing, it really looks like overkill for easier battles that do not drag over 3 turns. Besides, going Blood also grants Anton two useful hero skills - Anathema and Hour of Judgment. The former is a decent mass debuff. The second is a one-turn-only 40%+ damage boost. If you anticipate action during a particular turn, bring out the judgment hammer! In addition, there is one very good Dynasty Weapon to convert increased damage into increased healing - Arache (obtained from Necropolis mission 1 - this walkthrough follows the order of campaigns as presented in the game)! At level 4 (requires 3.5M EXP), all friendly creatures will carry a constant Life Drain, converting 15% of their dealt damage into healing that far exceeds your own healing spells. Wow!
Note: Currently (patch 1.2), Arache's 15% Life Drain is still bugged so that it could drain a lot more than 15%. More like... 1500%. Using this weapon above level 4 instantly turns your campaign into a farce (unless you are battling undeads). Let's hope it gets corrected soon.
UNIT CONSERVATION
The core of unit conservation especially for a Might hero is to only fight a battle when we can win with no or little loss. But will the AI outgrow us while we wait to get more army? The simple answer is NO as long as you don't purpose camp for several game months. There are two kinds of scripted AI armies in Heroes6:
(1) Stationary army (boss and mini-boss fights). These scripted armies do not grow at all, or grows by a fixed percentage every week. These armies can be much larger than yours if you face them too early. However, when you come back a few weeks later with a much more buffed force, you might find the challenge completely non-existent.

(2) Raider army - these are the heroes who invade you again and again. The AIs actually have nearly unlimited resources and army pool for these guys. So whenever you beat one down, another (usually the same guy) will re-spawn with the same, if not a little more units. They could split away some units from a scripted army, but not much.
From experience, if I attempt a rapid expansion, I am destined to run into very tough scripted armies that are intended for a lot later. However, if I clean up the town area every time after taking a town or fort, I am usually very ready for the next challenge when the new week's reinforcement joins the army. Blackhole really wants us to clean up those neutral stacks in the area. My mission score actually won't get hurt too much thanks to an ungodly kill/loss ratio.
And don't forget to use the special ability Guardian Angel to absorb the counterattack. This almost feels like cheating.
ABILITIES
What are the good abilities for Anton? Based on what I read and experimented, here comes the wish list. Welcome to experiment different abilities and share with us!
Unit conservation tools
- Reinforcement I, II. Awesome for daily encounters. Currently (v1.1.1) it is bugged so don't use it when the stack already suffers casualty, or you will lose those units forever.
- Heroism, Mass Heroism. A lot of your damage prevention comes from the Guardian Angel special ability (invulnerable for 1 turn), which refills quickly upon high-morale triggering. In earlier missions, the extra morale from the mass version can make a big difference, and you also gain Blood reputation from each shouting.
- Heal and Regenerate. Only used in tough fights. In daily encounters, healing will be handled by Sisters/Vestals (Tier 3) - remember to split them into at least 2 stacks to get better coverage. Mass regenerate could be useful, but Mass heal is not necessary.
- Tactics I so your Marksman can be deployed to a corner, and, along with your Vestals, protected by Praetorians. Later on, you might want Tactics II so your Blazing Glories can instantly slap down two stacks (along with Cleave) to open a battle.
Boss fight buffs/debuffs
- Mass Inner Fire (Fire magic). Very powerful damage buff. Useful for later missions, where you actually have extra mana to spare. You really don't need Mass Stoneskin, as your Might Defense will be godly anyway. (You do lack in Magic Defense, which could be a problem in the campaign final boss fight. But sadly there is no mass buff that improves this category.)
Passive abilities
- Logistics, Path Finding. To speed up the expansion.
- Archery I, Counterstirke I, Giant Slayer, Rampage, Cleave. Increase damages dealt.
- Parry, Resilience. Reduce damages taken.

CREATURES
A Might-oriented Anton has a solid army especially powerful on melee. No particular unit stands out as the primary damage dealer (as they are all pretty good).
Sentinels/Praetorian (tier 1). They are best used as damage soakers, standing beside multiple important stacks to take part of the damages dealt to them. The upgraded variety will join the counterattack if the aggressor happens to stand beside them. They are very solid cannon fodder, but not a high priority if you still have higher-tier creatures to hire.
Crossbowman/Marksman (tier 2) are the only official ranged units for Haven. Being a low-tier creature, its effectiveness is nowhere near the Liches or the Spiders, but when your Might Power gets very high, they again become your damage leader. While suffering no ranged penalty, they don't perform particularly well during castle sieges due to wall shielding. Probably for this very reason, Blackhole robbed the AI of their wall-building ability in most missions. That really feels like cheating! The upgraded Marksman are notorious for hitting friendly units with their piercing bolts. So start them at the front corner of the battlefield. Be very careful while moving around your melee units this turn because your Marksman will shoot quite early next turn.

Sister/Vestal (tier 3). These ladies are the army's primary medics in most battles until your Arache reaches level 4. They are popular gang violence victims, so always guard them with your Praetorian stack (then the AI will very predictably go after unguarded Griffins). In most battles you can split the sisters to 2 stacks for double healing coverage. Vestals' attack could Blind living creatures for 2 turns, which is extremely useful in earlier missions. The success of the Blinding effect is related to the relative stack power - it won't work if they attack a stack much stronger than themselves. They deal magical damage, so don't expect too much from them offensively.
Griffins/Imperial Griffins (tier 4). Thanks to their unlimited retaliation perk, this endangered species is great for soaking up damages. The AI loves to focus on them. So slapping them a Reinforcement II to open up a battle keeps you casualty-free for a long way. (Let them wait first on Turn 1 so they do attract the attacks.) Their Battle Dive also makes them a "ranged unit" every 3 turns, and if you make them wait before diving, they can actually act one more time right after the dive (feature or bug?). Important: Currently (v1.1.1) Imperial Griffins' Battle Dive is broken, so stick with the normal ones. You can still build the upgraded building, just switch to the normal ones when hiring.
Radiant/Blazing Glory (tier 5). You probably remember them from Necropolis mission 1. These ladies can be viewed as ranged units thanks to their teleport and no-retaliation perks. The upgraded version's high movement (8) enables them to hit from very far away. They also cleanse away negative effects on your own units and positive effects on their targets, which will come in handy. Unfortunately, they deal magic damage, so their contribution won't be as big as you wish. But since they go first, you will still see lots of their actions.
Sun Rider/Crusader (tier 6). Their damage is supposed to increase based on how many tiles they traveled until hitting the enemy. However, currently (v1.1.1) only the upgraded Crusader gets the increased damage. Besides, as long as the Crusaders attack after moving 1 or more tiles, their attack does not attract any retaliation. Very powerful indeed.
Celestial/Seraph (tier 7). The angels are back! The make it to the cover again, too! But now that all healing abilities resurrect fallen units, the Angels don't look so necessary anymore. In fact, you should be able to pull through endless perfect victories without them anyway by splitting up the Vestals. In this campaign, you won't be able to even use them until mission 3, and no Seraph until mission 4.
UNIQUE BUILDINGS
Haven towns can build an "advanced market", which is essentially an artifact shop. Six randomly selected artifacts will be put on display every time when a new save file is loaded (cough). This little building gives Haven a unique advantage - we can browse the artifacts as much as we want until we see something worth the investment. Specifically, we are looking for the following top items:
Emerald Yumi Bow (20000, Off hand). This is the "upgraded" Unicorn Horn Bow (which is useless for Haven, by the way). Ignores range and obstacle penalties. Marksmen deal full damage on those inside the wall (although the game still shows you the broken arrow icon). Massive, massive damage! You have to see it to believe it. You probably only need to buy it for mission 2's optional boss, though.
Gauntlets of the Cyclop (16000, hand). +8 Might Power, which is more than any other gloves in the game. Your Griffins, Marksmen, Riders, Praetorians and Angels will all thank you for it.
Ring of Haste (16000, finger). +10 initiatives to units. Free and powerful Mass Haste!
Crest of Honor (16000, pocket). +8 Leadership for more Guardian Angels.
The other unique Haven buildings are nowhere as awesome. Angel Watch seems to only add the extra Guardian Angel gauge within the town's border. The Statue of Revelation has the practical function of revealing some fog of war. But if you are reading this walkthrough, you will know what's in the dark anyway. The Choral of Believers, which gives battle bonuses in the town's border, is too passive. (Those invading heroes will be more like pests than threats.) Finally, the Resurrection Altar, revives only tier-3, -6, and -7 units. The building is more like a "life insurance" package - just in case. Better be more careful in battles and save the cash to buy more units.

Haven Campaign Mission 1
Level cap: 10
Difficulty Index: 2/6
Last updated: December 20, 2011 (patch 1.2)
WALKTHROUGH
Dynasty Traits: The Acclaimed Leader (Iron rank) Dynasty gives +5 morale after a perfect victory, which propels the happy circle of more Guardian Angels and more perfect victories. Another useful trait here is to increase Core creature growth (Iron rank), as the majority of your army will be Core creatures.
Mission 1 is scripted in a very relaxed way for you to enjoy the tremendously beautiful scenery - your opponents will never overpower you if you follow Blackhole's intention. You can use this mission to practice your troop conservation skills for a Might hero. Being a Might hero doesn't mean that you expect to lose units. Try to start the battle with Reinforcement on the enemy shooter's favorite (Sisters, then Griffons), follow up with Mass Heroism, and use the ample supply of Guardian Angel ability to soak up counterstrikes.
 You start in the NW corner of the map in front of Town A. This is a peaceful neighborhood with a few stacks of friendly creatures that will join you either for free or for some affordable prices. You can mouse over them to see if they are "friendly" (willing to join) or not. Flag the Sawmill, pick up the Sisters to the east, and go north to flag the Ore Pit (1). There is another group of friendly creatures just north of the Ore Pit. Before trying to take the next area, there is a small area directly south of Town A, where a creature building can be flagged at (2). You should be able to do this before the end of Week 1.
Next head south down the road with the conflux with your week 2 creatures and take/flag everything on your way. Before the end of Week 2, capture Fort B and the creature building southeast of the fort. You should be able to pick up some Lightning elemental after clearing a Ruin. The elementals are pretty helpful early on. Throughout the campaign, you will have more chances to recruit various creatures by clearing such structures.

After securing your home base, you now have a choice of where to go next. You can either cross the bridge at (3), or cross the river at (4). Blackhole obviously hints you to cross the bridge to the north, because the stack guarding (3) is much weaker than those guarding (4). Also, the enemies beyond (4) are much tougher than you at this point, although in my first run I accidentally ran them over with a Magic Anton (not possible with Might).
Let's follow Blackhole's intention: go north and cross the bridge. The defending neutral stack should be merely Trivial compared to your power. From here, you again have a choice: you can either go east to conquer the Orcs' Fort C and Town D first, or go north to solve the Griffin quest first. It doesn't make a huge difference as both of them are quite easy. Let's pick up the Griffons first since they are more fun to use than the low-tier trio. Head down the stairs at (5).
 The underground area (5') has a few attractions. There is a friendly stack to the east to pick up, a gold mine to the north for flagging, but most important of all, the little mad-or-desperate thieves who stole the Griffin eggs at (6). You also get a lot of Blood/Tear points. (By the way, if you manually fight every fight and frequently use the corresponding Blood/Tear ability, you should be able to reach the first level of Blood/Tear before the mission boss fight.) After picking up the eggs, take stairs (7) to the surface and meet with the Griffons. You get some Griffons to join your army and unlock the Griffin building in your towns.
Completing the Griffon quest also gives you a Might-restricted Dynasty Weapon, the Iron Feather. Since this walkthrough is based on the idea that "increased damage converts to increased healing from Lv4+ Arache", we will not bother with Iron Feather (and this weapon isn't nearly as good, anyway).
BUG ALERT:: A lot of people reported that their Iron Feather disappeared from their Dynasty Weapon list. This also happened to me - twice already! Before this problem is patched (current version v1.1.1), there seems to be a way to make sure any of your new Dynasty Weapons aren't lost: Right after you obtain it, save the game, exit to main menu, go to My Dynasty, and associate this new weapon with a hero. Good luck!
Back track to the underground area and return to the surface using stairs (5-5'). By now you might see a weak Orc hero crossing the bridge (3), trying to invade your territory. Since you likely don't have enough crystals yet to build an Advanced Town Portal in Town A (you might never have to, actually), you can camp a secondary hero with all your new week's growth in the town. The enemy hero is likely to back away from Town A, but go after Fort B. In my game, Anton made his way back just in time to reclaim Fort B before another new week comes.
Let's finish the weaker half of Orcs (Fort C, Town D) now. With all your accumulated units, there should be very little resistance. Flag/collect everything along the way. You can descent from Stairs (8-8') to collect a stats boost, too. The Arena nearby may be too tough for you right now, but you can always return to it later (the neutral stacks in the Arena do grow exponentially like others on the map, so don't drag too long.)
 Now we can cross the river at (4) and take on the stronger half of the Orcs (Fort E and Town F). Be prepared to see two fairly-powerful enemy heroes - these are probably the toughest fights of this mission. If you are just a day or two from getting the next week's growth, maybe it is a good idea to wait for these extra days. Just fight more neutral creatures to pass time. Besides, you might have the rare and exciting opportunity to defend Fort E if the AI thinks he has a chance.
After capture Town F, two gates (Ga) that separate you and the Haven faction are opened. Although you may expect invasions, in my game, I did not see any enemy heroes charging out. The opposing Haven faction has three Towns (G, H, J) and one Fort (I). At this point, the garrisons might be too large to handle. So take a week or two to tour your newly acquired territory, flagging/collecting everything. In terms of mission score, you can afford the extra time as long as you don't lose anything to neutral creatures.
You can also descent to an underground passage using stairs (9-9'). Other than a stat boost and interesting scenery, there is nothing much of interest. You can follow the watery passage to emerge in the enemy Haven's territory at (10-10'). However, you might be better off using the paved road on the surface. When you finally have enough units, you should be able to sweep Town G, Fort H, and Town I in rapid succession.
Almost done. There is one more underground area at (11-11'), where a LARGE group of Marksman waiting to join you. (The friendly stack also grows with other neutral stacks. So the later you claim them, the more you get!) Also around this time, I was able to buy the Emerald Yumi Bow, for 20K. My bloated Marksman stack could one-shot almost any stack from now on, which makes the rest of the battles jokingly easy.
When you are ready, gather all you have and crush the boss defending Town K. He is not particularly powerful. But he will be back.
| Comments (14) |
Page 5 of 23