Walkthroughs
- by Mytical

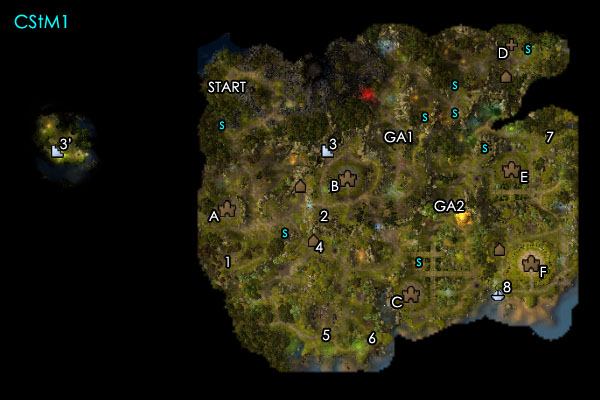
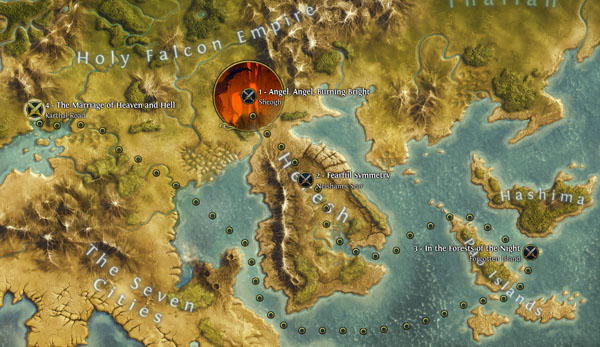
Map 2
This map is hectic, but not near the pain map 4 is. You are pressed for time in the first couple of weeks, and then have to protect your towns. Since there are multiple ways your enemy can reach your towns, this becomes quite the challenge. The good news is, the enemy only out numbers you two towns to 1, and your enemy can not get dragons. There is a pesky inferno town and heroes to deal with, but you should be able to negate them early, and make the town numbers a little more even to boot. Dynasty Traits. Since we need to get as far as we can as fast as we can, I chose the logistics dynasty trait and noble steed. Noble steed only works the first week, but by that time it should become redundant. I also went with first hero free, +3 core creatures/week, and +10% to all sources of gold. The 10% doesn’t help much in the beginning, but once you have a capital in your main town, it really shines.

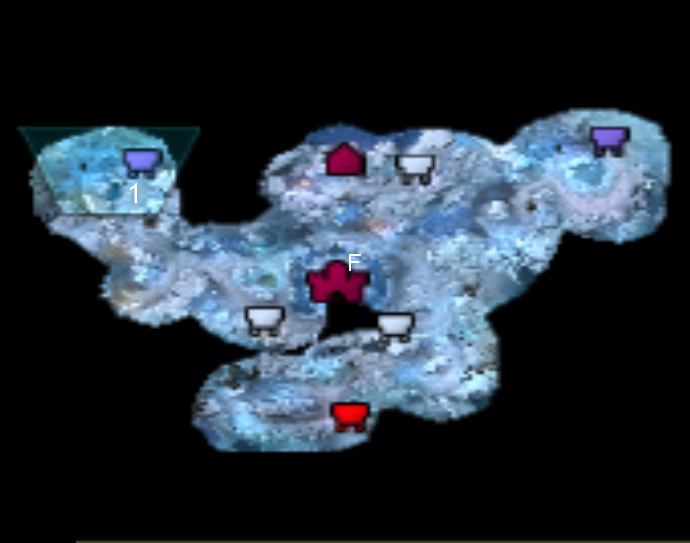
You start out with Town A, and at 1 nearby you get a quest to capture the sawmill at 1 above ground, and defeat the creatures there. Since we really need a sawmill anyhow, it is a good idea to flag it and the ore mine near your starting town. The way to Town D is blocked by some doors, so while you can clear out that area, and claim a gold mine, keep in mind that the creatures blocking your way to the town and the gold mine are a bit tougher than what you have been facing.
At 2 you will be met by Menan, and he tasks you with reaching the dragons at C before anybody else does. Since we plan on doing that anyhow, go for it. You will face three trials. They are not that difficult, and they give you good experience points, so go for it. You will also be asked to decide if you want to back Nightshard (Tears) or Soulscar (Blood)… the following walkthrough is backing the tear candidate. Before you panic, it is a ‘If you are defeated’ question… you are not actually backing either candidate.
When you hit T, you will have to fight some lurkers with a stack of Assassins and a stack of Shades. The quest says you have to kill them before they spot you, but really all you have to do is get past the doors before your stacks become visible... and then kill them. There are no worries there.
Claim Fort B, port in any reinforcements, and rush toward C. Here you will have to fight some Black Dragons, so do that and claim your prize. Not only do you get a few Black Dragons, you get to build the dragon buildings in your towns. You will find yourself back at your starting town, and get a cutscene where 3 doors open.
Start heading south. You will get a quest to train with three Faceless. The Faceless are marked at 3. You will also get a quest to help one of your heroes to get to 4. Claim Inferno Town D and convert it asap. Just a note: often, Inferno will have a hero wandering around, you will have to stop them before you get the quest to purge the Inferno complete.
Keep an eye out for attackers headed toward your towns, but head toward Town E. Might as well have that hero stop at 4 to claim some extra troops, but keep in mind it is a trap... so have your main hero nearby to kill the Inferno troops that appear from nowhere. All that is really left is F, but there is plenty of experience and things to clear out before you go.

| Comments (3) |
- by Mytical
 It is a pleasure to announce that thanks to the sterling work of Mytical, Celestial Heavens now have walkthroughs for the H6 expansion, Shades of darkness.
Available through the walkthroughs link on the top of our main news page, the H6SoD walkthroughs join the rest of the bunch available from the same page. Enjoy! 

INTRODUCTION
Welcome to the Dungeon campaign of the Shades of Darkness expansion. First, let's have a look at some general tips.
Might or Magic?
For the campaign the default is Might, so I stuck with this. The main strategy of the Dungeon is to do as much damage as possible as fast as possible, and Might seems to fit this. So the walkthrough that follows is based on this.
Blood or Tears?
The question here becomes - do you want to do more damage or avoid as damage as much as possible? I went with damage avoidance, as most dungeon creatures are kind of frail. So Tear it is.
"Feign death" = get out of damage free. If you invoke it on a unit, and it gets hit, the damage goes to zero and until that unit's next turn they cannot be targeted except by AOE magic. Useful. "Distract" makes combat so much easier it is not even funny. Range units got you down, pluck this thing right next to them, and by the time they can do any damage to one of your units, you should be in melee range. I do not know if it works vs undead, constructs, etc. (but it does against elementals). So keep that in mind. "Feign death" does fool undead, etc. Also, since I like "Reinforcements" and "Regeneration" it's easier to get Tear points.
Custom or Default Hero?
Stick with default hero or build your own? I like to make my own, so I chose a Might hero with default Enlightenment. Other good choices are Regeneration master, or Abyss dweller - which causes Lurker attacks to reduce stats. I like free skills though, which is why I like Enlightenment. That way you have 6 starting skills, not just 5.
Skill Choices: Now, I am not going to say: "Get this skill at this level", but here are some useful skills.
Useful Magic Skills: Regeneration, Mass Regeneration, Life Drain, Mass Life Drain, Weakness, Mass Weakness.
High Priority Might Skills: Reinforcement I, II, III. Toughness I, II, III. Cleave. Giant Slayer.
Useful Might Skills: Archery I, II, III. Tactics I, II, Counterstrike I, II, III. Pressed attack.
General skills just about every town should get: Logistics and Pathfinding (a secondary hero should follow you around gathering things if at all possible... one with the +20% skill). Feel free to try other builds as this ties up a lot of your skill points.

WALKTHROUGH
Map 1
First I have to say that level 8 feels like too low of a cap for this, but what can you do. Got hero on Hard with this: a Might/Tear Raelag with the Enlightenment specialty (I made a hero, but named him the same as the one they offer). Now I can not draw a map to save my life, and this is just one possible way to go, so ...
If you use Dynasty traits, here are the three I went with. Experience, (forgot the level cap, you reach it WAY before you end the map, so you can substitute here), Movement and the +150 points of racial gauge at the start of each combat (this also is not really needed, so feel free to substitute).
You start at level 5, so chose your 5 skills before moving an inch. I also suggest picking up every crystal off the ground you see.
 You start at A (click minimap to enlarge). There is a door blocking your way north at D. Start by clearing to the left of your starting point, then head north to clear out until you reach the door, and then finally head toward 1. There are some Stalkers at S1, which will start a side quest to pick up a total of 3 stacks of them. Make sure to clear out everything you can before heading up to S2. There is a mini boss here, and an absolutely useless fort. Send the angel packing and head toward 2. You've bypassed the door and when you have a set amount of crystals, you will complete a quest, and get to summon some back up. Head north toward p1. There is a building here which gives you some more assassins, and a one way portal. Remember it, you will be back. Head towards 3.
 At M1, you pick up a few Minotaurs and get a quest to fight a haven army for more, but before we head to do that, there is a portal near the Minotaur that will take you to S3, where there is also an artifact merchant. Hope for something good that you can actually afford.
Once you have done everything head toward P1 (which connects to p1 underground), but you have to fight a mini boss to access it. The good news is you claim some more Minotaurs if you beat him. Hit the portal. Start going towards 4, but clear out the entire area before you climb the stairs. Make sure you have full movement points when you surface at 4. You will get two quests, one of which you will fail. One is to fight, and get Blood points, one is not to fight and get Tear points. Since I went Tear, and since the level cap is easy to reach, I chose not to fight.
At P there is a Sanctuary which you can hide your hero in. If you have Pathfinding, Logistics and the Dynasty traits I suggested, only for 1 day, though. At G you get a cutscene that the portal will open up. There is a Unicorn bow protected by some Haven archers here, I suggest claiming it if at all possible. Then through G we go.
It is impossible to get lost here, as there is only one way to go. You will have a fight, send them to meet Elrath in person, then start heading back to A. Fight or don't, doesn't matter, but just know that you have at least one fight left regardless if you outrun your 3 (yes 3 ... if you didn't kill the two patrols that is) pursuers. At A you will have a fight with a Dungeon hero and troops, but you should be more than a match for them.
- by maltz
 Warning: Wearing over-sized wings could result in unexpected loss of balance and back muscle strain.
 INTRODUCTION
While Epilogue 1 happens on the sky, Epilogue 2 takes place deep in the abyss. The last mission of Heroes6 is actually beautifully designed and well balanced, featuring a spectacular finale and review of the regular campaigns: legions of neutral creatures, decent mini-boss fights with Sanctuary, Stronghold, Haven, and Necropolis (no Inferno - probably because they have been defeated in the regular campaign), and a final boss that surpasses anything else big you have brought down in the game.
 All you need to do is to pick your best Blood character and enjoy the thrill! This walkthrough features Anton (Blood + Might) because I have never seen Imperial Griffins' battle dive (it was bugged before v1.2). Please feel free to try other characters.
This mission is very linear. You have to defeat one faction after another; they don't come together. So this mission is easier than it seems - you always focus on one enemy at a time. You gain powers from taking each faction's well-developed towns, which are quite lightly defended like in mission 1. There will be aggressive heroes hunting you down as soon as you enter, but they are just as week as those back in mission 1.
At the end of each faction's territory, there will be a mini-boss fight that unlocks the next area. While the mini-bosses often carry armies that are above Moderate threat (up to Deadly), none of them should be overwhelmingly difficult as long as you keep a steady pace and waiting for the next week's growth should you find a battle too difficult... to win without any loss.
 A Marksman's dream: all enemies voluntarily line up for a perfect shot during high morale + luck!
Guess what, you will be able to collect Moon Fragments again! However, there is NO Tear of Asha in this mission (feature or bug?). All you get for collecting four fragment is the completed moon disc that enables you summon 3 pheonixes, which is completely useless by the time you get it (unless you use Sandor, you should start a mission with one anyway). The location of the fragments will be omitted from the map.
But even when there is no Tear of Asha, there will be enough towns to give you a gigantic army to fight the final boss. If you don't upgrade all creature buildings, you should have enough resources and gold to hire all creatures.
 Epilogue mission 2
Level cap: 30
Difficulty Index: 3/6
Last updated: December 29, 2011 (v1.2)
Dynasty Traits: Same as the mission 1, first free generic hero (hire another Might hero anyway) is great. You can also go for the campaign-completion bonus trait. For Haven it is +4 Leadership.
You start the mission at the lower left corner (start). Since this is the abyss, you are actually on the upper level. Your main character stands beside Town A, while your side kick hero should spawns beside Fort B. Take out all neutral stacks around Town A, collect resources, and flag the resource buildings on your way out. You can clear the neutrals at (1) so your side kick hero can contribute her/his army to your main hero. South of (1) you can flag a crystal mine.
 Your town is very underdeveloped, but the Sanctuary AI's towns are very well built. To harvest AI's towns as soon as possible, you can use your income and loots to hire generic heroes, and combine their army (shooters preferred) with your main hero. Your first enemy is Sanctuary, who owns a few towns and forts to your north.
If you have a good magic hero, it is possible to venture into the Sanctuary territory in Week 2, defeat a mobile Sanctuary hero, and take Town C. Otherwise, you can clear your own areas first, wait for more creatures, take Fort D first, then go east to grab Town C. From here it will be very straight forward - take Town E to the north and Fort F further north. The first mini-boss of the mission, a familiar face, is located in front of the stairs at (2). He does not move, and he will wait for you to outgrow him.
Note: Your Realm-ability expert secondary heroes can convert towns at discounted resource and gold, too. Besides, converting forts (v1.2) has now become a decent investment - you start breaking even after 15 days or so even (slightly better than buying gold chests artifacts).
After taking all towns and forts in the Sanctuary territory, take some time to clear every neutral creatures on the reachable upper level. Don't challenge the mini-boss until you have run out of things to do. Even if you can marginally beat this boss, in the next area an even more powerful hostile hero will come to you shortly. So take some time to load up your character with battle and weekly bonuses. Handle the mini-boss and use the stairs (2-2').
Your next opponent is Stronghold on the lower level. In my game, there was a hostile hero coming at me on the second day from the south. The Stronghold territory also consists of a few towns and forts - Fort G, Town H, Town I, and the mini-boss' Fort J. Grab Fort G as soon as possible to give yourself a basic town portal destination, and flag the Warpath Lodge (W) in the dead-end area to the northeast.
Your next goal is to take Stronghold's Town H to the south. Feel free to skip encounters on the side of the road - you will have the time to come back for them later. By the time you reach Town H, it should have been fully built. Interestingly, I did not have enough resources to convert Town H before a new week arrived, and I received a scripted 7-stack Stronghold army meant for the AI!
 The nice things about Stronghold towns is that you can buy artifacts before converting them. (If you are Haven or Sanctuary then you can build the Advanced Market anyway.) Definitely look for the Emerald Yumi Bow, the Ring of Haste, the +8 Leaderhip and Destiny accessories, and any part you lacked. Another interesting find is that the Warpath Lodge in stronghold towns are independent of the Warpath Lodge you flag on the adventure map. In my game, at one point I gained +8 movement points per battle! Anton had some very, very long days.
Local attraction: there is a ruins south of Town H at (3). It gave me 200 Dark Elementals at (4)! They are very helpful before I eventually replaced them with Celestials close to the end. With the reinforcement, go after Town I and disable the Stronghold faction for good. Now you have all the time to come back to deal with neutral stacks.
When you have done everything on this lower-level area, you should be ready for the mini-boss fight. Load up your main hero with units and battle boosts. Take stairs (4-4'), (5-5'), and eventually (6-6') to the upper level. In this small area you can challenge the quite-powerful Stronghold mini-boss guarding Fort J. There is also a second Warpath Lodge (W) to flag.
After you defeat the mini-boss, the first barrier is lifted. You can go back to Town I and use stairs (7-7') and (8-8') to advance to the next area.
Your next opponent is Haven, controlling Town K on the lower level, as well as Fort L and Town M on the upper level. The two areas are connected by stairs (9-9'). The Haven mini-boss in front of Fort L, and he is also dormant. However, as you can expect, there will be at least one hostile hero coming at you.

By now you should be mighty enough to handle the town garrisons and mobile heroes with ease. Clear the area except the mini-boss. Then wait for your new week for more units, and visit as many battle boosts as possible. This mini-boss is the most difficult so far! (Too bad, can't fight Jorgen as a faceless). If you received another a stack of creatures back in the ruins at (3), leave them in your town. You will get a good group of upgraded top-tier units after this fight.
After Jorgen is defeated, the second barrier is lifted. Return to Town K and use the stairs (10-10') and (11-11') the enter the next area.
 Your last opponent is Necropolis (so you might want to adjust your weapon and equipment), controlling Fort N, and, after stairwell (12-12'), Fort O, and Town P. This is largely a linear area, with the exception of a small dead-end south of Fort O harboring a creature building. Same routine here - beat a mobile hero and take everything from them!
The immobile Necropolis mini-boss guards the final stairwell at (13-13'). So you know what to do - after taking all the forts and towns, visit battle boosts and wait for a new week's growth. The mini-boss looks menacing, but should go down pretty quickly. You can always wait for another week if you don't feel comfortable.
Now there is no other enemies except for the final boss! Your army should be more than enough to defeat it. But hey, feel free to wait for a kick-ass army and visit more battle boosts. This is the last battle of the game, so you may as well be as powerful as you want!
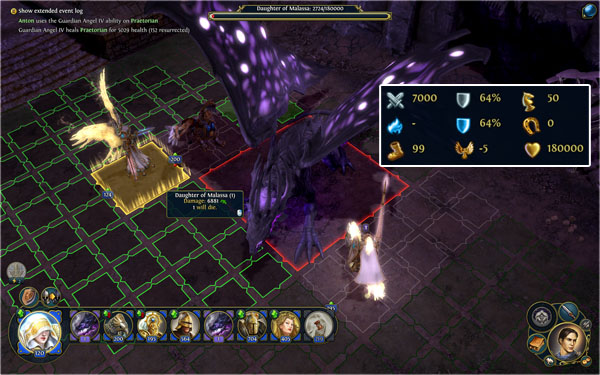
Final Boss: Daughter of Malassa
 180K hit points - the "healthiest" boss! The dragon has 99 movement points, but it does not move. Instead it uses a powerful ranged breath attack that shoots out like an Imperial Griffin's battle dive. So don't line up your units to let the breath hit multiple targets at once. You will receive an achievement if you always avoid the breath to hit multiple targets (it is ok to let it hit a stack protected by Praetorians, though). The breath also temporarily disables the target stack's special ability.
Otherwise, just cast your best mass buffs and keep swinging at the boss. She is a living creature, so Life Drain works on her. There is nothing to hold you back!
Congratulations for truly finishing the Heroes6 campaigns! I hope you had a great time! Let's wait and see what Raelag will do to eventually make him Agrael in the expansion. :D
| Comments (8) |
- by maltz

Welcome to the Epilogue. This mini-campaign contains just two missions, but they are not connected to each other. You have to pick one of the five main characters from the regular campaign. A Tear character plays mission 1, while a Blood character goes through mission 2. (So too bad you won't see all of them appear at the same time like in Heroes5). You can think of the setup as "alternative endings". Hopefully you have at least one characters of each path so you can enjoy both missions.
 This walkthrough will use Irina (Magic + Tear) in mission 1, because I think she is the most versatile among the three Tear heroes I have. However, you are welcome to try other characters. This mission is not so difficult that only the best Magic hero can pass. This is a mission 5 with mission 3 enemies. Besides, to make sure you don't wait forever to make a powerful army to fight the final-final boss, Blackhole again dropped a Tear of Asha to be found by the usual routine of collecting four moon disc fragments.
Mission 1 mostly takes place above the clouds with pieces of plateaus connected by portals. You know it is high when the fog or wars are all white! You are against very aggressive Angels, who usually rush straight to you as soon as they can. So whenever you reach a new milestone, be ready for another fight.
Luckily, none of the regular angel heroes are too tough. I don't remember seeing any hero, or any scripted army inside a town that has any 3-digit stack (it probably will if you wait long enough). After you defeat an angel hero, it is a good idea to rush forward to take their home town, which should be very well developed. Steal them!
Warning: Since this mission is very easy, it is possible to over-achieve and trigger the forced final boss battle too early. Please refer to the walkthrough below for how to avoid this.
 Epilogue mission 1
Level cap: 30
Difficulty Index: 3/6
Last updated: December 28, 2011 (v1.2)
Dynasty Traits: Again, free first generic hero at this level is a great trait. Hire yet another Might hero (for +1 Wood and Ore per day) as soon as possible anyway. You can also experiment with the campaign-completion reward Dynasty Trait. For Sanctuary, it is +2 Might Power and Defence. Budget will be tight in this mission, so don't get any growth bonuses.
 You start the mission in the bottom left corner (start). The first goal is to get you a town to work on. Visit the stable and follow the road east. Defeat and collect everything - you need some building materials to jump boost the town when you get it. There won't be any sawmill or ore pit for quite a while.
In my game, by the time you get close to the first portal (1), the first enemy hero already found Irina. This hero might carry some artifact you can use. While you have a small army, these heroes are nothing of a threat. Use the portal to get to the east side at (1'). Head straight west to claim your first town, Town A, and come back to collect the resources in this area.
To your west, the road branches to north and south. If you are confident with your hero build (such as an ass-kicking Tide Master), it is better to go north. If not, it is better to go south first to allow your army an extra week to grow.
Let's discuss going south first. Going south enables you to flag a Warpath Lodge (W), which greatly accelerates this mission. There is another one to flag later. Continue west to enter the two-way portal at (2-2'). You will arrive at one of the small plateaus northeast. Here you can collect the first Moon Disc Fragment (MF).
 When you go north from the branch point, you can take over a very lightly defended Haven Fort, Fort B. This also triggers the counterattack of another angel hero, whom may carry some artifact as well. Get rid off that and clear the nearby area. You can collect the second Moon Fragment here.
When you are ready, push further north to conquer another very weak (and underdeveloped) Haven Town, Town C. It looks like this town is of utmost importance as all the huge paved roads are leading to it, and your intuition may tell you to build an advanced town portal here. Not so fast. There will be three more towns like this. This town is actually the least developed among all. Soon you will take something much better that already has the advanced town portal built for you.
After you take Town C, don't wonder off too far. In my game, two angry Angel heroes came after me, but they are not really difficult. After defeating these two waves of counterattacks, the Haven opponent becomes quite dormant (you can notice that the AI barely think during their turn.) At this point you are free to explore in any directions. Now let's look at the general layout of the map.
 Plan A: Tear of Asha. There are two portals, (3) and (6), one on each side of Town C. Through these portals you can collect the remaining two moon fragments through them, and control some mines to finally give you some (poor) resource income.
Plan B: Sacred Kirins and crystals. There are three Forts north of Town C. If you take just one on either side (Fort D or Fort E), the game rewards you with a nice group of Sacred Kirins and a large number of crystals. Sacred Kirins' movement may be nerfed by patch 1.2, but their special attack is extremely powerful (especially for a Magic hero). But don't get too excited...
The final boss fight is triggered A WEEK AFTER you take the middle Fort, which is defended by some mediocre garrison (nothing like you have seen in Necropolis and Sanctuary mission 4). So it is very easy to accidentally take it and trigger the final boss fight. Leave it for the last!
Plan C: Steal two fully built towns. There are two Haven towns, Town F and Town G, one on each side of the central forts. The AI builds them up very quickly, but don't really have enough units to properly defend them. If there is nothing left to build, who cares about having no Wood or Ore?
 Thank you, AI!
It sounds like all of the above are top priorities! So let's do a bit of everything - Plan D: all of the above. After defeating two invading angel heroes around Town C, head west and use the portal at (3-3') to get to the western plateau. Collect the third Moon Fragment (MF) and take Fort H. Ship the new week's growth through Fort H, and use the portal (4-4') to emerge just south of Town F. Take Town F.
 From Town F, head east and take Fort D to receive you Kirin and crystals. Use the portal north of Town F (5-5') to clear the northwest plateau and take Fort I and some more resource buildings.
Come back to Town F. Travel east to take Fort E (skip the central Fort L). Continue east to take Town G. Sweet! Go south from Town G and use the portal (7-7') to get to the eastern plateau. Go west to take Fort J. Pick up the last Moon Fragment (MF) southeast of the portal, and have a secondary hero to pick up the Tear of Asha (Tear) west of Town A.
If you use the portal in the middle (6') of the eastern plateau, you will return to the east of Town C (6). Instead of leaving this eastern plateau, continue south to use portal (8-8'). This brings you to a small plateau to the northeast, where you can flag the second Warpath Lodge (W).
 Return to Town G and use the portal to the north (9-9') to bring you to the northeast plateau. Go northwest to take Fort K, and go south to use the portal (10-10') to sweep another small plateau to the west. You can access an artifact merchant there.
Now you can sit and develop for a while. Use your secondary heroes to pick up resources left on the ground, and if you are Haven, Sanctuary, or Stronghold, buy some artifacts if they are better than what you are using. Don't bother upgrading all creature buildings - you probably don't have enough gold to buy all the creatures anyway.
When you feel "almost" ready to fight the final boss, take Fort L in the middle. The gate to the north should be open. Now you have 7 days to prepare for the final fight. In the meantime, you can challenge the final Haven town in the north, Town M. It should not be difficult at all at this point. If you still have extra days, send your main hero to visit as many one-time battle boosts as you can. I recommend the area around the first portal (1) (which should be a short trip from Town A).
When the seven-day counter is up, Michael shows up and the final fight automatically begins. (Before that, you can actually see an invisible Michael on the expanded world map as a yellow creature dot just north of Fort L).

Final Boss: Michael and Escorts
From the numbers, Michael does not look as tough as Uriel. His Might Power is only 7750. He has only 100K hit points. But like Uriel he is also escorted by guards - 10 strengthened Light Elementals. Good for Tide Master Irina, one wave of Tsunami and they become 10 dizzy and disabled Light Elementals.
But that did not really disable them - they serve as Michael's blood bank. All damages on Michael are transferred to the guards and evenly distributed among them. Each elemental has 10K HP, so that gives Michael 100K extra HP. When that 100K extra HP runs out, all guards die instantly.
Michael does not really have a powerful special attack. Since he uses Might Power, you can cast Mass Stone Skin to make Michael's attack miserable. Cast all your best mass bluffs, keep attacking, and Michael should go down fairly quickly. Congratulations!
Note: There is an achievement that requires at least 4 minions to live when Michael goes down. I don't see how this can be possible if Michael's initial damage taken is transferred to his minions. Maybe the damage transferring will stop after a few turns?
- by maltz

You must have been waiting for the battle from the loading screen! But we have some work to do first - how about gathering 500 Blood Crystals? Sounds like it will take forever... it probably will.
 You can accelerate the process by flagging as many crystal mines as you can (6 mines in total), collecting/buying the artifact Crystal Eyeglasses (+1 crystal per day, 2 on the map, I found one in the Advanced Market), and of course trade Wood and Ore for Crystals at the best exchange rate. Soon after you accumulate 500 crystals, the way to the boss will be force opened. However, it is probably your best interest NOT to rush to this day too early.
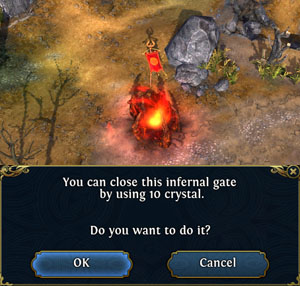
The AI again one-way portals heroes to you right inside your home territory. This time, they arrive through two pairs of one-way portals as well as Inferno Gates. Like before, you can stop the invasions from the portals by taking the Towns that controls the portals' entrance. You can also stop the invasions from the gates by paying 10 crystals to close the gate before an invasion takes place.
In general, this is a very easy mission - a mission 4 with mission 2 enemies. So don't feel too much pressure. Enjoy the life of a hoarder!
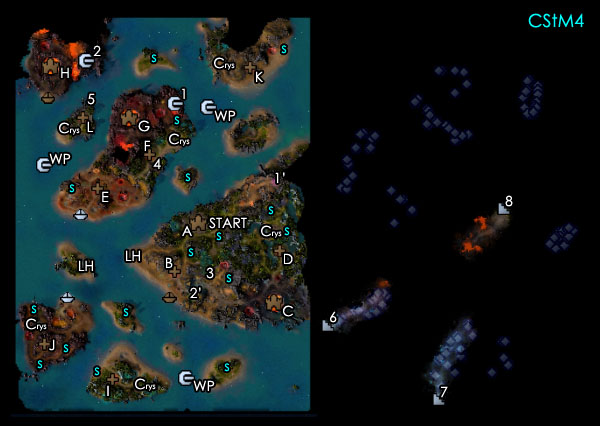 Stronghold Campaign Mission 4
Level cap: 30
Difficulty Index: 2/6
Last updated: December 26, 2011 (v 1.2)
Dynasty Traits: Again you don't need any economic bonus except for free first generic hero (pick a Might hero for +1 Wood and Ore per day - buy one more anyway). The +3 movement bonus is great, too. If you have the third trait slot available, consider a crystal-related trait such as Merchant (better market exchange rate for crystals, maybe you can achieve 1-to-1 exchange rate from Wood and Ore?) or Perfectionist (buildings uses 1 less crystal).
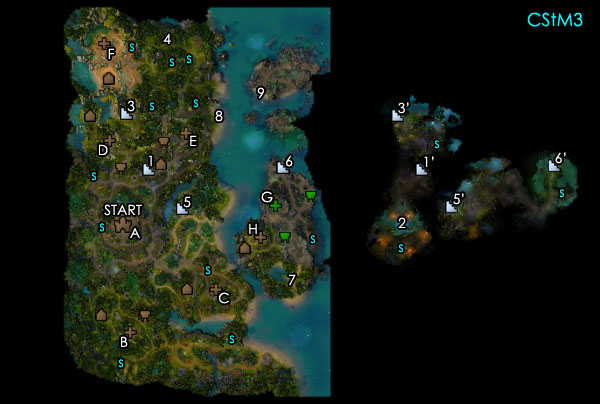
 Sandor starts the mission with a very well protected Town A on the biggest island. Don't worry about saving crystals early on - the top priority is always to develop and expand. Flag the buildings nearby (the Sawmill and Ore Pit is to the south and east).
If you go all the way east, you can see the exit of the first pair of one-way portal (1'). One way to delay the demon invasion is to pick up all resources around the exit of the portal as quickly as possible, so any weak AI's hero won't accidentally step over to collect resources (and awkwardly can't go back). When I picked up the resources immediately, I never had any invasion coming this way. However, if I left resources beside (1'), I saw an "invasion" almost immediately. But still, it is a good idea to build an Advanced Town Portal in Town A as soon as possible.
Your side kick hero starts the mission on the sea north of Town A. Let her sail southwest first and flag a pair of Light Houses (LH) - you might need Sandor's help to flag the one on the main island. Ship the side kick hero's units to Sandor so she can explore faster. There are three Whirlpools (WP) on the sea. Entering one will randomly transfer your hero to one of the other two Whirlpools. There is no enemy hero on the sea - the exploring team is completely safe.
Note: If you hire a generic Might hero and fully load him up with Realm abilities, you should be able to see resources still hidden by the fog of war. This provides valuable scouting information about where islands are, as well as where to go to collect unguarded floating resources.
 Head southwest to take over Fort B from the Inferno player. To the east you can see the exit of the second one-way portal pair (2'). Unfortunately, if the AI decides to come from this portal, they can take Fort B on the same day, and you will have to convert the local creature building back to Stronghold. In my game, there was only one (very weak) invasion coming this way (during the second month).
When you feel powerful enough, break into the Necropolis vault at (3) to receive 50 crystals - WOW! These crystals actually serve an important purpose early on. Around the 3rd week or so, you should beginning to have an Inferno Gate popping up in your territory at the beginning of a turn. The game will show you exactly where the gate is, so there is no way you can miss it (unless you went for a washroom break after hitting end turn).
If you ignore the gate, I guess eventually the invasion will come. There is a very simple way to close those gates - march any hero to the gate and pay 10 crystals. In my game, I almost always reach the gates on the second day after its appearance, and there was never any invasion. There is one new gate about every week. The lump sum 50 crystals from the vault (3) will make sure you don't run out of crystals for some time.
 Now let's unite all towns and forts from the main island. Sandor's next target is Town C to the east, and then Fort D to the north. Both should be very easy. North of Fort D is the first crystal mine (Crys) in this mission. There are five more. The Arena there could be a little too tough, but you can always come back later for it.
Whenever the main island is safe, you can send Sandor on the sea to conquer some Inferno towns and forts. Your first target should be the island to the northwest, with Fort E, Fort F, and Town G. Why? First, there are 50 more crystals to be collected from a ruin southwest of Fort F at (4). Second, by controlling Fort G, you also permanently stop potential invasion from the first pair of one-way portal from (1-1'). These fights should be quite easy.
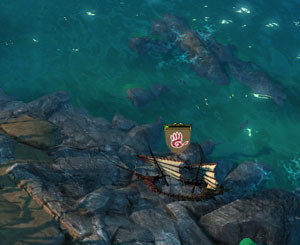
If you feel adventurous, you can try to put the end to the invasion from the second pair of one-way portal. The entrance of that portal is at (2), to the very northwest end of the map, beside Town H. Before you get to Town H, you can complete the only secondary quest - the "sunk" ship is located at (5).
If you find Town H too hard, simply come back later. There are lots of islands to conquer and to flag crystal mines in the meantime. Southwest of the main island you can take over Fort I and Fort J. Each of the islands contains a crystal mine. To the northeast corner of the map lies Fort K, where you can flag another crystal mine. Just south of Town H is Fort L - yes, another crystal mine. None of the forts are heavily guarded. This is another mission 4 with mission 2 enemies!
 Sandor: "What do you mean there is nothing left to do... Go out and reveal the fog of wars at the corners!
Eventually, you will have killed and collected everything. The Orange inferno cease to exist, and all demon gates are promptly closed. There is nothing else you can do but to wait. In my game, I did everything I could in the middle of Month 2. Fortunately, I only idled for a few days before the next interesting thing happened.
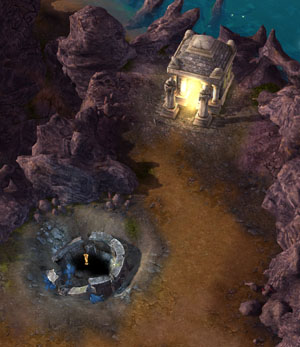 When your crystal count reaches a certain point (roughly 300), your crystal mines will collapse one after the other, starting from the one north of Fort J. The collapsed mine serves as a stairs, leading to a narrow, dead-end underground passage. The first passage north of Fort J leads to (6). You can pick up about 20 crystals from the passage (there are no enemies in these passages). The next crystal mine to go is the one east of Fort I. This leads to the underground passage at (7).
In my game, I accumulated 500 crystals right after the second mine collapsed. I guess if you don't have enough crystals, the game will continue to collpase the mines until all six are gone. The map above shows the resource indicators of the underground area - more passages and crystals are certainly there.
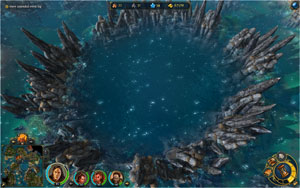
When you finally have enough crystals, the final passage leading to the boss will open - in a place you least expect (and least prefer). That's why you don't want this day to come too early. Load up everything you have, let Sandor visit as many battle boost as he can, bring another hero, and get down there! The final boss is at the end of the central passage (8). The use of the secondary hero is to remove the nasty tiny neutral stack just before the final boss, so Sandor gets too keep all his one-time battle boosts.
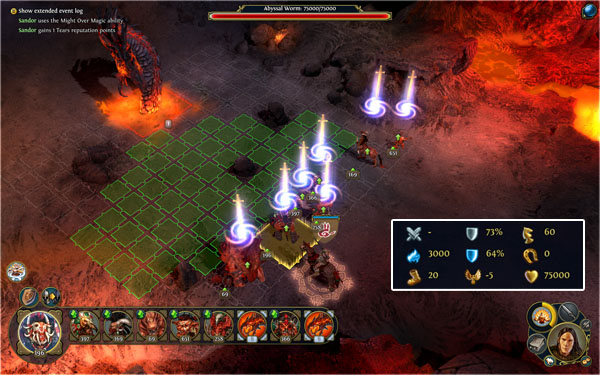
Boss: Abyssal Worm
Hm, yet another boss with 75000 HP. The worm behaves like a chicken - it escapes to a seemingly random place whenever you melee attack him (but the retaliation will still deliver). It uses fire-based magic attack. You can greatly reduce the damage with the Tear ultimate "Might over Magic". Otherwise just slap Mass Life Drain (or equip Arache), your best attack buff and hack away! If you feel naughty, you can cast Weakness on the boss to cut the damage by half. Anyway, the boss should go down quickly.
That's the end of the Stronghold campaign! If you have followed the default campaign order from left to right like me, congratulations on your To the Bitter End achievement. See you in the Epilogue!
| Comments (6) |
- by maltz

Finally, you can upgrade units; but you have to earn them one by one. This mission has a very unique design - you will only have one town from the beginning to the end, while your opponent has zero. You do not grow powerful by building up your only town. Somehow, the walls still don't give any growth bonus!
Instead, Sandor recruits his army by gathering a large number friendly stacks on the map. There is actually a quest that requires you to collect 40 stacks, but in reality you can pick up even more! It does not have to be Sandor to do the recruit. So hire your secondary heroes and send them out in multiple directions!
While Sandor's army expands like a balloon, you will have plenty of frustration. The script spawns a seemingly endless stream of weak invasions. You won't have any problem to win perfect victories against them, but they just keep showing up when Sandor is busy far away. The mission won't end until the scripted invasions run out. Once you defeat that last hero, the mission is won.
 Stronghold Campaign Mission 3
Level cap: 24
Difficulty Index: 2/6
Last updated: December 26, 2011 (v1.2)
Dynasty Trait: Growth bonus does not matter here. The +3 movement trait is definitely great, while you can opt for some battle-oriented trait. I doubt whether the Hunter trait (+50% movement while seeing an enemy hero, Gold rank) works here. First free generic hero will help at the beginning, too.
 Sandor starts the mission with a fight against a familiar Sanctuary hero. The fight is not particularly difficult - but to keep a perfect record, it is better NOT to deploy the Cyclops. It is really hard to heal them (as their actual health does not decrease until their turn comes up). Even if you win this fight without any loss, Sandor will continue the mission with a lot less units. No worries though, he will soon get that number back.
Let's discuss the general strategy of the mission. The Sanctuary AI will keep spawning heroes to invade you randomly through one of the whirlpools on the sea. My end-game record shows that I fought a total of 16 heroes. The invasion comes almost every week, although in some weeks there could be 2, even 3 waves.
The invasions are largely unpredictable. Your top priority is to gather the free units. Send your secondary heroes in different directions so you can speed up Sandor's growth. This mission can be really a breeze if you can quickly pick up a lot of units. When you have enough crystals or resources to trade for crystals, build an Advanced Town Portal in Town A. This will make your life a lot easier. Later, you can also build a Warpath Lodge in Town A, which should speed up Sandor's advance by quite a bit.
There are four general directions you can go from Town A. The north is more difficult than the south, so it is better to send Sandor to the south, while letting a secondary hero pick up the north route's free units. Whenever you reach a Red Stronghold fort, you will be able to unlock one of the upgraded units, and the fort joins you automatically. Here comes the list of creature upgrades and their locations:
Fort B: Centaur - Marauder
Fort C: Goblin - Goblin Hunter
Fort D: Jaguar Warrior - Panther Warrior
Fort E: Mauler - Crusher
Fort F: Cyclops - Enraged Cyclops
Fort H: Harpy - Fury
After you unlock the creatures from Fort B and Fort C and collect the creatures in these two areas, you should be powerful enough to go north. You can unlock Dreamwalker - Dreamreaver by going down the stairs at (1-1'), and talk to the Dreamreaver at (2) (no Fort involved). Before you leave this small underground area, there is a stat boost (s) south of the pool.
 Break through the undead border garrisons, unlock the creatures at Fort D and Fort E. There is another small isolated underground area accessible from stairs (3-3'). Continue north to claim Fort F. Collect all friendly stacks in these areas as well. In my game, three Sanctuary heroes spawned right after Sandor claimed Fort F.
East of Fort F you can pick up a rare "Golden Egg" at (4), which after a few weeks will hatch into a Golden Goose that yields 2000 gold per day. You can leave the hatching job to a secondary hero - just keep the egg in the hero's pocket for warmth. There is an artifact merchant east of the Golden Egg.
After defeating the next wave of invasions, you have several precious days to claim the last upgrade. Get down the stairs at (5-5') and follow the underground passage east. You should receive a quest from Sandor's mother. Return to the surface with the stairs at (6-6'). Follow path south, and you should see a Necro fort. (This guy is the boss of Sanctuary mission 3.) Now they are actually your ally, and you can't do anything to them. They don't do anything at all, either.
 Is it my eyes or... the tent on the left needs a bigger texture file.
Keep going south then west so you can claim the last Fort - Fort H. Finally you have all seven upgrades! To complete Sandor's mother's quest, go east from Fort H and turn south to (7). Give the quest item to the Sea Dragon "Hai Ryou" (which is exactly "Sea Dragon" in Japanese), and use any hero to talk to Sandor's mother in front of Fort H. Done! If you want to earn Blood points, though, you fight the Sea Dragon instead. Either way, you get a Tear of Asha for your (lack of) effort.

Optional Boss Fight: Sea Dragon
How did the Sea Dragon come to this inland lake? There are actually two achievements associated with this Sea Dragon. You need to defeat it in 10 turns, and defeat it for "slaying a dragon".
The sea dragon only has 75000 HP. Its special attack freezes stacks, but is not particularly powerful. Since you have collected hundreds of units in each stack, this fight should be over very quickly. There is not really any strategy involved. Put on your Arache or cast Mass Life Drain and hack away!
 Too much time and nothing to do... how about tracking down a hidden Ore under the bush?
 Or sailing on the rocks?
 By now you have probably completed all quests except for the primary - to defend Town A. There should be a few more heroes on their way, so you can take some time visiting missed stat boosts.
There is a shipyard at (8), where you can build ships to pick up resources from the sea, and fight some more enemies on the island at (9). I thought the mission boss was on this island. But there are not many interesting things on the island.
When the last invasion finally arrives, the game will assign you a new quest - the boss is the same hero, whom you fought at the beginning of the mission. In my game, the last invasion came at the beginning of Month 3, right after I cleared the last neutral creature on the map. I hope clearing neutral creatures is not necessary, as tracking down every boring stack guarding nothing important in the middle of nowhere is really sleep inducing. Well, the final invasion is not really more exciting... but thank father sky and mother earth it is over! (Unfortunately, the same feeling will come back in the next mission.)
| Comments (10) |
- by maltz

The struggle between the slaves and slavers is not over yet. In this mission, Sandor sets sail to the Pao islands to establish his name among the Orcs. Depending on your path of Blood or Tear, you will be battling different opponents for the first half of the mission. You can also earn different Dynasty Weapons:
Sword of Whistlebone (Might) - Tear path
Thunder Staff (Magic) - Blood path
Malathua's Cleaver - both paths
You can hire all seven tiers of Stronghold creatures, but you can't upgrade any of them. Also, in my game, there seems to be a discount on creatures' weekly growth - the walls don't give the +creature effects. Nonetheless, this is an easy mission so it doesn't make a big difference. Also, you will be able to hire a lot of heroes cheaply (probably as soon as you defeat them).
Note: By the way, you might read about a serious "Tear path" bug online. This bug has been fixed by patch 1.2. So there is nothing to worry about now.
 Stronghold Campaign Mission 2
Level cap: 17 (best guess)
Difficulty Index: 2/6
Last updated: December 26, 2011 (v1.2)
Dynasty Traits: Since you still can't hire upgraded creatures, you are destined to have a lot of gold and resource leftover. So again you can skip economic bonuses and go for the movement and battle bonus, and the traits that will let you spend more gold - creature growths.
 Some of the islands on this map are divided by mountain ridges in the middle, so the map above shows the territory boundaries. At the very beginning of the mission, Sandor has to fight a very brief and easy battle consistent with the cut scenes in Sanctuary mission 1.
Then Sandor landed in the southeast corner at (start). Collect resources and follow the road south and west. Don't worry about the branch roads - there is nothing valuable, and you will be able to come back later. Cash all chests since there is a group of Centaurs for hire at (1). Continue the road west and you can trigger the story at (2). After the cut scene, Sandor is transported to Town A to the northwest.
Depending on your Sandor's Blood/Tear alignment, you have to fight different enemies. As this walkthrough follows the Tear path, Sandor's objective is to defeat the Red Stronghold faction that controls Town D. (If you follow the Blood path, you have to defeat the Yellow Stronghold faction that controls Town F.) The Red and Yellow Orcs fight each other fruitlessly around Town E. They both have literally thousands and thousands of resources (see picture below). The island of Town E will soon have its beach full of abandoned ships.
 Sandor: "My dear ally! I have some gold to spare! Let's see what you have. You have... 1240 wood, 1270 ore, 635 crystals, 647600 gold... (cry)"
The game gives Sandor four months to defeat the Red Orc faction - that's a lot more than enough. Take your time to clear the surroundings of Town A, flagging the Sawmill, Ore Pit, and Crystal Mine (in the east). You can also flag a Lighthouse at (3). There will be lots of sailing in this mission, and this is just one of the three Lighthouses in this mission.
 After you run out of things to do on the island, take the free ship on the beach and sail south. You should be able to capture Fort B very easily, and flag the creature building southwest of it. There is nothing you can do to the pointless hand-changing on the other side of the island yet.
Your passage to the outside world is the Whirlpool at (4), but don't go for it yet. Southwest of the Whirlpool is Fort C, where you can flag a Gold Mine, a Lighthouse, as well as visit a stats boost (s). If you have not done so, you can hire a secondary hero and build a ship for him/her to collect resources on the sea. Just like the Sanctuary campaign, there are lots of goodies on the sea.
After finishing all businesses in your backyard (Town A, Fort B, Fort C), collect all your creatures and go through the whirlpool at (4). Sandor should appear at the whirlpool close to the center of the map at (4'). Sail northeast all the way, pass the crater-ring (unfortunately, you don't fight any epic sea monster in this mission), and land on the northeast island where Town D is. The path to the town is blocked by a closed gate. The Red Orc sends its weak invasions with the one-way portal of (5-5').
 In order to open the gate to Town D, you have to release three groups of slaves (SL) working at blood crystal mines. Their guards are all very weak, so there shouldn't be any problem at all. Upon releasing all slaves, your ally at Town F joins you unconditionally (but she does not bring any of her mountain loads of resources). And you should have a very easy time defeating the quest hero in Town D. In my game, this hero charged at Sandor during his turn, and was crushed even on auto-combat. Now how many months did you take to accomplish that? Less than two, or even one? Your reward for finishing this quest is a Dynasty weapon (a different weapon if you walk the Blood path).
You might still need to take Town E from the Red Orc if it happened to own it at this time. It is probably completely undefended, so even an army-less secondary hero can do it. However, upon the completion of your secondary quest, the Orange Orc (Sharka) awakes, and will start invading you through the two-way portal at (6-6'). If you own Town E, chances are that the first invasion will head straight to Town E. Later on, you can portal a bunch of cheap secondary heroes to Town E and enjoy the free ships. There are so many things to collect from the sea.
 The second half of this mission is to slowly take over the remaining towns and forts while minding the periodic, weak invasions from the Orange Orc. Town G will join you when Sandor goes over after the Red Orc is defeated. This also unlocks the tier-6 creature building (Jaguar Warrior). When you have Jaguar Warriors in the army, the AIs will ignore the Centaurs and instead target the Jaguar Warriors, so your Reinforcement II should go to them.
You can unlock the tier-7 creature building (Cyclops) by heading to the cool-looking Cyclops hero at (7), just northwest of Fort H. You can get there either by sailing or walking from Town G. The Cyclops army that challenges you is extremely weak especially considering how much progress you have made at this point. After the battle the Cyclops hero walks away - maybe he will join Sandor on the Blood path?
 Unfortunately, the Cyclops creature building is a very bad investment in this mission. First, they are very expensive. Second, you can't upgrade them, so its growth will be shamefully low (1 per week per town). In my game, this mission was over a few days after I finally had 10 Cyclops (solving this quest already gave me 3). Just spend the cash to buy the best artifacts.
Now you can take some time to clean up areas that you think might contain useful artifacts and accumulate some EXP. This mission's creature stacks are all quite small (a mission 2 with mission 1 enemy), so it is likely that you can't see the level cap by the time it ends. There are two Shrine of Seven Dragons (SD) you can pay to level up. The first one is just north of the crater. The area surrounding Town G is also very disappointing.
When you have finished all businesses here, gather all your army and pass the two-way portal at (6-6'). You can quickly conquer Fort I from the Orange Orc. There are three more stats boost in this area - two on the same island, one on the small volcano island to the northeast. You can use a free ship waiting for you at (8).
Soon you will again run out of things to do. One more enemy left - Sharka. So march everything you have to Town J and finish him! Enjoy one more Dynasty Weapon!
- by maltz
INTRODUCTION
Welcome to the Stronghold campaign! In the not-very-distant past this was the "Might faction", then the Orcs who can't cast magics. Thanks to Heroes6's theme, the Stronghold faction is just as magical as any other factions... or is it? Just look at Sandor's overgrown muscle! (By the way, I used to wonder how come Sandor is the owner of the "Staff of Sandro"... didn't look at the spelling too carefully.)

PLANNING
 While every other faction have two magic schools that they can't learn (for example, Necropolis cannot learn Light and Fire), Stronghold is able to cast magics from all but one schools. Unfortunately, Stronghold's magic shortage happens to be the most powerful Prime school (featuring Heroes6's Ace and King of magics: Time Stasis and Meditation). Having one extra magic school is offset by the fact that a Stronghold hero will have some trouble keeping up with mana. Besides, five out of seven Stronghold creatures use Might Power in their attack, so a Magic hero will struggle with limited damage with limited mana.
On the other hand, a Stronghold magic hero's special ability is a little more versatile than a Stronghold might hero. The idols can serve as a temporary distraction, while the Tear II ability gives a 1-turn Mass Reinforcement that goes well with other mass bluffs.
Since previous walkthroughs have covered all four possible heroes build, let's follow the game's default class - Might. How about the Tear path (Chieftan) as it makes a good story and grants an interesting ultimate ability that essentially nullifies all magic attacks for a short time? It will certainly come in handy.
Here is a list of abilities that I recommend. This campaign is very easy in general, so there is no need to spend too many ability points on mass buffs/debuffs.
Daily unit conservation: Reinforcement II, Tactics I, Mass Life Drain, Mass Regenerate, Heal (probably won't need Mass Heal).
Mass Buff/Debuff: Mass Heroism (no mana requirement), Mass Weakness
Passive abilities
- Logistics, Path Finding. To speed up the expansion.
- Archery I, II, Counterstrike I, II, III, Giant Slayer, Rampage, Cleave. Increase damages dealt.
- Parry, Resilience, Toughness I, Defense I. Reduce damages taken.
 Irina... if we were not related... Wait a second, didn't Goink join me later in the story?
CEATURES
 Mauler/Crusher (tier-1). Yet another might-based, mediocre-initiative tier-1 melee. But this one is very different - why? The upgraded version attacks AGAIN after the target's counterattack - not only drains the damage right back (Arache or Mass Life Drain), but also delivers another heavy blow!
Goblin (Hunter) (tier-2). Ranged unit that comes in huge numbers. Somehow their boomerang, which is supposed to be full-ranged in all other games I have played, loses power over medium or longer distance. A Unicorn Horn Bow or Emerald Yumi Bow would make them stars of your roster! Before having such a bow weapon, their trap ability is also very handy. You can even split them up to setup multiple traps.
Harpy/Fury (tier-3). These flying creatures have a great range to perform their strike-and-return, but their damage is not really impressive. Only the upgraded version's attack is not retaliated - then they will be extremely useful. Bad news: there are no upgraded units of any sort to recruit in the first two campaign missions.
 Dreamwalker/Dreamreaver (tier-4). A rare Magic user in the Stronghold roster. They have a very nice, quickly-renewed special ability that slows and damanges a single stack (basic version) or all stacks (upgraded version). The damage is applied whenever the target moves. Combining this with Goblin's traps, the enemy's melee might never reach you.
Centaur (Marauder) (tier-5). The cornerstone of the Stronghold army. High initiative, good ranged power, and shoots at the first enemy stack that crosses the middle of the battlefield. Before you get the tier-6 Jaguar Warriors, the AI will always target Centaurs. Getting Reinforcement II as quickly as possible makes unit conservation a lot easier.
Jaguar/Panther Warrior (tier-6). High initiative, good movement, and a charging special attack that draws no retaliation. The upgraded version damages all surrounding opponent (similar to Kappa Shoya's Crashing Leap, but the affected area is bigger). The AI will always target them when they are in your army. Reinforcement II is the answer.
(Enraged) Cyclops (tier-7). By now you must have fought them and know that they won't die until their action comes up. For some reason, this trait is not fully compatible with Life Drain, so you will have some hard time keeping them properly healed. The upgraded version is a ranged unit that shoots cool (but weak and half-ranged) magic-based laser beams. Both versions deal a powerful special melee attack. Their building is so expensive that you probably won't have many of them.

BUILDINGS
Stronghold seriously lacks Wood, although the town buildings are apparently made of furs and bones. There are a few useful buildings that stand out from the rest that I not necessary recommend.
 Advanced Market. Didn't know the Orcs have mastered Commerce! By now you should have learned what to look for: a Great Bow (Unicorn or Emerald Yumi), the Ring of Haste, the Boots of Wayfarer, the +8 Morale/Luck accessories, the Pendent of Mastery, etc. The Puppet Master Magic Comb may look funny on Sandro, but it will be equally ass-kicking. Even better, when a new saved game is loaded, there will be new items in the shop.
Hall of Raiders. Same as the adventure map structure, this building gives 250 gold per battle for an initial investment of 2500 gold and 5 resources each. Assuming the best market exchange rate, your still need to have 40 battles to break even. Usually the hardest fight in a mission happens before the 40th battle. It is better to put the resources into something that makes a difference early.
Warpath Lodge. Same as the adventure map structure, this building awards 3 land movement after each combat, but has diminishing returns for additional buildings. Unlike the description says, your hero does NOT have to visit the town during the same week to receive the benefit. While you may recall how far your main hero can travel with it, you need to invest 5000 gold, 5 wood, 5 ore, and 10 crystals. Fortunately, in all missions of this campaign you will be richer than you need to, so you can always be able to afford two of them. Particularly useful on mission 3 and 4.
ARTIFACTS
Four Dynasty Weapons are given in the Stronghold campaign - 1 in mission one, 3 in mission 2. You can also collect a total of two complete artifact sets in this campaign - the Prophet Set, the Regent Set, and most parts of the Warlord Set. However, since you have access to the advanced market, it is always better to replace some low-quality set artifact with the best possible choice of the part.
 Stronghold Campaign Mission 1
Level cap: 11
Difficulty Index: 3/6
Last updated: December 25, 2011 (v1.2)
Dynasty Traits: Other than the usual Core Creature +3 for mission 1, by now you might have achieved the Platinum Rank in your Dynasty, so you can try something fancy. One of the three Platinum Rank traits you can buy is "Fanatic", which rewards friendly heroes with 150 points of racial ability at the beginning of each combat. This is a great trait to have! However, in my game I was never able to get Sandor's rage to level 3 or 4 even at the very end of the campaign. Is it caused by the Fanatic trait, which (by a bug) carries into later missions for free?
 Very good mission name! And good for us, it runs a lot faster than the movie "No Country for Old Man". From the campaign map, you might recognize this as the same area where Sanctuary mission 4 took place (according to story: will take place). Indeed, you will find a lot of consistent landmarks!
Sandor starts in the northwest corner of the map (start). Now if you do NOT have a lv 4+ Arache, you can take Life Drain as your level 1 ability, followed by Reinforcement and Regenerate., and Reinformcent II, Mass Life Drain, and Mass Regenerate after level 5. Otherwise, you should go a long way with Arache with Reinforcement II. Fight everything that you can beat without loss, collect friendly Maulers, and follow the road all the way down to take Town A.
Sandor's only opponent is the Red Haven AI, which owns all other towns on the map. Fortunately, this map is very carefully scripted in a way that you always face something you can manage. First, travel down to (1) and free a number of Goblins and gather some free Blood/Tear points. There is a very productive creature east of Town A that you definitely want to have.
Collect the resources in the area until the Red AI launches its first, weak invasion. Defeat this hero, and easily steal Town B from the AI. On your way to Town B, you can free a group of Harpy and a group of Centaur at (2) after a not-too-difficult fight.
From Town B, travel northwest to defeat a stack guarding the stairs at (3). There are a few resource and creature buildings and some friendly creatures to flag and collect in the small underground area at (3'), but no enemy at all. You can use a secondary hero for the job.
Starting from the day you take Town B, there should be another invasion from the Red AI in a week or two. You might have to fight this hero around Town B, so don't wonder too far off or you might lose the town to the AI. However, you might have enough time to send Sandor get down to (4) to flag a creature building, and to fight the next invasion around (4).
 Whenever you defeat an invasion, Sandor is usually free to do his quest for about a week. The next point you can visit is an interesting Haven town in construction at (5), guarded by a dormant hero. You can further recruit a number of friendly stacks, as well as unlock the Dreamwalker building.
There are more Orc slaves to be freed at (6). Now you should have freed all four groups of slaves required by the game, and the gate (GA1) northeast of Town B should open. But don't wonder off yet. Let's first make sure Town B is safe while Sandor is away.
You can do that by taking over Town C from the Red AI. It will be a slightly more difficult fight than those you have had so far, since the AI should be building a more advance Town wall (with the arrow towers). But since you have been collecting so many friendly creatures, there shouldn't be any problem. You can take some time to clear the area around Town B and C - the next gate (GA2) will remain closed for a while. By the way, you can see a familiar huge yellow-leaf tree northeast of Town C. This is actually the exact same tree seen in Sanctuary mission 4. Town C was labeled as "Town F" back there (although chronologically that mission happens later).
When you run out of things to do, gather everything you have and venture north of the first gate (GA1). Beat everything, visit the stats boosts (s). Follow the path east to challenge the hero before Fort D and take the Fort to advance the quest.
 Defeating this hero rewards you the first Dynasty Weapon of the campaign, Sword of the Wolf (Might). At level 3 it prevents enemies to escape from battles (sadly, an active ability). Its free Mass Haste comes very late at level 4, and the ultimate level 5 ability gives insignificant power boost when you most need it (at the beginning of the battle). Not a very useful weapon.
Now the second gate (GA2) should open. By now you should be rich enough to afford some top quality artifacts, so build up the Advanced Markets and shop! The top priority should be the Emerald Yumi Bow to really boost your Goblins' power. When you are ready, pass the gate, and challenge Town E. By the time you arrive, the AI should have cleaned everything except for a friendly stack of Goblins at (7). Be grateful to the AI's generosity!
Just one more obstacle remains - march everything you have and crush the garrison in Town F! This is the final AI town and you should earn the check mark of another quest, some Might Power and Blood points. To finish this mission, simply defeat the guards of the shipyard at (8), board the free ship, and sail south a bit.
Note: Town F will become the infamous Town H in Sanctuary mission 4, garrisoned by the greatest army of Heroes6!
- by maltz
You can tell from the mission's name - this one is going to be Haven vs. Inferno. While you can conquer and convert everything to amass a huge army, a secondary mission interestingly requires you to stick with the "Tear path" and NOT convert any Town and Fort (though you CAN convert creature buildings). Can you win this mission with just one town plus several creature buildings?
Well, the answer is YES since this is a mission 4 with mission 2 enemies! Most areas are isolated from each other so you don't even worry about invasion - but there are zero enemy hero activities anyway (except for one scripted invasion)! Maybe the AI will "wake up" once you start converting towns and forts, but this walkthrough will stick with the "Tear path" and enjoy the relaxed atmosphere.
 Inferno Campaign Mission 4
Level cap: 30
Difficulty Index: 2/6
Last updated: December 18, 2011
Dynasty Traits: For choosing Tear, once again you will be swimming in resources since you spend at most 50K+ gold on hiring every week. Feel free to get the creature bonuses (as it will actually make a little difference). I still like to have a free generic hero - they mean a lot at the beginning.
 Kiril begins this easy mission underground at (start). Just west from the starting point, you can find a very weak stack of Fire Elementals guarding a completely random artifact at (1). This spot is made very famous around the community since it has a low chance to spawn any artifact, including Dynasty Weapons - no matter you already have it or not. Since a few Dynasty Weapons (see list below) are not awarded to the player throughout the campaign, this is the only "normal" way to obtain them:
- Dragon Flame Tongue (Might)
- Perfect Silksword (Might)
- Edge of Chaos (Might) - preorder bonus
- Staff of Sar-Aggreth (Magic)
- Staff of Asha's Eightfold (Magic) - collector edition bonus
- Staff of Cleansing (Magic) - collector edition bonus
If you see something you don't like (most of times you get garbage), simply restart the mission and take a look again. My best result for the full hour of effort was a suit of extremely overpowered Guardian Breastplate - hope you get something nice, too!
Note: Farming your missing Dynasty Weapons here is very inefficient, since most artifacts are not Dynasty Weapons. There is a custom scenario made by ShardofTruth on the Ubisoft official forum. In this custom game (put it into your game's My Document/MMH6/Scenario folder), you can simply pick up your missing Dynasty Weapons from the floor (use it at your own risk; it might take away the fun of collecting and leveling). For the Weapon Master achievement, your hero has to equip a new Dynasty Weapon after obtaining it to make the counter go up.
Update for patch 1.2: This spot no longer spawns Dynasty Weapons. Doh!
Continue on the path north towards Town A. Defeat the unimpressive mini-boss to claim the town - this will be our only base of operation for the "Tear Path" - better build it up quickly! Pick up all resources lying around (you are also given quite a few to start this mission), and make your way to the exit through (2).
 Kiril emerges from the top of the volcano at (2') to begin his conquest of the Purple Haven lands. Three roads lead away from the volcano - which one first? Kiril's dominance of the surface is established by conquering Town E - after that the Haven player goes completely dormant. The defense in Town E isn't too powerful, so you should be able to challenge it with a few more weeks of creatures from Town A.
Let's go south first to grab the closest and weakest Town B and boost our income. (We won't convert the towns, but we can still build the economic structures inside the towns.) Clear the area until a Purple hero comes from the east with a mediocre army. If you ignore him, he will proceed to attack Town A. In my game, I moved Kiril back toward the volcano (2'), and the Purple hero chose to fight Kiril even if Kiril was not really on his way.
After dispatching this hero, you can continue expanding southward and take Fort C, flag the creature building and convert it (only converting Towns and Forts will fail our Tear Path). The main quest of this mission involves clearing seven stacks of Dark Elementals, marked as (DE) on the map. In this area, you can fight the first (and weakest) stack of Dark elementals (they usually come with some other creatures). The Town B - Fort C area is not connected to anything else. Consider them your backyard now.
Next let's work on Fort D to the north. You can fight the second stack of Dark Elementals (DE) east of Fort D. Sweep clean the vicinity of Fort D. Now you should have enough units to take over Town E. Ship your fresh recruits to Kiril and do it! In my game, Town E has been built to level-4, and I ended up with two level-4 towns (Town A and E).
 After taking Town E, the familiar Purple hero awaits you at (3) (the picture on the left is the army he carries on hard). He is probably too powerful for you now, but don't worry - he does not move at all. The Purple AI has officially entered hibernation (feature or bug?) and you might not even notice your new turn has arrived - don't press End Turn too hard or twice!
The rest of the surface is now open for Kiril to conquer. Fort F, Fort G, Town H, Town I just take them one by one when you feel like to. You can defeat two more stacks of Dark Elementals (DE) in these territories. The shipyard at (4) enables you to explore the sea, where you can bring down another stack of Dark Elemental - probably the most powerful among the seven. From Town I, do not go northeast to use the stairs yet - leave it for the last.

By now you should have accumulated enough units to defeat the Purple hero at (3). Continue east to flag Fort J and meet some interesting family members at (5) (you don't have to fight them - maybe you do for the Blood path?). Knock down yet another Dark Elemental stack.
 Almost over! Finish all your business, equip your best artifacts, gather all you have, and enter the stairs at (6-6'). Here comes the last stack of Dark Elemental at the beginning of the underground passage. Follow the passage north to use the stairs (7-7'). Follow the boring path east to use the teleport at (8), which won't be activated until you have defeated all seven stacks of Dark Elementals. Ready for the mission finale battle?
Hm, the picture on the right is what you fight. You might find this fight difficult if you "over-achieve" and reach here too early. But since you have completed the "Tear Path" secondary mission of not converting towns and forts by entering the Invisible Library... you CAN convert them now! Within a few weeks, you should have more than enough units, and you should be gating in so many stacks that you may forget which ones are real! This marks the unspectacular ending of the Inferno campaign. Anyway, congratulations!
- by maltz
 Jorgen: "Forget about the full-plate armor... where did the other two guys come from?"
INTRODUCTION
Mission 3 sounds like an undead map, but the undeads are gone! In mission 3 and beyond, we will always face living creatures (easy heal!), mainly Orcs and Naga here. Xana, the better-looking Heroes5 Biara, joins Kiril and will be carried over to mission 4.
 Resources is no longer abundant due to the endless construction projects going on - lots of towns to conquer, all structures unlocked except the Pit Lord (tier-7) upgrade. It may be worthwhile to assign a town-building specialist hero to get the 20% upgrade discount. Crystals will be in dire shortage as usual, but you can always trade for more. Chances are you will win this mission before you accumulate enough resources to fully upgrade all towns, so you only need to upgrade buildings in your primary hiring town.
Again it is Tear of Asha time! Four moon fragments can be found scattered on the map. As usual, by the time you get the tear, you would be powerful enough to win the mission already. But 3 free phoenixes could help a bit at the beginning of the next mission.
Dynasty Traits: As usual, free first generic hero is great (pick a Might hero for level-3 Realm abilities). There is usually a Hellhound Master who breeds +3 hellhound per week, or a Master Trainer who trains +1 elite creatures per week. I ended up hiring both of them and use Kiril's Mentor to give them enough experience to reach level 15. Hero movement +3 helps, too.
 Inferno Campaign Mission 3
Level cap: 25
Difficulty Index: 3/6
Last updated: December 18, 2011
Kiril starts the mission with a very unique volcanic Town A with a very un-unique town name. Grab the free small stack of Pit Fiends by the town (there is an achievement for getting free tier-7 creatures to join you). Take a few days to collect the resources nearby, and go south.
 You can quickly flag a weakly defended Orc Fort B. There is Orc's Town C just west of Fort B that you can conquer in a hurry. The highlight of this area is a Warpath Lodge, which gives you additional movement points after defeating an enemy. There are two Warpath Lodges in this mission (the second one is just east of the stairs at (4)), giving you a total of 5 bonus movement points for each victory.
There are various observation towers on the map that will give you a good look of the surrounding territories and possibly some early warnings of invasions. Let's spend a moment to look at the layout of the map.
Town A, Fort B, and Town C are your headquarters. I recommend that you build an Advanced Town Portal in Town C and make it your capital. There are enemies in three directions - west, east, and underground (south). The AI only attacks you from east and south. Getting the Advanced Portal in Town C enables you to defend home efficiently.
Let's look at west first. There is an Orc's Fort D not far from Town C, controlling two creature buildings (core and elite). The creatures blocking the border are actually more powerful than the garrison in Fort D. Further northwest is a powerful Orc hero designed for much later. Fortunately, this hero, and any other hero that stands behind are completely dormant - so we can ignore them all together. Fort D will be the farthest from enemy attacks (although they are actually the closest to enemies).
 Let's look at east next. From the observation tower at home you already saw the exit of a one-way portal at (1'). The AI will send an endless stream of very weak heroes (like having "4 creatures" in total) to you. Looks like just another "spawn something right beside your home" trick from Blackhole, but this one is much more easily tackled.
The entrance of this one-way portal (1) is surprisingly close. You can easily push northeast and conquer Fort E and Town F, both are very weak, to put an end on the nuisance. Fort E and Town F are also isolated from the outside world. Take them as early as possible and make them your backyard. (There is something obviously wrong with the foundation of Town F.) The second piece of Moon Fragment can be found just south of Town F.
Finally, let's look at underground. Between Town C and Fort D you can see stairs (2-2'). You can get down here and take the Orc's Town G in the underworld. Now look at the name of Town G! Two is a bit too many. Just south of Town G lies the first piece of Moon Fragment (MF).
In my game, the defending hero of Town G has a bracelet artifact that allows him to cast Implosion. Since the damage of Implosion cannot be healed, I had to resort to Tear II's special ability "Seal of Power" to let the gated dogs replenish the loss. This could be the only spot in this mission that you would lose any unit at all.

East of Town G, you can collect a large number of resources and flag a crystal mine. There are two set of stairs leaving this underground area. The stairs on the northeast (3-3') will bring you back to the road leading to Fort E and Town F. The stairs on the south (4-4') will bring you to the south, where you can reach deep in the Orc's territories to proceed with your mission. The enemies will be progressively more difficult.
 Once you own Fort D, Fort E, Town F, and Town G, it is time to go south. Emerge on (4) and continue east. You will be able to conquer Fort H, Town I, and Town J on the way. Between Fort I and Town J is another set of stairs (5-5') that will take you to a small area with two crystal mines (nice!) governed by Fort K.
By the time you are done with Town H to Fort K, you should be powerful enough to tackle the Orc hero in front of Town L. There are two 2-way portals beside Town L. The green portal on the right (6-6') leads you to a Sanctuary island governed by Fort M with a couple of buildings to flag, and more importantly the third moon fragment (MF) on the beach southwest of the portal.
The blue portal on the left of Town L (7-7') leads you to an isolated beach area, where you can collect the fourth and final Moon Fragment (MF) south of the portal. Having all four fragments on the same hero allows you to collect the Tear of Asha (Tear) on the very east of the map close to Town H.
In the same beach area there is a very well-built Sanctuary town, defended by the most powerful hero in this mission so far - but this should be still far from challenging. After grabbing the Sanctuary town but before converting it, you might be able to pick up a few useful artifacts from the Advanced Market.

Now with the Tear of Asha installed in your capital and so many towns and creature dwellings under your command, you can demolish the rest of the mission like a bulldozer. Go back to Town J and descend down the stairs at (8-8'). There is a linear passage that leads you to the exit stairs at (9-9'). Take the nearby Fort K and advance your quest. You can also finish another quest by opening one of the three chests (the top one) at (10). Don't open it with a weak secondary hero or that hero can be kissed goodbye! Take Fort P.
When you are done with everything such as stats boosts (s), gather all you have and march to Town Q to face the boss battle of this mission. It is not a difficult fight since you must have accumulated a huge army by now. After the battle, you can enter the cave at (11) to end the mission.
Page 4 of 23