
The struggle between the slaves and slavers is not over yet. In this mission, Sandor sets sail to the Pao islands to establish his name among the Orcs. Depending on your path of Blood or Tear, you will be battling different opponents for the first half of the mission. You can also earn different Dynasty Weapons:
Sword of Whistlebone (Might) - Tear path
Thunder Staff (Magic) - Blood path
Malathua's Cleaver - both paths
You can hire all seven tiers of Stronghold creatures, but you can't upgrade any of them. Also, in my game, there seems to be a discount on creatures' weekly growth - the walls don't give the +creature effects. Nonetheless, this is an easy mission so it doesn't make a big difference. Also, you will be able to hire a lot of heroes cheaply (probably as soon as you defeat them).
Note: By the way, you might read about a serious "Tear path" bug online. This bug has been fixed by patch 1.2. So there is nothing to worry about now.
 Stronghold Campaign Mission 2
Level cap: 17 (best guess)
Difficulty Index: 2/6
Last updated: December 26, 2011 (v1.2)
Dynasty Traits: Since you still can't hire upgraded creatures, you are destined to have a lot of gold and resource leftover. So again you can skip economic bonuses and go for the movement and battle bonus, and the traits that will let you spend more gold - creature growths.
 Some of the islands on this map are divided by mountain ridges in the middle, so the map above shows the territory boundaries. At the very beginning of the mission, Sandor has to fight a very brief and easy battle consistent with the cut scenes in Sanctuary mission 1.
Then Sandor landed in the southeast corner at (start). Collect resources and follow the road south and west. Don't worry about the branch roads - there is nothing valuable, and you will be able to come back later. Cash all chests since there is a group of Centaurs for hire at (1). Continue the road west and you can trigger the story at (2). After the cut scene, Sandor is transported to Town A to the northwest.
Depending on your Sandor's Blood/Tear alignment, you have to fight different enemies. As this walkthrough follows the Tear path, Sandor's objective is to defeat the Red Stronghold faction that controls Town D. (If you follow the Blood path, you have to defeat the Yellow Stronghold faction that controls Town F.) The Red and Yellow Orcs fight each other fruitlessly around Town E. They both have literally thousands and thousands of resources (see picture below). The island of Town E will soon have its beach full of abandoned ships.
 Sandor: "My dear ally! I have some gold to spare! Let's see what you have. You have... 1240 wood, 1270 ore, 635 crystals, 647600 gold... (cry)"
The game gives Sandor four months to defeat the Red Orc faction - that's a lot more than enough. Take your time to clear the surroundings of Town A, flagging the Sawmill, Ore Pit, and Crystal Mine (in the east). You can also flag a Lighthouse at (3). There will be lots of sailing in this mission, and this is just one of the three Lighthouses in this mission.
 After you run out of things to do on the island, take the free ship on the beach and sail south. You should be able to capture Fort B very easily, and flag the creature building southwest of it. There is nothing you can do to the pointless hand-changing on the other side of the island yet.
Your passage to the outside world is the Whirlpool at (4), but don't go for it yet. Southwest of the Whirlpool is Fort C, where you can flag a Gold Mine, a Lighthouse, as well as visit a stats boost (s). If you have not done so, you can hire a secondary hero and build a ship for him/her to collect resources on the sea. Just like the Sanctuary campaign, there are lots of goodies on the sea.
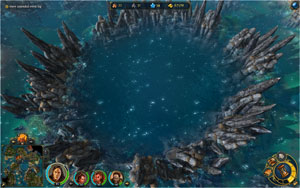
After finishing all businesses in your backyard (Town A, Fort B, Fort C), collect all your creatures and go through the whirlpool at (4). Sandor should appear at the whirlpool close to the center of the map at (4'). Sail northeast all the way, pass the crater-ring (unfortunately, you don't fight any epic sea monster in this mission), and land on the northeast island where Town D is. The path to the town is blocked by a closed gate. The Red Orc sends its weak invasions with the one-way portal of (5-5').
 In order to open the gate to Town D, you have to release three groups of slaves (SL) working at blood crystal mines. Their guards are all very weak, so there shouldn't be any problem at all. Upon releasing all slaves, your ally at Town F joins you unconditionally (but she does not bring any of her mountain loads of resources). And you should have a very easy time defeating the quest hero in Town D. In my game, this hero charged at Sandor during his turn, and was crushed even on auto-combat. Now how many months did you take to accomplish that? Less than two, or even one? Your reward for finishing this quest is a Dynasty weapon (a different weapon if you walk the Blood path).
You might still need to take Town E from the Red Orc if it happened to own it at this time. It is probably completely undefended, so even an army-less secondary hero can do it. However, upon the completion of your secondary quest, the Orange Orc (Sharka) awakes, and will start invading you through the two-way portal at (6-6'). If you own Town E, chances are that the first invasion will head straight to Town E. Later on, you can portal a bunch of cheap secondary heroes to Town E and enjoy the free ships. There are so many things to collect from the sea.
 The second half of this mission is to slowly take over the remaining towns and forts while minding the periodic, weak invasions from the Orange Orc. Town G will join you when Sandor goes over after the Red Orc is defeated. This also unlocks the tier-6 creature building (Jaguar Warrior). When you have Jaguar Warriors in the army, the AIs will ignore the Centaurs and instead target the Jaguar Warriors, so your Reinforcement II should go to them.
You can unlock the tier-7 creature building (Cyclops) by heading to the cool-looking Cyclops hero at (7), just northwest of Fort H. You can get there either by sailing or walking from Town G. The Cyclops army that challenges you is extremely weak especially considering how much progress you have made at this point. After the battle the Cyclops hero walks away - maybe he will join Sandor on the Blood path?
 Unfortunately, the Cyclops creature building is a very bad investment in this mission. First, they are very expensive. Second, you can't upgrade them, so its growth will be shamefully low (1 per week per town). In my game, this mission was over a few days after I finally had 10 Cyclops (solving this quest already gave me 3). Just spend the cash to buy the best artifacts.
Now you can take some time to clean up areas that you think might contain useful artifacts and accumulate some EXP. This mission's creature stacks are all quite small (a mission 2 with mission 1 enemy), so it is likely that you can't see the level cap by the time it ends. There are two Shrine of Seven Dragons (SD) you can pay to level up. The first one is just north of the crater. The area surrounding Town G is also very disappointing.
When you have finished all businesses here, gather all your army and pass the two-way portal at (6-6'). You can quickly conquer Fort I from the Orange Orc. There are three more stats boost in this area - two on the same island, one on the small volcano island to the northeast. You can use a free ship waiting for you at (8).
Soon you will again run out of things to do. One more enemy left - Sharka. So march everything you have to Town J and finish him! Enjoy one more Dynasty Weapon!