Walkthroughs
- by Harukaba
Crag Hack and Yog must find the Sword of Judgment, Armor of Wonder, and Lions Shield of Courage to win the scenario. However, if either hero is defeated in combat, the scenario is lost. They are limited to level 37 but will carry his experience, skills, and spells on to their next scenario. Starting Bonus: 4000 Gold or 10 Ogres or 40 Orcs.
Maps


Click on a map to see a larger version.
Green - Friendly Town
Red - Enemy Town
Grey - Neutral Town
Yellow - Underground Passage
A# - Allied Towns
O# - Opponent Towns (a,b,c,d,e,f,g indicates which enemy)
N# - Neutral Towns
M# - Mirror Entrances (a) and exits (b). two-way unless stated
E# - Exit (a) entrance and (b) exit
S# - Seer (a) and the location of the item (b)
G# - Guard Tents (a) and the location of the Guard Tower (b)
J - Jail
X - Ambush
Starting Out
Pick the 40 Orcs as your bonus since that will increase your odds for getting joins, such as the Wolf Raiders in front of the Stronghold. Their ranged attack will also be a great help to defeating the many wandering stacks. There are no taverns in the towns and the only way to hire additional heroes is from a tavern in the northeast area on Yog's side. You also can't build a Capitol but that shouldn't be a problem since there's a lot of gold lying around and take the gold from the chests instead of experience. Be sure to give both Crag and Yog a Ballista since, with their high attack, they will do a lot of damage.
First Leg
Your home area is seperated from the enemy area by two Anti-Magic neutral Garrisons with 40 Cyclops Kings, 60+ Ogre Magi, and 100+ Orc Chieftains and two wanderng stacks of 200 Scorpicores. I recommend going through the Garrisons as they are much easier, even with the Anti-Magic field. So build up both the Rampart and Stronghold towns for the first month and then break through the Garrisons. Crag took over O1c (tan) and then moved north to take over O1b (green) while Yog took over O1a (purple). Unfortunately, O1d (blue) is underground protected by a one-way mirror (M1a) so it's necessary to leave either Crag or Yog by M1b to protect O1b from being taken over.
Finishing Up
I then explored the map and found an Altar of Sacrifice (found under E3a) which I used to increase both Crag's and Yog's level to 37. After that, I went to get the artifacts by going to E1a (northwest) and using the two-way mirror system to visit both G1b and G2a as well as by defeating the 4 Crystal Dragons to get the Sword of Judgement. Now go to E2a (west) through G2b to defeat the 8 Red Dragons to get the Lion's Shield of Courage and to visit G3a. Now go up to E3a (northeast) to get the Armor of Wonder by defeating 75 Minotaur Kings. Once all three artifacts are retrieved, the map is done.
| Comments (2) |
- by Harukaba
Gem and Gelu must find the Sandals of the Saint, Helm of Heavenly Enlightenment, and the Necklace of Celestial Bliss to win the scenario. However, if either hero is defeated in combat, the scenario is lost. They are limited to level 37 but will carry his experience, skills, and spells on to their next scenario. Starting Bonus: 6 Rogues or Spyglass or Boots of Speed.
Maps

Click on a map to see a larger version.
Green - Friendly Town
Red - Enemy Town
Grey - Neutral Town
Yellow - Underground Passage
A# - Allied Towns
O# - Opponent Towns (a,b,c,d,e,f,g indicates which enemy)
N# - Neutral Towns
M# - Mirror Entrances (a) and exits (b). two-way unless stated
E# - Exit (a) entrance and (b) exit
S# - Seer (a) and the location of the item (b)
G# - Guard Tents (a) and the location of the Guard Tower (b)
J - Jail
X - Ambush
Starting Out
With so many Castle towns and so many Rampart towns, Gelu can have many dozens of Sharpshooters to quickly go on the offensive on this relatively easy map. So pick the Boots of Speed bonus and give it to Gelu along with all of the Wood Elves as possible and have him start taking over enemy towns. I had Gem stay in the home territory to flag mines, attack wandering stacks , and fending off any hero that makes it through the Garrisons with her huge spell pool.
First Leg
Gem used Town Portal and went to every town to buy Wood Elves to give them to Gelu who turned them into Sharpshooters. Gelu and went along the east side by going to O3b (teal) and then to O2b (teal) as well as visiting the Archer Towers along the way to increase Gelu's Sharpshooter army. I then followed the red path to defeat the other towns and, with Resurrection, suffered very little losses. I used Gem to use View Air to keep track of the enemy heroes and used either Gem or Gelu to portal to the nearest town to defeat them. Both enemies were defeated in about three to four weeks.
I mainly built up to City Halls (one Capital) and Castles so that I'd have enough money to upgrade to Sharpshooters. I didn't really build many other buildings because Sharpshooters are strong enough and it's easy to get very many of them.
Finishing Up
As the map indicates, Gem and Gelu are allowed to only get certain of the artifacts. Before you do so, try to level Gem and Gelu as much as possible but it's very difficult as there are few places to do so. However, visit all of the Places of Learning and build as many Mage Guilds as you (and be sure to visit them all) before collecting all three artifacts and winning the map.
| Comments (3) |
- by Harukaba
Defeat the Rangers and Barbarians against Sandro and his forces of undead to win the scenario. However, if Sandro is defeated in combat, the scenario is lost. Sandro is limited to level 40 but will carry his experience, skills, and spells on to his next scenario. Starting Bonus: +3 Attack or +3 Defense.
Maps
Click on a map to see a larger version.
Green - Friendly Town
Red - Enemy Town
Grey - Neutral Town
Yellow - Underground Passage
A# - Allied Towns
O# - Opponent Towns (a,b,c,d,e,f,g indicates which enemy)
N# - Neutral Towns
M# - Mirror Entrances (a) and exits (b). two-way unless stated
E# - Exit (a) entrance and (b) exit
S# - Seer (a) and the location of the item (b)
G# - Guard Tents (a) and the location of the Guard Tower (b)
J - Jail
X - Ambush
Starting Out
I'd pick the +3 Attack as your bonus and send Sandro out to attack the wandering stacks to build up a big supply of Liches. If you have the Town Portal spell, protecting your towns will be much easier, especially considering how many towns there which will make traveling much easier. There are many ambushes in the northern part of the map (30 Wood Elves and 20 Grand Elves) so be careful when you send out scouts.
First Leg
There's not a best path to take after you're finished building up your army of Liches from the local wandering stacks. I headed north to defeat Gem and Gelu because Gelu had picked up the Dimension Door spell and had Logistics so it was hard to defend my towns with him bypassing mountains even with the Town Portal spell. O2b (green) ended up having Dimension Door so Gem started using it to which was really irritating. So I headed north to O1b (green) and then east to N4 through both a Zombie ambush and an ambush of 60 Wood Elves and 20 Grand Elves. I got the Bow of the Sharpshooter which removes the range, obstacle, and melee penalties from all the Hero's shooter stacks in addition to increasing the hero's archery skill by 30%.
After that, I used View Air to keep a track of the enemy heroes and made my way to the nearest town, portaling to other towns when they were threatened by any strong approaching enemy (especially Gem, Gelu, Yog, or Crag). I kept on building a Liche army and completing some of the quests along the way.
S1a will give you the Sword of Hellfire (Increases the Hero's attack skill by +6) if you reach level 32. S2a will give you the Helm of Heavenly Enlightenment (+6 addition to each of Attack, Defense, Power, and Knowledge primary skills) for 100 wood. S3a will give you the Talisman of Mana (Hero recovers 1 additional spell point every day) if you exchange the Charm of Mana (Hero recovers 2 additional spell points every day). S4a will give you +6 Defense in return for the Dragon Scale Shield. S5a will give you 11 Wraiths for 22 Hobgoblins.
Finishing Up
Since this is the last map you'll have controlling Sandro and since it seems that Sandro's stats get changed for the final confrontation, there's no need to visit Places of Learning or spend additional time increasing levels. There are enough wandering stacks around to keep Sandro well-stocked with Liches and Animate Undead will keep the losses to a minimum.
| Comments (4) |
- by Harukaba
Wipe out all invading forces to win the scenario. However, if Sandro is defeated in combat, the scenario is lost. Sandro is limited to level 40 but will carry his experience, skills and spells on to his next scenario. Starting Bonus: +3 Spell Power or +3 Knowledge.
Maps


Click on a map to see a larger version.
Green - Friendly Town
Red - Enemy Town
Grey - Neutral Town
Yellow - Underground Passage
A# - Allied Towns
O# - Opponent Towns (a,b,c,d,e,f,g indicates which enemy)
N# - Neutral Towns
M# - Mirror Entrances (a) and exits (b). two-way unless stated
E# - Exit (a) entrance and (b) exit
S# - Seer (a) and the location of the item (b)
G# - Guard Tents (a) and the location of the Guard Tower (b)
J - Jail
X - Ambush
Starting Out
You have to pick Sandro's skills as you did with Gem, Gelu, Yog,and Crag. Sandro starts out with Sorcery and Necromancy and he really needs Earth Magic and Wisdom. I also got Knowledge, Archery, Air Magic, and Logistics to round him out nicely. If you are able to get Town Portal and/or Animate Undead then count yourself lucky as these spells don't always show up. These spells are very important in the next map and it's easier to play this map to get those spells than in the next but of course, it's up to you to decide.I recommend picking the 3 Spell Power as your bonus since your Liches will do most of the fighting and you won't need a huge spell pool.
First Leg
You start out in a town with no Fort while all of the other towns are nearly built-up. If you wait around, you'll get overwhelmed even with Sandro's Liche generating ability. So quickly attack all of the wandering stacks around A1 and use a secondary hero to flag the mines. Build a Mage Guild and Necromancer Amplifier in A1 and be sure to have Sandro visit so he can at least get the Magic Arrow spell. Your aim is to travel along the yellow path and attack the Gold Dragons and then the Chaos Hydras. While this looks suicidal, the Liches will be able to handle them with relative ease. Once you break through and before you attack O1a (green) be sure to take a look at the gold mine which is protected by a lot of skeletons. If the enemy hasn't defeated them, I recommend that you do so since you'll get a lot of Liches which will really help you out. After that, go north and take over O1a which will probably be nearly built-up including a level 5 Mage Guild.
Second Leg
I then focused on visiting both O1b and O2a to get as many spells as possible. I then holed up the enemy in one of these two towns, brought down a secondary hero, gave them many Liches, and took Sandro around to visit Places of Learning and attack wandering stacks and to fulfill the many seer quests.
S1a wants 37 Infernal Troglodytes and only gives you 6984 gold in return which is pretty useless. S2a wants 79 Liches (NOT Power Liches) and will give you 6 Defense in return. S3a wants the Stoic Watchman artifact and will give you Advanced Eagle Eye in return. This one is useless since no other hero advances with Sandro and he has no empty skill slot to fill with Advanced Eagle Eye, even if you'd want such a useless skill.
Finishing Up
You can get up to level 40 by using the Altar of Sacrifice and sacrificing troops from the castles under your command but that can get very tedious. I went up to level 32 before defeating the final town and winning the map.
| Comments (5) |
- by Harukaba
You must capture Castle Crypthome to win the scenario. However, if Gem or Gelu is defeated in combat, the scenario is lost. The heroes are limited to level 33 but will carry their experience, skills and spells on to their next scenario. Starting Bonus: 15 Wood Elves or 20 Silver Pegasi.
Maps

Click on a map to see a larger version.
Green - Friendly Town
Red - Enemy Town
Grey - Neutral Town
Yellow - Underground Passage
A# - Allied Towns
O# - Opponent Towns (a,b,c,d,e,f,g indicates which enemy)
N# - Neutral Towns
M# - Mirror Entrances (a) and exits (b). two-way unless stated
E# - Exit (a) entrance and (b) exit
S# - Seer (a) and the location of the item (b)
G# - Guard Tents (a) and the location of the Guard Tower (b)
J - Jail
X - Ambush
Starting Out
I picked the Wood Elves as my bonus so that Gelu would have a bigger army of Sharpshooters and Gem will be ok with her huge pool of spell points.
First Leg
You are protected by Garrisons but that doesn't mean you can rest easy. I sent Gem to the east and Gelu to the west to flag mines and to take over N2 and N1. They don't have the Fort built so I used them for gold and relied on A1 for my troops. By the start of the third week I had explored the entire starting area and was ready to make the trip to the enemy area. I used Gelu for this because he had better Attack and Defense skills. He used primarily his Sharpshooters while Gem followed with the other troops and attacked the wandering stacks while Gelu concentrated on the enemy.
The two enemy Garrisons contain 600 Skeleton Warriors, 50 Black Knights, and 20 Bone dragons. Gelu used Expert Slow and his Resurrection spell ensured that no Sharpshooter was lost. He picked a direction at random and went east while Gem stayed in the area to flag mines and protect the starting area from any enemy hero. The fight with O2a (orange) was pretty easy and Gelu went to take over O1b (red). Gem used her Expert View Air to keep track of the enemy heroes and I had either Gem or Gelu portal to the nearest town to ensure it wasn't taken over. I also used Gem to transport more troops for Gelu (primarily Wood Elves so he could transform them to Sharpshooters) so that he wouldn't have to use his spell points for that.
Finishing Up
Gelu then went northwest from O1b (red) to take over O1a (orange). He made sure to defeat any remaining orange troops to eliminate them from the game. He portaled back to O1b (red) and headed south to defeat any red heroes along the way. O2b (red) is protected by a Garrison which contains 100 Ghost Dragons, 60 Vampire Lords, and 80 Power Liches. So I left either Gem or Gelu in front of it while the other looked for places of learning and experience. Visiting the Dragon Utopia south of O2a (orange) is a good idea as that can be worth quite a bit of experience. Unfortunately, Gem and Gelu have a tough time gaining levels as they don't have any Altar of Sacrifice and, even if they did, could only sacrifice artifacts so would have a limited amount of experience as opposed to being able to sacrifice creatures.
After exploring as much as possible, Gelu attacked the Garrison with as many troops as possible and easily defeated O2b (red) to win the map.
| Comments (3) |
- by Harukaba
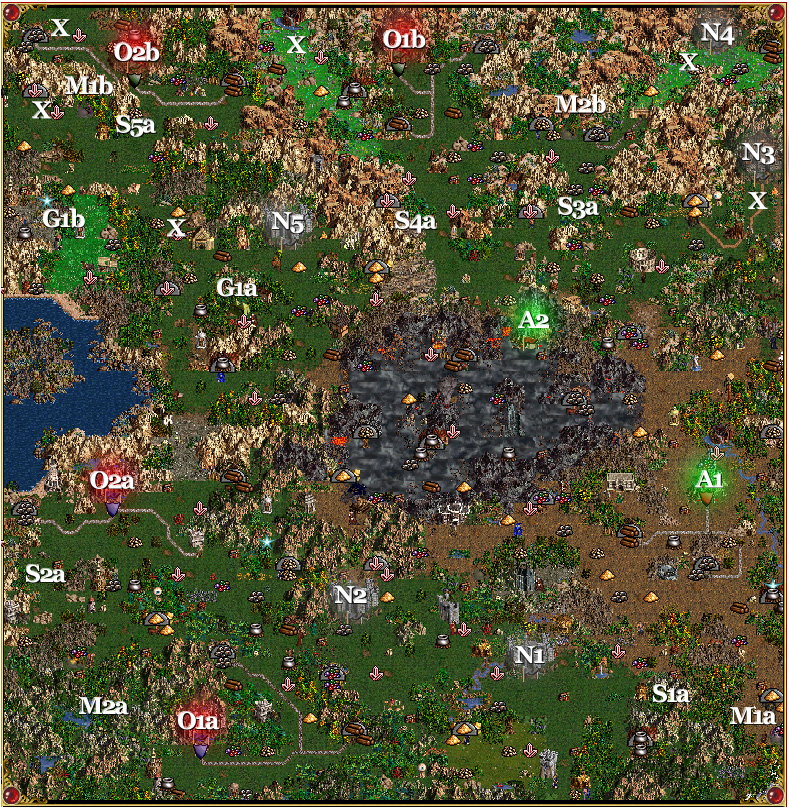
Yog and Crag Hack must defeat the Necromancers to win the scenario. However, if either hero is defeated in combat, the scenario is lost. Yog and Crag Hack are limited to level 33 but will carry their experience, skills and spells on to the next scenario. Starting Bonus: 6000 gold or 15 Crystal or Boots of Polarity.
Maps
Click on a map to see a larger version.
Green - Friendly Town
Red - Enemy Town
Grey - Neutral Town
Yellow - Underground Passage
A# - Allied Towns
O# - Opponent Towns (a,b,c,d,e,f,g indicates which enemy)
N# - Neutral Towns
M# - Mirror Entrances (a) and exits (b). two-way unless stated
E# - Exit (a) entrance and (b) exit
S# - Seer (a) and the location of the item (b)
G# - Guard Tents (a) and the location of the Guard Tower (b)
J - Jail
X - Ambush
Starting Out
Pick the 6000 gold as your bonus and be prepared for a great tent hunt. You need to find four tents before you can conquer two towns that are otherwise unreachable as well as gaining access to the gate system.
I picked Crag Hack as my main hero primarily because he had Expert Earth and the Town Portal spell while Yog only had Expert Air. Of course, your game may vary so feel free to use whichever one you think is better.First Leg
Concentrate on building the Ogre Fort, Cliff Net, and Behemoth Lair, and the Citadel in the first week even at the expense of the City Hall. You can do that in the second week as it's more important to start producing troops as soon as possible as you don't want to wait for the enemy to outproduce you.
All of the wandering stacks are from the Stronghold towns so the chances of some joining is pretty high, especially if you have the Diplomacy skill. I had Yog visit Creature Generators and flag mines while Crag attacked wandering stacks hoping for joins. Once he had a good number of troops, he attacked the Orc Chieftains who are north of A2 which resulted in getting the Endless Sack of Gold and 50,000 gold. With the Resurrection and Blind spells, I suffered no losses from this battle.
If you had many joins, you can always attack the Behemoths between A1 and A2 but if you didn't, waiting until the second week for reinforcements would be a good idea. In addition to adding to your Behemoth troop total, you get the Ogre's Club of Havoc which adds 5 to Attack.Second Leg
At the start of the second week I gave Crag the Rocs, Ogres, and Behemoths and everything else to Yog. I made getting these upgraded structures a priority in one of the towns and in the other town I worked on building a City Hall.
I had Crag go through the northeast passage on the dark blue path to visit G4a and take over N1 since every bit of gold helps. I then had him go back west and south on the red path to take over O1a and visit G3a. Meanwhile Yog was clearing out the northwest area on the light blue path including N2. Since he had a bunch of level 1-4 troops he had problems with the Ghost Dragons guarding G1a so Crag portaled in and took care of them. Meanwhile Yog was going back on the green path to take visit G2a which would enable Crag to go through the floor quest gates. Once the last tent had been visited, Crag portaled to A1 and made his way through them. There were three events of 50,000 gold each which really helped getting additional troops. I then took over O2a (purple) and O2b (orange) as well as visiting G5a which opened up all of the black gates guarding the mirror portals.
I make this process sound easy but it took me a few times in order to do it well. The key is to not lose sight of visiting all of the guard tents and in only portaling back to your original towns when the enemy gets too close. Once you can make it to O2a (purple) and O2b (orange) , preferably as soon as possible, the enemy is just about defeated.What helps in this are the quests you can and probably should do. S1a (west of A2) gives 20 Thunderbirds once you've defeated Nimbus. S2a (west of O1a) gives 25 Cyclops Kings if you defeat the Ancient Behemoths at S2b (north of S2a). S3a gives you 4 Dread Knights if you give 5 Wood, 15 Mercury, 5 Ore, and 2500 Gold.
Finishing Up
I then took over all of the castles but one using Crag Hack's Town Portal spell except for one and gave a secondary hero troops while Crag and Yog got to level 33. The Altar of Sacrifice also puts all those otherwise useless Necromancer troops to good use by giving experience. Building up the Mage Guilds will help greatly in the upcoming maps, especially the Destroy Undead spell.
| Comments (1) |
- by Harukaba
Crag Hack must find all the pieces of the Legion and return them to the town of Hartferd to win the scenario. However, if Crag Hack is defeated in combat, the scenario is lost. Crag Hack is limited to level 30 but will carry his experience, skills, and spells on to his next scenario. Starting Bonus: 3000 gold or Mage Guild Level 2 or Equestrian's Gloves.
Maps


Click on a map to see a larger version.
Green - Friendly Town
Red - Enemy Town
Grey - Neutral Town
Yellow - Underground Passage
A# - Allied Towns
O# - Opponent Towns (a,b,c,d,e,f,g indicates which enemy)
N# - Neutral Towns
M# - Mirror Entrances (a) and exits (b). two-way unless stated
E# - Exit (a) entrance and (b) exit
S# - Seer (a) and the location of the item (b)
G# - Guard Tents (a) and the location of the Guard Tower (b)
J - Jail
X - Ambush
Starting Out
The most difficult part of this campaign is to make sure the secondary skills Crag has are as good as possible because the only skill that's set in is Offense. What I picked was Ballistics, Artillery, Earth Magic, Logistics, Archery, Wisdom, and Air Magic. The only skills I think are necessary are Artillery, Earth Magic, and Wisdom because the Ballista will help you out before you get a lot of troops and will do a lot of damage while Earth Magic/Wisdom will let you learn Town Portal. Magic Resistance won't be necessary since the enemy heroes on this map didn't use a lot of magic. For the rest, pick your favorite skills and if you can get Tactics all the better to protect your Archers.I recommend you pick the Equestrian's Gloves as your bonus as you'll need to do a lot of running around in the first month.
First Leg
Hartferd, your starting town at A1, is extremely limited in what you can build and while additional buildings are given to you for free this is done too slowly to be relied on and you can never build the upgraded buildings. Fortunately, there are troop generators near Hartferd that you should visit. What I did was hire additional heroes and give Crag as many troops as possible and then went northeast a bit to purchase a Ballista. I then went southwest to hire archers and kill the Dendroid Soldiers to flag that gold mine. Then I went to the east to flag the Swordsmen generators and finally back to the northwest to flag the Pikemen generators. Finally I went north of A1 to flag the Griffin generators and then back to A1 to upgrade troops. All this time I was building up the Mage Guild in A1 because I wanted to get to level 4 before breaking out of this area so that I could get the Town Portal spell. There are enough loose resources that you should be able to have enough if you trade for them at the Marketplace.
On the 10th day, I went west of A1 and attacked the Peasants who will always join and hired more from the Hovels in the area. The 450 Peasants will be good bait against the Crusaders you have to defeat in order to face the enemies. Your next stop is the Hill Fort which is to the south of the Crusaders. After that, go to the south and visit A1. There are three Mercenary Camps which might give you good selections of troops if you're lucky.
Second Leg
I then hired as many troops as I could from A1 and then went to defeat the blue hero along the blue path. I did have to attack some Enchanters along the way and was able to attack some heroes outside of O1a which is another limited town. I went south to get to O2a which is not limited at all and Lord Chasim is almost as powerful as you are and could have a good collection of troops. Once you've defeated him and taken over O2a, blue won't give you any trouble which leaves you to concentrate on the tan enemy. Hire as many troops from O2a as possible and get back to the Hill Fort to upgrade your troops as the tan enemy will most likely be poking in your area by this time. Having Town Portal is really helpful as I went to A1 and then north to the Hill Fort.
During this time I had heroes by each of the four troop generators and, at the start of every week, had them visit the generators and take them to A1 so when Crag came by there were plenty of troops for him to take. Lord Velmer is another strong hero that you must defeat to weaken the tan hero. I followed the tan path, defeated Lord Velmer, took over O1b and south to take over O2b which eliminated the tan hero.

Finishing Up
Now you can explore the map, attacking wandering stacks to earn experience and flag mines so you can build mage towers in each of your towns. When you're ready go to N1, buy a boat and go to the whirlpool so you can defeat Lord Tyranall on the southwest island. He has Expert Tactics along with 30 Champions, 60 Crusaders, 200 Halberdiers, and 150 Marksmen (two stacks of 75 each) but this should be no problem for you by now. Be sure to visit G1a (northeast of A1) with a secondary hero and have Crag visit G2a on Lord Tyranall's island so you can go underground and get the parts to the Legion. Go through G1b and another tower that only lets in Crag and then M1a which has two possible exits. The Legion parts are guarded by Ghost Dragons but they should not be a problem as long as you bring a decent amount of troops. Then use Town Portal and go back to A1 once you have all four pieces to win the map.
| Comments (1) |
- by Harukaba
Unholy Alliance - Search for a Killer
Defeat all the Necromancers in the area to win the scenario. However, if Gelu is defeated in combat, the scenario is lost. Gelu is limited to level 30 but will carry his experience, skills, and spells on to the next scenario. Starting Bonus: Pendant of Life or 2000 gold or 1 Green Dragon
Maps


Click on a map to see a larger version.
Green - Friendly Town
Red - Enemy Town
Grey - Neutral Town
Yellow - Underground Passage
A# - Allied Towns
O# - Opponent Towns (a,b,c,d,e,f,g indicates which enemy)
N# - Neutral Towns
M# - Mirror Entrances (a) and exits (b). two-way unless stated
E# - Exit (a) entrance and (b) exit
S# - Seer (a) and the location of the item (b)
G# - Guard Tents (a) and the location of the Guard Tower (b)
J - Jail
X - Ambush
Starting Out
The most difficult part of this campaign is to make sure the secondary skills Gelu has are as good as possible. The first two slots are always going to be Leadership and Archery which leaves you with six slots to fill. I consider Earth Magic and Wisdom to be essential skills that you should get for the Town Portal and Slow spells. I got them along with First Aid, Armorer, Logistics, and Offense. I would have rather gotten Tactics or even another magic school instead of First Aid but I wasn't able to before I stopped trying.Definitely pick the Green Dragon as your starting bonus as you need to take over another town in the first week and you'll be able to upgrade them to Gold Dragons very soon.
First Leg
Head east immediately with Gelu in order to get the second town as fast as you can. The enemy has 5 towns to your one so you can understand the need to make inroads as fast as you can. Hire a second hero at the starting town to flag mines and don't stop to attack wandering stacks until you have reached the second town. Once you have you can take a somewhat leisurely exploration of the starting area. The second town is pretty well built up and you can build Dragon Cliffs in the first week which will help when you take over O1a (Soledare). Concentrate on making a City Hall in the first town since gold will be a big problem if you upgrade Wood Elves to Sharpshooters on a regular basis.
I'd attack O1a (Soledare) on the first day of the second week but wouldn't use any Sharpshooters because the Castle turrets attack them constantly and they are too valuable to lose. If you buy everything else in your second town, you will be okay and shouldn't lose any of your Green Dragons. Fortunately, there is no annoying magic-casting hero in O1a so that will make things a lot easier.
Second Leg
There are two ways to get across the river, through the underground or on a boat. While there are a good deal of Places of Learning underground, it's more important to make a dent in the enemy so I'd buy a boat at the shipyard and head directly south. Even without Navigation, you will make landfall in three or four days. Before you go, be sure to build a level 4 mage guild in the second town in order to get Town Portal. This will be very important to get reinforcements quickly which will be vital as you will see. Take over O2a and O3a and watch out for any enemy heroes in the area since there's a super enemy going by the name of Aislinn with a lot of troops wandering around and you certainly don't want to face with just Sharpshooters and Green Dragons. So while Gelu is wandering around in the western parts of the enemy's area flagging mines and taking over towns, make sure you're upgrading the second town to at least Gold Dragons and Dendroid Soldiers. What I did was town portal to my first town (A1) and buy as many troops as I could, then town portal to my second town (N1) and upgrade the troops I got in A1 as well as buying as troops from N1 giving a priority to Gold Dragons and Dendroid Soldiers and Wood Elves (upgrade them to Sharpshooters). Then I return to the nearest town by Aislinn and hope he attacks when I'm safe in a Castle. After he's defeated, you can breathe a sigh of relief since the rest of map will be very much easier.
Finishing Up
At this point, I headed east with Gelu and took over O4a and took Gelu underground so he could visit the Places of Learning and attack wandering stacks for experience and hopefully levels. While there were quite a few enemy heroes wandering around, I just hired the troops in the Necromancer towns which were enough to dissuade or even defeat the enemy heroes outright. I also built up the mage guilds in all of the towns and was fortunate enough to get Meteor Shower and Implosion but not Slow which strikes me as somewhat purposeful. I also visited the Tree of Knowledge east of O3a before taking over the final town at O5a and defeating all of the enemy heroes to win the map.
| Comments (4) |
- by Harukaba
You must kill Lord Fayette to win the scenario. However, if Gem is defeated in combat, the scenario is lost. Gem is limited to level 30 but will carry her experience, skills, and spells on to her next scenario. Starting Bonus: 30 Grand Elves or Homestead or Destroy Undead Scroll.
Maps


Click on a map to see a larger version.
Green - Friendly Town
Red - Enemy Town
Grey - Neutral Town
Yellow - Underground Passage
A# - Allied Towns
O# - Opponent Towns (a,b,c,d,e,f,g indicates which enemy)
N# - Neutral Towns
M# - Mirror Entrances (a) and exits (b). two-way unless stated
E# - Exit (a) entrance and (b) exit
S# - Seer (a) and the location of the item (b)
G# - Guard Tents (a) and the location of the Guard Tower (b)
J - Jail
X - Ambush
Starting Out
The most difficult part of this campaign is to make sure the secondary skills Gem has are as good as possible. This seems to be very easy since it seems that Archery, Wisdom, Air Magic, Water Magic, Earth Magic, Tactics, and First Air are locked in with only one slot to be concerned with. I chose Intelligence although other good choices would be Offense or Armorer to increase the effectiveness of the troops or Sorcery to make the spells even have more power.I recommend picking the 30 Grand Elves as your bonus since that will enable you to clear out local stacks faster.
First Leg
There is only one path between your area and the Necromancer area and it's guarded by a stack of Black Dragons so you have several weeks to explore and flag mines and build up your towns before having to face the enemy. I focused on building a high quantity of Centaur Captains, Battle Dwarves, Grand Elves, and Dendroid Soldiers in both of the starting Rampart towns and used the third town as a gold producer. Just keep a careful watch on the Black Dragon stack and have a good force in the area when the enemy breaks through in about week 3 or 4. Once this happens, get all of the troops you can and make the push to the enemy area.
Second Leg
Follow the blue path to O1a and defeat any heroes you come across on the way there. Gem should have Expert View Air by now so this is a great way to keep tabs on the enemy. In my game, O1a was the most heavily built-up town so once you take it over, the enemy should be severely weakened. If there are no enemy heroes in the area and if you have enough troops then go through the Garrison which should have 8 Black Knights, 10 Liches, 5 Bone Dragons and 30 Vampires. If not, you can place Gem in front of the Garrison while you give her more troops since the enemy can only go through the Garrison to reach you.
Once you're ready, go further on the blue path to take over O2a and then north to take over N2. At this point, you're protected from Lord Fayette by G2b underground that can only be opened by visiting G1a which is in the southeastern corner guarded by approximately 18 Gold Dragons. I spent the next several weeks flagging mines and building up Mage Guilds in all of the towns so that I'd have a much easier time in the future. I was also battling wandering stacks in a futile attempt to gain levels or find Places of Learning. Unfortunately, there are very few of either so I remained at level 25 and not as strong as I had hoped at the end of the map.
Finishing Up
Once you've visited the Mage Guilds and have a good deal of troops, visit G1a (southeastern corner) and then back west to E2a to go underground and face Lord Fayette. His stats are 11 10 8 8 (Armorer and Resistance) with at least 75 Black Knights (I had 98) who will do a great deal of damage unless you have a strong spell such as Lightning or Implosion. Once you cast Implosion, Lord Fayette will likely cast Anti-Magic on the Black Knights so you have to cast Dispel before you can cast spells on them again. Resurrection will help you out a lot and once you have defeated Lord Fayette you will have won the map.
| Comments (16) |
- by Harukaba
Yog must defeat the Necromancers creating havoc in this part of Erathia to win the scenario. However, if Yog is defeated in combat, the scenario is lost. Yog is limited to level 30 but will carry his experience and skills on to his next scenario. Starting Bonus: 40 Goblins or 2 Cyclops or 4 Rocs.
Maps

Click on a map to see a larger version.
Green - Friendly Town
Red - Enemy Town
Grey - Neutral Town
Yellow - Underground Passage
A# - Allied Towns
O# - Opponent Towns (a,b,c,d,e,f,g indicates which enemy)
N# - Neutral Towns
M# - Mirror Entrances (a) and exits (b). two-way unless stated
E# - Exit (a) entrance and (b) exit
S# - Seer (a) and the location of the item (b)
G# - Guard Tents (a) and the location of the Guard Tower (b)
J - Jail
X - Ambush
Starting Out
The most difficult part of this campaign is to make sure the secondary skills Yog has are as good as possible. You can reset them by restarting the map until you are pleased with the result. This can be somewhat tedious and I recommend saving if you get anything that's even half-way good because you never know if you will be that lucky again and restarting the map is boring. Yog has four skills that are locked in (Pathfinding, Ballistics, Tactics, and Offense) and getting Wisdom plus a spell school is extremely difficult. I was fortunate and got Artillery, Air Magic, Logistics, and Wisdom.
I recommend picking the 4 Rocs as your bonus since that will fit in with your army.
First Leg
I would spend the first 3 weeks exploring your local area in collecting troops and flagging mines. It's not really necessary to get upgraded troops since you'll eventually be using mostly Necromancer troops for this map. I relied on Goblins, Wolf Riders, Orcs, and Rocs until I replaced them with Necromancer troops.
In the 3rd or 4th week, you'll start seeing the enemy poke around in the area northeast of A1 so that's when I start making inroads into the enemy area. N1 is protected by a small force but is not built up at all (it doesn't even have a Fort) so I'd only use it for a City Hall. O1a and O2a (tan) are the primary towns and will probably be your toughest battles if you can't catch the enemy heroes out in the open. Fortunately, once you take them over and keep them you will have weakened the enemy significantly as well as getting a good source of troops that will help you in the second leg if you suffered heavy casualties from your original Stronghold troops.
The tan enemy will probably have taken over both N2 and N3 by now but they shouldn't be built up very much and shouldn't be a danger. Your goal is to keep the enemy trapped in one town while you have Yog visit power-ups and level-up. If the last town is N2 then it's easy to have one hero sit outside N2 and use Stronghold troops and use another hero to ferry them from A1.
Finishing Up
As long as you keep the enemy trapped, you can take as long as you want to explore and gain levels. There are 3 Trees of Knowledge in the central southern area that are very helpful once you get to level 27. There's also an Altar of Sacrifice in the northeast corner that will help get to that level as well as plenty of wandering stacks. There are three Seer quests but none of them are really useful. S1a will give you the Buckler of the Gnoll King for the Targ of the Rampaging Ogre which only gives one defense extra. S2a will trade 20 Vampire Lords for 100 skeletons and the enemy often completes this one before you can even get to the area. S3a will give you Angel Wings for 15 Cyclops Kings which lets you fly all of the time without having to know the spell.
Once you are done traveling and visiting power-ups, stock up with Necromancer troops and visit the last tan town and defeat it to win this map.
| Comments (8) |
Page 11 of 23