Walkthroughs
- by Harukaba
Bring the Vampire's Cowl to the town of Leafhall to win the scenario. However, if Gem or Clancy are defeated in combat or you lose the Cowl, the scenario is lost. Your heroes are limited to level 20, but Gem and Clancy will carry their experience, skills and spells on to the next scenario. Starting Bonus: Town Hall or 15 Wood or +1 Defense Skill.
Maps


Click on a map to see a larger version.
Green - Friendly Town
Red - Enemy Town
Grey - Neutral Town
Yellow - Underground Passage
A# - Allied Towns
O# - Opponent Towns (a,b,c,d,e,f,g indicates which enemy)
N# - Neutral Towns
M# - Mirror Entrances (a) and exits (b). two-way unless stated
E# - Exit (a) entrance and (b) exit
S# - Seer (a) and the location of the item (b)
G# - Guard Tents (a) and the location of the Guard Tower (b)
J - Jail
X - Ambush
Starting Out
I'd select the Town Hall as your bonus so you can focus on getting Wood Elves and the Castle the first week and be closer to getting the City Hall. One good thing about this map is that the Mage Guilds aren't restricted in any way so if Gem has Wisdom, it finally will be put to some use on this map. After the enemy is defeated, I recommend building a level 5 Mage Guild in every town for the widest selection of spells, especially the important level 4 spells.
First Leg
As usual, give Gem all of the starting troops and hire another hero for additional troops. Build a Homestead in A1 and recruit the Wood Elves and also give them to Gem. Flag the Centaur Stables and Dwarf Cottage on the second day and give them to Gem as well. Now you're going to make a circle route of your area and conquer both of the neutral Rampart towns. Since they don't have Forts, they will be used for their gold and for their Centaurs and Dwarves. On the second or third day, go east or west along the red path ignoring all of the artifacts since they are all guarded. Take over N1 and N2, being sure to flag the Centaur Stables, Dwarf Cottages, and Homesteads that are by the Rampart towns and hire all of the troops that are available at the towns. You should have a good force by the time you return to A1. In A1, be sure to build a Castle and the Upgraded Homestead for the Grand Elves at the very least.
By the time Gem returns, it'll be in the second or third week and she can upgrade all of the troops she gathered along her journey. There's a very valuable Town Portal scroll guarded by either Behemoths or Angels to the west of N1 that you will want to get sooner rather than later. You can get it now since it's relatively close and with your upgraded troops you probably won't suffer many losses and it'll be easy to get back to A1 once you have it. I suggest flagging the local mines with Clancy while leaving Gem at A1 to protect your territory if the enemy tries to invade while you're waiting to build up a larger army. In the 4th week or the start of the second month, you should definitely invade the Necromancer territory.
Second Leg
Give Gem all of the troops and head on the blue path. You'll have to battle a wandering stack of Giants and Titans but the Forget or Blind spell will be very handy here. Continue along and head through the Garrison (Mass Slow will be very helpful here for your Grand Elves) and take over O1a and any enemy heroes nearby. What you do now depends on what the enemy has done and where the enemy heroes are. Using View Air is a big help here. So if the enemy hasn't taken over N3 and isn't on the way to take it over, then go southwest instead and take over O2b. Pay careful attention at the start of each round to make sure the enemy isn't trying to take over one of your towns and use Town Portal to quickly defend your acquisitions. I suggest going through the gates instead of the Garrisons because the underground isn't that big and it will take you another day at the most to get through them. I'd rather take a bit longer to get to the enemy than losing troops because I wanted to take a shortcut. In addition, with your Town Portal scroll you should have no problem with getting quickly to where the enemy is if they happen to slip past you. Once the enemy is defeated you can relax and concentrate on raising the level of both Clancy and Gem as well as visiting all of the places of learning.
Finishing Up
Since there is no grand final battle before winning this map, it's not necessary to get a lot of troops. I suggest building a level 5 Mage Guild in every town and having both Gem and Clancy visit every town (made even easier with the Town Portal scroll). I think that either I was extremely unlucky or the spell was prohibited since I didn't get the Town Portal spell in any of the towns. After you've visited the Places of Learning, visit G1a which is southeast of N1 and then go underground at either E7a or E8a and visit G1b. The tower beyond wants 40,000 gold which you should be easily able to give. Once you have freed the hero, take the Vampire's Cowl and return to Leafhall to win. The hero that was jailed doesn't need to be the one to return it so you can give it to either Gem or Clancy and use Town Portal to return to Leafhall quickly
| Comments (2) |
- by Harukaba
Acquire the Amulet of the Undertaker to win the scenario. However, if Gem or Clancy are defeated in combat, the scenario is lost. Your heroes are limited to level 15, but Gem and Clancy will carry their experience, skills and spells on to the next scenario. Starting Bonus: Blacksmith or 15 Wood or +1 Spell Power.
Maps
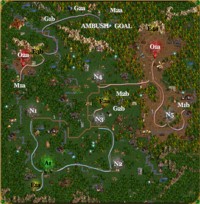
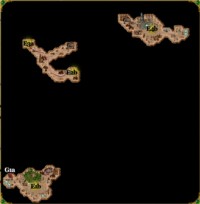
Click on a map to see a larger version.
Green - Friendly Town
Red - Enemy Town
Grey - Neutral Town
Yellow - Underground Passage
A# - Allied Towns
O# - Opponent Towns (a,b,c,d,e,f,g indicates which enemy)
N# - Neutral Towns
M# - Mirror Entrances (a) and exits (b). two-way unless stated
E# - Exit (a) entrance and (b) exit
S# - Seer (a) and the location of the item (b)
G# - Guard Tents (a) and the location of the Guard Tower (b)
J - Jail
X - Ambush
Starting Out
I'd take either the Blacksmith or the 15 Wood as the bonus. The Blacksmith will enable you to build a City Hall faster yet the 15 Wood will enable you to build creature generators faster so it's up to you which one you prefer. The Mage Guilds have the same restrictions as in the previous map in that you can't build level 4 or 5 Mage Guilds.
First Leg
It's far better to take out the enemy than in trying to get the amulet to win the map. Give Gem the starting forces from Clancy and see if you can hire a Rampart hero to giver her even more. Flag the Wood and Ore resource mines near A1 and see if you can go underground at E1a to flag the Homestead and get more Wood Elves. Then get back to the surface and head north to claim the second Rampart town at N1. This town doesn't have a Fort and so I'd use it to build a City Hall for the gold. As to A1, I'd build a Homestead and then a Castle and then work on getting a City Hall. The second week upgrade to Grand Elves and Centaur Captains because they will be used to take over the next two neutral towns.
Second Leg
After giving Gem the troops and upgrading them at A1, go east along the blue path and past the Vampire Lords to take over N2 and then north to take over N3. The enemy will have to go by N3 in order to either invade your territory to go down E2a since that's the only way to get to O2a. So I'd start building up N3 and have Clancy use the Castle troops to defeat the enemy heroes that wander by. Unfortunately, there are a bunch of Scorpicores right in front of E2a and since they're so fast they will likely kill most or all of your Grand Elves if you decide to attack them. In addition, there are Dragons guarding E3a underground so even if you make it past the Scorpicores you have another powerful enemy facing you. One tactic is to wait until the enemy defeats the Scorpicores and goes underground. You then follow it and wait for it to defeat the Black Dragons and then you defeat the hero once their forces have been whittled down. This is chancy since the enemy could always decide to attack N3 instead but it's the easiest. While you're waiting you can flag the resource mines while building up your towns. I suggest building the Enchanted Spring and Dendroid Arches in your Rampart town the second week while you're waiting for the way to O2a to be cleared by the enemy.
Third Leg
In about week 4 give Gem all of the troops from A1 and send her back to N3 since the enemy will probably have cleared out E2a and you can follow them along the red path to O2a. Try to defeat that enemy outside of O2a if you can but take it over in any way you can and head south through the one-way mirror at M1a. You'll be at M1b in Necromancer territory to the east of N5 which has most likely been taken over by the enemy. Take over that town and defeat any wandering hero that's nearby. Then head north along the red path and take over O1a and defeat any enemy that's near. Unfortunately they will probably have gone through one of their garrisons and taken over N4 which means you need to follow them. The garrisons don't allow the use of any magic and have about two weeks worth of every Necromancer nonupgraded unit. After you defeat them you can take over N4 and hunt down any enemy nearby. There's a distinct possibility that the enemy will head south and try to attack N3 so having a good force of Castle troops is essential because it would take too long for Gem to return and she might not be able to take on another garrison and win. Once the enemy has been eliminated you can breathe a sigh of relief since most of the difficulty of this map is behind you.
Finishing Up
Now that all of the enemies are gone, you can increase the levels of Gem and Clancy since they will both transfer to the next map. If you didn't do it in the first map, I suggest building level 3 Mage Guilds in every town and having both Gem and Clancy visit them all since there's a good chance of you getting a variety of nice spells. To finish the map, follow the purple path from O2a through G1b (be sure to visit G1a through E1a), past a School of War that both should visit, past the Ambush of 60 Bone and Ghost Dragons, and finally about 80 Ghost Dragons before you can grab the Amulet of the Undertaker and win the map.
| Comments (1) |
- by Harukaba
Defeat all your enemies to win the scenario. However, if Gem is defeated in combat, the scenario is lost. Gem is limited to level 10 but will carry her experience, skills and spells on to the next scenario. Starting Bonus: 10 Wood and 10 Ore or 8 Crystal or Level 1 Mage Guild.
Maps

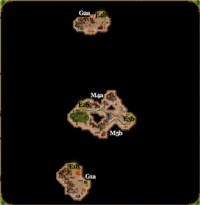
Click on a map to see a larger version.
Green - Friendly Town
Red - Enemy Town
Grey - Neutral Town
Yellow - Underground Passage
A# - Allied Towns
O# - Opponent Towns (a,b,c,d,e,f,g indicates which enemy)
N# - Neutral Towns
M# - Mirror Entrances (a) and exits (b). two-way unless stated
E# - Exit (a) entrance and (b) exit
S# - Seer (a) and the location of the item (b)
G# - Guard Tents (a) and the location of the Guard Tower (b)
J - Jail
X - Ambush
Starting Out
Take the Level 1 Mage Guild as your bonus since it will help you get a City Hall and eventually a Capitol faster as well as letting you use the Wood and Ore for building creature generators. There is a limitation in that you can't build Level 4 or Level 5 Mage Guilds in any of the towns so if you won't be able to get Town Portal to easily defend your towns.
First Leg
Hire some additional troops and give Gem most of them, flag the Centaur Stables and hire additional Centaurs, flag the resource mines, and try to take over both the second Rampart town and the Gold Mine. Place a priority on getting Grand Elves in both Rampart towns since they are the most effective against the slow moving early Necromancer troops. I recommend starting your push into enemy territory starting as early as the 3rd or 4th week by following the blue path. Take over N1 then swing north and take over N2. I'd use these two towns as money and possibly resource producing towns since if you act fast your first two towns will produce all of the creatures you need. Then head east on the green path and down E2a for a brief side-trip.
Second Leg
In this section of the underground there are two gold mines and a one-way mirror at M4a which will take up back to the surface at M4b which is in the southeast corner. The Arena is a nice place to visit for the bonus and if you're low on magic points there's a well handy. Continue along the green path down M5a back to the underground and then east to E3b. When you exit you will be west of a Necromancer town that you should easily conquer. Hunt down any enemy heroes that are in the area since you don't want them sneaking past you. View Air is a great tool for this job. Once you have overtaken N3, go north on the green path to do the same thing to N4. This should also be a relatively easy task since Grand Elves plus Slow or Blind or Forgetfulness works wonders. If you're low on troops you might want to stay in N4 and have two additional heroes ferry troops from A2 and A1 while striking down any enemy heroes that attack you or that wander by.
Finishing Up
Once you have enough troops to feel confident, head either west or east on the yellow path and take over O2a or O1a, head into either M3a or M3b, and take over the final town. Unlike other campaigns where heroes travel from map to map, there aren't many places of learning on this map and so it's not necessary to delay the victory longer than necessary. The only real danger you're likely to face is the Castle towers so to minimize your Grand Elf losses, you can always send a weaker hero to lure the strong enemy out and then use Gem to attack the enemy after surrendering with the weaker hero. Once you defeat every Necromancer town and hero, you will have won this map.
- by Steven W. Carter
 Elwin is the only hero that carries over in the campaign, so make sure he is
powerful, and make sure he learns as many spells as possible. Also, since
he'll get the summoning skill, it's best that you travel with a full army so
you can control which creatures he summons. Similarly, it's better for Elwin
to be a Warden or Summoner than a Beastmaster, although you'll still want to
pick up some combat skills.
The best Nature units are elves, griffins, and faerie dragons. Elves are the only Nature ranged troop outside the creature portal, and so by default they're better than white tigers. Griffins are a good utility troop since they can fly, and the faerie dragon bonuses are better than the phoenix bonuses. Phoenixes are better for summoning.
As for the creature portal, I like to use a combination of water elementals and fire elementals since they compliment each other, and since the only other Nature ranged unit is the level 2 elf. (Waspworts are too slow to use in an army, but they're fine for castle defenses.)
- by Steven W. Carter
Objective:
1. Defeat Lord Harke.
Maps
 Click on a map to see a larger version.
First Leg
Elwin starts right outside your starting town, but he hasn't officially visited it yet. So if Elwin has nobility, bring up the town's information screen so Elwin gets set as governor. Then move him straight west towards Gramin. Once he gets close enough, Gramin will be able to move (he's stuck otherwise).
Gramin starts out level 25, but he can't do much on his own because most of his skills are tactics skills. So you can try leaving the two heroes in their own armies so they cover more ground, but it's probably best to put them in an army together.
Note: Elwin starts out with the Bow of the Elf King, which gives ranged units an extra shot. That, obviously, makes ranged units much more powerful, and so you might want to skip water elementals this scenario and rely exclusively on fire elementals.
So start exploring. Right next to your town you'll find a quest hut plus a three-way portal leading to a crystal mine and a small treasure area. The inhabitant of the quest hut will give you a "pot-o-gold" if you return his Four Leaf Clover to him. (The pot-o-gold is about 8000 gold, not an artifact.) His "arch enemy" is the stack of leprechauns at the end of the Ungthor's Path choice in the portal. Try to do the quest right away since it will make building up your town easier.
Also notice the red dragon portal exit near your town. There are no less than four such exits in your area of the map. Plus, there are two red dragon portal entrances in Red's lands (which you can't get to), and Red's lands aren't very large, so you'll be seeing Red's heroes using the portals all throughout the scenario. If Elwin is so powerful that you don't need Gramin to help him, then just stash Gramin in your starting town, and use him to hunt Red heroes. After the first one (or two), which will be around level 27, all the Red heroes will be level 1, and they should be easy to defeat.
So, for that first Red army, use Elwin in the battle, and have him summon phoenixes every turn. Then have the phoenixes attack the enemy heroes while the enemy troops all attack the phoenixes. Once the heroes are dead, it'll just be a case of mopping up.
Second Leg 
Otherwise, try to explore your area of the map as quickly as possible. South of your starting town you'll find two neutral Nature towns that should be easy to capture. South of that lies Teal's (Harke's) lands, but there is a group of behemoths and cyclopes blocking the way, so you're safe enough from Teal for a while. North of your starting town you'll find another neutral Nature town, plus a multi-way portal leading to a few treasure areas. (The treasure areas contain a lot of skill shrines if you need them.) So explore as much of the northern area as you want, or until Blue starts knocking on your door, and then head south.
Once you're ready to confront Harke, purchase as many troops as possible and put them and both your heroes into a single army. Harke's army will be tougher than the end-scenario armies you've seen before, mostly because he seems to accumulate all the troops from all of Teal's towns. Harke is also level 39, plus a tactics specialist, so his army will be even more difficult than normal.
So when you face him, start summoning and try to kill him first so you can get rid of his tactics bonuses. This is the last major battle you'll face in the campaign (everything else Elwin can handle all by himself), so don't worry about losses. Just make sure Elwin survives and you defeat Harke's army (Gramin doesn't need to survive). If you have trouble, capture the first two Teal towns you come across (one might still be neutral), and then just blockade Harke until you can defeat him.
Finishing Up
Once Harke is defeated, go through the quest gate at (197,107) (northeast of Teal's southwestern town). You'll find the red keymaster tent there, which you can skip, plus a teal dragon portal, which you should take. The portal will take you to a blue keymaster tent and a purple dragon portal. Visit the tent and then take the purple portal, and then walk all the way back to the coast near your starting town.
You'll find the blue keymaster gate there, plus a blue boat waiting behind it. (You remember the introductory story about blue sails and red sails, right?) So board the blue boat and sail to the island where Shaera is waiting. Then just walk up to Shaera to win the scenario (and the campaign).
| Comments (8) |
- by Steven W. Carter
Objective:
1. Find Mirilass.
2. Capture Harke Manor.
Carries Over:
1. Elwin (max level 32)
Maps
 Click on a map to see a larger version.
First Leg
After flagging the nearby ore pit, sawmill, and tree lodge, head south across the bridge. You'll quickly run into an Orange Nature town, and, once you capture it (easy enough with summoned creatures), you'll make your corner of the map much more secure. (The only way in will be by your starting town.) So once the orange town is yours, take your time and explore the area, and also build up your two towns.
Note: There is a quest hut in the area at (65,104). If you kill the nearby medusae (they're next to a backpack, but they're not flagged), you'll receive a dwarven shield.
Once you clean out your part of the map (including the treasure areas past the two portals), head north. You'll soon find Splitoak, where Mirilass' brother lives. If you've learned a couple level 5 spells from your first two towns, then taking Splitoak shouldn't be too difficult, and when you do you'll learn that Mirilass is hiding near the blue keymaster tent in the southwestern corner of the map.
The only way for you to go now is west, so head in that direction. You'll find a neutral Nature town that should be easy to capture, plus another portal leading to a treasure area. Eventually, you'll come to the blue keymaster gate guarding Blue's town (Harke Manor). Blue doesn't have access to the command word, so it's stuck inside waiting for you.
Finishing Up 
You still don't have any choice about where to go, so head south into Orange's domain. Orange starts out with three towns under its control, so it might put up a fight, and it might not. So play the area by ear, and capture what you can without losing too many troops. Everything in Orange's part of the map is optional; you just need to travel through it to reach the blue keymaster tent.
When you pass through the quest gate leading to the blue keymaster tent, you'll be attacked by a large army of Nature troops (including two faerie dragons). Summon in some phoenixes or faerie dragons of your own, and let them distract the enemy while you pick them off with your elves and elementals. Once the army is defeated, visit the blue keymaster tent and then take the dragon portal to the northern part of the map.
Harke Manor will have a reasonable number of troops defending it, and it'll have a castle, but the enemy hero will only be level 22, and you'll have seven towns supporting you (if you've defeated everybody else). So if you can't take the town on your first attempt, just wait a week and ferry in more troops and try again. Once you capture the town, the scenario will end.
- by Steven W. Carter
Objective:
1. Construct a Mirror of True Love.
Carries Over:
1. Elwin (max level 28)
Maps
 Click on a map to see a larger version.
First Leg
Ignore the piles of wood for now and head straight north. As you exit the glade, eight white tigers will join you. They won't be much help or hindrance, so put them into a separate army and let them pick up stuff (like, say, that wood). Keep moving north on the second day, and you should notice a neutral Nature town. Capture the town (it won't have any ranged troops, so summon in your favorite troop until you have enough to take the town) and then explore the area.
You'll find that you're boxed in -- at least until Elwin visits the quest hut at (114,60) and gets his first quest of many in this scenario. It seems that if you bring potions of mirth, quickness, resistance, and endurance back to the hut, the alchemist there will give you the cloud-silver you need to construct the mirror. So, after you flag the two resource buildings in the area, follow the path east.
Note: Elwin has to be in the army that visits the quest hut. If he isn't you'll still get the quest, but the trees blocking the road won't disappear. Elwin also has to be in the army that returns the potions.
Here's where you'll find the potions:- Mirth. It's right next to the tree of knowledge at the edge of the path.
- Endurance. It's at the end of the south branch of the path, guarded by some cyclopes.
- Quickness. It's along the northern branch of the path, next to the bridge.
- Resistance. It's northwest of the path, guarded by some waspworts.
Once you have the four potions, send Elwin back to the quest hut to complete the quest (and also re-supply his troops), and send the white tigers over to the blue keymaster tent. Once Elwin completes the quest, the rocky area in front of the tent will disappear, and so the tigers will be able to visit it, allowing Elwin to pass through the keymaster gate beyond the bridge.
Second Leg 
Almost immediately upon passing the keymaster gate, you should notice one of Green's Nature towns. Run over and capture the town, and then explore the area. You'll find the second quest hut behind the town to the west. The jeweler inside will fashion the cloud-silver you have into a mirror frame provided you give him 40 gems. Conveniently, there is a gem mine right next to the hut, but it will still take a while to accumulate what the jeweler needs.
So head out east and do some more exploring. Elwin himself needs to go to the quest hut once you have 40 gems, but there isn't any hurry to do this, so you don't need to keep Elwin close to town. In fact, it's probably better for Elwin to ramble as far as way as possible so he can pick up resources and neutral towns before Green and Red get to them.
Finishing Up
But, eventually, once you have 40 gems, go ahead and complete the quest. The third quest hut is at (59,98), near a town. The merchant inside will give you some pure sand in exchange for 10,000 gold. But be careful. This isn't one of those quests where they ask you if you want to complete it. If you visit the quest hut while carrying 10,000 gold, you'll automatically complete the quest. So only visit it when you're ready.
The fourth (and final) quest hut is at (37,111) (along the coast). The dragon there will turn your sand into a mirror provided you free its mate. The mate is being held in the Red town in the northeastern corner of the map (past a quest gate). Once you capture the town, you'll receive a black dragon troop, and you should add it to your army. Then, when you visit the quest hut again, you'll win the scenario. So take your time before completing the quest, and try to get Elwin as much experience as possible (but chances are you still won't get him very close to level 28).
| Comments (3) |
- by Steven W. Carter
Objective:
1. Solve the tragedy of the white tigers.
Carries Over:
1. Elwin (max level 22)
Maps
 Click on a map to see a larger version.
First Leg
This is one of those maps that is very convenient for the computer players, but very inconvenient for you. If you cross the bridge to the southwest you'll find not one but two dragon portal exits nearby, giving the computer players easy access to your town and resource buildings. Luckily, the map is only medium-sized, so you'll never be too far away from home, and you'll be able to use the dragon portals yourself to get home quickly.
So visit your starting town if Elwin has nobility, and then cross the bridge to the southwest. You'll find that you have to help the white tigers with their "greatest tragedy" and that you shouldn't attack any of the Teal- flagged white tigers on the map. (They won't attack you, either.) So clear out the little island area except for the water elementals, and then cross the next bridge to the northeast. You'll find some Orange-flagged trolls there eating some white tigers.
After killing the trolls, you'll decide that the trolls are the great tragedy you need to help the tigers with, and, if you progress a little farther to the northeast, you'll find a Window of the Magi that will show you the location of all the trolls on the map.
Now you have a choice: there are two-way portals to the east and west, and you have to pick one to proceed farther into the map. However, the best one to take is the western one since it leads to the Nature towns owned by the computer players. (The eastern portal leads to Chaos towns as well as Nature towns.) Also, by going west, you'll be able to neutralize the enemy towns closest to the dragon portal entrances.
Second Leg 
So head towards the western portal, stopping to visit the quest hut and some trolls along the way. The quest hut will offer you a Nature skill for 15 wood, but if you can't afford it yet, don't worry about it. You'll be passing this way often enough during the scenario, and you can complete the quest later. (Or you might want to just wait for enough wood. That quest hut has given me as many as three Nature skills in the past, instead of the promised one.)
Once you pass through the western two-way portal, you'll find one of the dragon portal entrances that leads to your starting town. If your army is looking sad at this point, then go back to town to re-supply your army and learn some new spells. Then head back to the same place.
Continuing west, you'll find another quest hut willing to trade a Nature skill for 15 wood, another group of trolls, plus assorted useful buildings. Eventually, you'll also run into one of Green's Nature towns. So take the town and then explore the area while you build it up. Then head south.
Note: When you take enemy towns in the campaign, don't be too concerned about defending them. Just funnel their troops to your starting town, and make sure you hold your starting town.
To the south you'll find one of Blue's Might towns. Take it or not, but explore the area and kill the trolls south of the town. Then head east to the "connector area" of the islands on the map. (You'll recognize it by the eight bridges.) Depending on how much experience you have at this point, you can go to any of the three areas connected here that you haven't visited yet. Each has a town plus assorted other useful buildings, and you can conquer the areas as much as you want. But none of them lead to the last set of trolls (to the southeast). To get there, you'll have to head back to your town and then take the eastern portal that you skipped before.
Finishing Up
So once you've done what you want in the middle of the map, and once you've killed the last set of trolls (you should hear that Orange has been eliminated), head to the quest gate at (130,94) (along the southern edge of the map). You'll have to go back to your starting town first, but conveniently you'll find a dragon portal entrance with the last set of trolls. You'll still have to walk all the way back to the quest gate, but along the way you can trouble Green and Blue if they happen to get in the way (or even if they don't).
Past the quest gate you'll find the "Troll Lord" plus 80 trolls, but they shouldn't be any match for your army. In fact, the Troll Lord might attempt to flee, so kill him before he gets the chance. Once he's dead, visit the nearby tiger den to learn that the trolls were only an annoyance, and that the real tragedy is the recent stillborn deaths of the tiger cubs.
This revelation will open the way to an underground passage plus a red keymaster tent (to the west), so visit the tent and then head underground. You'll find Red's lands, and all you have to do to finish the scenario is defeat Red's main hero, Worllarc. But there are some optional stacks of undead creatures around if you want to pick up some artifacts or experience, which you might want to do since Worllarc's army won't be very powerful. In fact, Worllarc himself will only be level 17, and he won't have any level 4 creatures with him, so the battle should be pretty easy. Once you defeat Worllarc, the scenario will end.
| Comments (3) |
- by Steven W. Carter
Objective:
1. Find Shaera's father, Gramin.
Carries Over:
1. Elwin (max level 15)
Maps
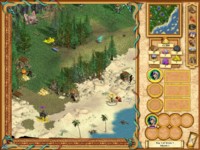 Click on a map to see a larger version.
First Leg
Elwin starts out with the summon wolf spell, and that plus his weak combat skills should get you through the initial two battles. Then continue following the path, flagging troop buildings and only attacking what's in your way. The idea is to get to the first neutral town as quickly as possible and with as many troops as possible.
Once you take the town, feel free to go back and collect some of the things you missed before. In particular you should fight the earth elementals to get the wand of fire bolt. That'll help you way more than any other artifact on the map, and with elves in your army the earth elementals should be easy to defeat. You might also want to pick up the mage robe, but the medicine cart is guarded by 50+ bandits, and it probably isn't worthwhile to pick up anyway.
Note: As you gain levels, don't focus completely on your Nature skills. The second scenario will give you all sorts of ways to gain Nature skills, and so you should leave several advancement opportunities open.
Then explore east of your town a little and flag the windmill, treetop lodge, and gold mine. There is also a neutral Chaos town in the area, but you might want to avoid it until you can build up your army a little. Past the Chaos town to the east is a dead end that contains some creatures to kill and artifacts to pick up. Once you do what you want to do there and take the Chaos town, head north past Orange's domain. (It's protected by a keymaster gate, and you can't access it yet.)
If you go north at the intersection, you'll find one of Blue's towns. It might be difficult to take, depending on what spells you know and what you have in your army. But try to summon creatures to protect your troops from ranged attacks, and use your elves and wand of fire bolt to kill the enemy ranged attackers. Then, when the enemy melee attackers sit behind the walls doing nothing, summon in a large force of wolves (or better, if you have it) and let them charge the gate. Once the gate is down, you should be able to pick off the enemies with your wand and elves while the summoned creatures distract them.
Second Leg 
Once the Blue town is yours, you'll find a few useful buildings nearby, including another gold mine. Also, if you go back to the intersection and head east, you'll find an underground passage at (79,76) and a quest hut at (77,94). The passage is required for progressing through the scenario, so take on the Chaos group guarding it when you have a big enough army. (If you're having troubles with the battle, and if you have more money than you know what to do with, you can use an army of Might or Chaos troops to soften up the Chaos guardians before attacking them with your main army.) The quest hut will give you an arrow of stunning for a ring of strength (carried by a nearby neutral hero with some evil eyes), so complete the trade if you think it's useful.
When you go underground, you'll find yourself in the middle of a long tunnel. If you used the Window of the Magi near your first town, then you'll see that the southwestern end is where you want to go. There you'll find the orange keymaster tent, allowing you to enter Orange's lands, and also a two-way portal to the northeastern end of the tunnel, allowing you to scoop up some treasures without having to face the monks guarding them.
When you get back above ground, head for Orange's area. You'll find the blue keymaster gate near the entrance, but it leads to a treasure area guarded by cyclopes, and the cyclopes will probably damage your army too much to make the treasure (mainly a summoning amulet) worthwhile.
You'll also, of course, find one of Orange's towns in the area. But there are a few reasons not to attack it: you don't need to attack it, you'll probably reach level 15 without attacking it, it'll probably have numerous ranged troops guarding it, and it's a Chaos town. Also, once you pass the Orange town to the north, you'll find a Nature town, and it'll probably be lightly guarded. So take that town instead, and then hang around it for a couple days while you ferry in troops and build up the town to have a level 2 druid's hall. You can also take the opportunity to flag the nearby resource buildings.
Finishing Up
Then head east. Shortly you'll find Blue's second town. You might want to try attacking this town, depending upon how well it's defended. Blue's main hero will probably inside, and that hero will probably have artifacts and tactics, meaning that even without cyclopes the inhabitants might cause you problems. So save first and then try attacking it. If you can take the town without losing too many troops, then do so just for the experience.
Otherwise, continue heading east. You should encounter Orange's other town, but again it will probably be too difficult to attack. So instead head south to the coast where you'll likely find a stack of behemoths. This will be your last battle, so feel free to sacrifice all your troops if necessary to win. But between the behemoths and the treasure chests they're guarding, you should end up pretty close to level 15, if not actually making level 15. Then head north through the quest gate and meet up with Gramin and complete the scenario.
| Comments (8) |
- by Vox Clamant
|
|
||

Yorwick is hard to reach, and contains the GM trainers for all the specialty skills except meditation.
To get there, you need a party strong enough to take on lots of vampires and apparitions. There is no town transport altar, so set a Lloyd's beacon, when you get there, if you have that spell. You must clear out the connecting tunnel from Thronheim that dumps you out at "Connecting Tunnel A" on the above map, fight your way the long way around to Yorwick village, then enter "Connecting Tunnel B" to break through a wall that gives you a direct access from the village to the Connecting Tunnel.
Thanks Claus -- Claus reports another secret mountain pass right near Connecting Tunnel "A" that is a shortcut to Yorwick. (I am beginning to suspect Claus is a Sherpa.)
Thanks Starla and Jaded -- Have some fun (save first) and go swimming! Starla and jaded found that if you jump into the ocean when you come out "Connecting Tunnel A" you get into the rendering engine! Walk NW and you will see the village above you! Jump up, and you're in the village!
Page 15 of 23

