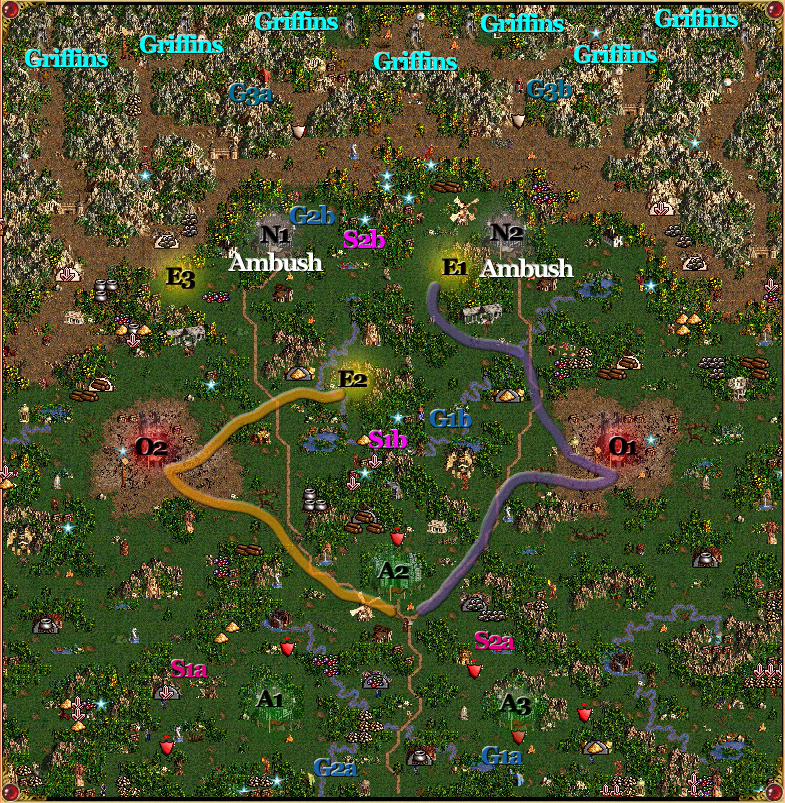
Now you can relax with most of the threat eliminated. There is the Tan enemy but they are weak don't send out heroes often. However, don't rush to take out the last two Tan castles since they are protected by extremely strong ambushes which consist of 60 Familiars, 50 Infernal Trogs, 30 Harpy Hags, 30 Magogs, 20 Cerebri, 20 Evil Eyes, and 5 Scorpicores or 5 Efreet Sultans. I suggest not attempting this until you're ready to flag the Griffin Towers near the end of the map. The benefit to taking over the two Tan castles is that you get rid of two very strong stationary Tan heroes that are found below G3a and G3b.
Flag the mines and build up all of your castles so you can get as many troops as possible to fight the garrison troops that protect access to the Griffin Towers. You'll definitely have the gold (especially if you build the City Hall in every town you conqured) and there are so many resources available that you shouldn't run out.
There are two Seer quests that require you to visit a Keymaster Tent in order to get past the Border Guards that prevent access to the artifacts that the Seers want. G1a corresponds with G1b and you find the Bird of Perception at S1b that you take to S1a for Expert Eagle Eye. G2a corresponds with G2b and you find the Ladybird of Luck at S2b that you take to S2a for 50 Griffins. There really is no need to get the Expert Eagle Eye as there are no heroes to learn spells from but the 50 Griffins are very valuable.
|
Finishing Up
|
|
Once you have enough creatures, put them on your best heroes and have them defeat the garrison troops and flag the Griffin Towers. You'll need to go to the KeyMaster Tent at G3a to open the Border Guard at G3b to get access to three Griffin Cliffs. The battles shouldn't be very tough as your main heroes will have enough magic power to defeat most of the enemies quickly.
|
|
Return to Campaign Walkthroughs
|