Walkthroughs
- by Rapier
Objective:
- Obtain Amulet of Necromancy
- Caputure Godric’s Daughter
- Bring Godric’s Daughter to Lorekeep
- Capture Hikm
- Markal and Isabel must survive
Carry Over:
- Markal
- Isabel
Bonuses at Start:
- 3 Liches
- 1 Bone Dragon
- Cape of the Lion’s Mane
The cape of the lion’s mane is worthless as it increases moral, which the undead are immune too. Which of the other two you want depends on your preferences, although I think the Liches are better for the final fight you have to on this map.
Guess what, you are going to fight Godric!
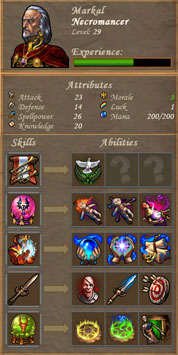
The old general can be tougher than the final campaign boss, depending on how much, and how well you have developed him in C1M5, and C3M2. Godric's army builds up very quickly, so you better fight him as soon as possible. Hopefully, you have built your Markal to become a never-stay-dead Necromancer. Here is an example on the left:
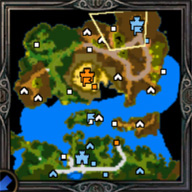
Fortunately, this map is relatively small, as it is basically a zoomed-in version of C3M2. The mines, stat bonuses, and even the Sylanna's Ancient (level-up tree) are all in the same place. Also, if you have learned the Town Portal spell for Isabel and Markal, it will save you quite a few days of travel.
This scenario will be over quite soon, so you can forget about building town upgrades -- just focus on money. Get the Towns Halls and Capital on Day 1 and 2, and then perhaps the Castle Walls to increase your troop production. You can upgrade troops with a Hill Fort south of Lorekeep later, with a discounted price. So it is really pointless to build any upgrade buildings in your two towns.
Note that Isabel's Haven troops starts leaving her to join Godric on Day 2, so try your best not to leave Haven troop with Isabel when you hit End Turn. You really don't need to dismiss her troops, as you can hide them in the castle, or simply swap them to a level-one hero. You can also convert them to undead in Lorekeep, and make Isabel command undead units as well. Just put all armies on Markal for the final boss fight. (Unfortunately, you cannot make Isabel fight Godric in this campaign finale.)
For Markal, get all the troops from the Necropolis, and then head west as fast as you can, while collecting as many skeleton archers as possible. Your goal is to collect a large group of Wraiths half way to Isabel's castle. The Hut of Magi in the north reveals Godric's castle, so send a low-level hero to visit it sooner or later.
Before picking up the powerful reinforcement, you will first meet a large number of Rakshaka. Now it is the time to make the Necromancers proud! Mass Slow, Puppet Master, Frenzy are all wonderful spells to use in this fight. You should be able to avoid losses, since you can always raise them back before the end of the fight. You can cast Mark of Necromancer on the enemy, so your mana is constantly high.
After picking up the undeads, visit the prison just east of Newpost, and collect Freya from the prison (you must visit it with Markal) and then head back along the road towards Lorekeep. You don't have to go all the way back, as...
Angels will ambush Markal on his way back. Again, make use of Puppet Master, Frenzy, Blind along with Raise Dead to make sure you take no losses. After the fight, you get an artifact -- the Angel's Wings have been automatically equipped on Markal. This artifact makes Markal "fly" all over the place, and only Markal can equip it. You will eventually use it to access Godric's castle, and you can also use it to fly to the northern islands to pick up stat bonuses for Markal. However, if Markal is going to travel almost exclusively on paved road for a given day, removing Angel's Wings will enable Markal to travel farther.
Now you are actually ready to fight Godric! However, if you have developed Godric into a power house in the past, then Markal is in no shape to win at this moment. You need more army! There are plenty of creatures on the map for Markal to convert to skeleton archers. Also, you can convert Haven troops to undead units back in Lorekeep.
If you want to fight Godric early, try to do it on Day 1 of Week 2. This way, Godric doesn't have time to get a second week's worth of reinforcements, but you do! You can use Isabel to quickly transfer Haven units to Lorekeep (with Town Portal), convert them to join the fresh undead units from Lorekeep, and upgrade them in the Hill Fort with a low-level hero, and ship the units back to Markal, who flies over the mountain to fight. You can do all of these in one day!
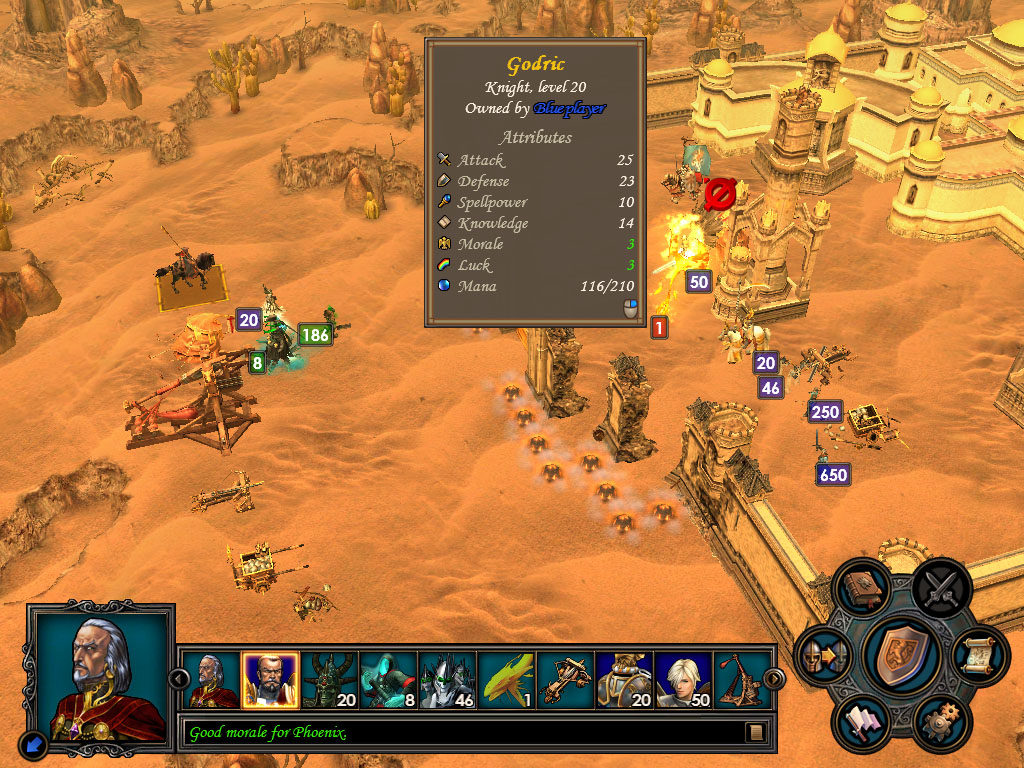
If you don't fight Godric on Day 1, Week 2, there will be two Orange heroes coming to you by sea, at the beginning of week 2. One will land close to Newpost and try to steal it from you, while the other will land on the shore just south of the Hill Fort, trying to take your Lorekeep. These Orange armies are not as powerful as the spawned heroes back in C3M3, though, so they are actually excellent sources of skeleton archers. The screenshot below is what you and Godric can look like on Day 5, Week 3, Month 1 (heroic, patch 1.3).

Godric's army consists of a wide array of Academy units. Focus on the ranged units (Titans, Archmages and Master Gremlins) first, and then worry about the other troops. The Titans, although small in number, can hurt a lot! If you have trouble defeating Godric's Academy army, there is something really wrong with your Markal. Either you should come back later with a lot more units, or you have built him into a mediocre Jack-of-all-trades.
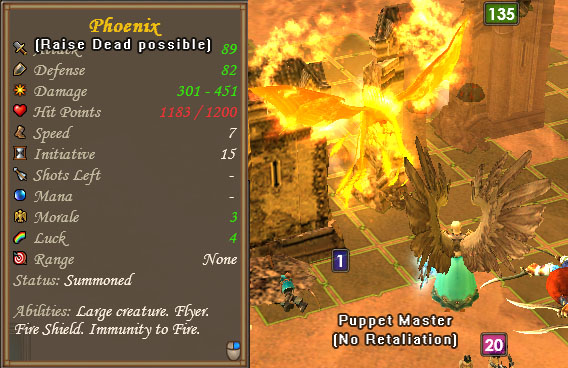
Don't feel too happy when you defeat Godric's Academy army, because that's far less than half of the fight! Godric now automatically summons in Haven troops, within the same battle. If you have no means of regaining mana (Mark of Necromancer, activated by the Spirit Link feat under Dark Magic), be conservative with it against the Academy army. The size of Godric's Haven troops has been drastically increased in patch 1.2, and largely toned down in patch 1.3 (as Markal was weakend significantly as well). The screenshot on the upper right happens later during the same battle, when Godric summons his reinforcement. Note how little Markal's undead army has been reduced to (as Raise Dead is almost useless now).
If somehow Godric's action initiative comes directly after Markal (as in the picture), try not to cast Mass Effect spells as Godric will immediately replace it with his positive (Light Magic) version on his own troops, meaning your action is totally wasted! For example, if you cast Mass Slow, and Godrci casts Mass Haste, then only Mass Haste stays. When this happens, cast some regular spells (such as Puppet Master) to bring your action slightly behind Godric, and overwrite his positive spells then.
You really have to fight hard against Godric's Haven army. On heroic (patch 1.3), it starts with 25 Angels, 10 Paladins, and hundreds of Footmen and Archers. These numbers grow extremely rapidaly. Two weeks later, you will see 50 Angels, 20 Paladins, 650 Footmen and 250 Archers (see picture to the upperr ight). On patch 1.2, you would expect double that number!
A Pheonix (with expert Summoning Magic) can be extremely handy here, and you can actually cast Raise Dead on the phoenix to bring back its HP! (Conjouring a new phoenix costs 28 mana, with Arcane Training, on patch 1.3.)
It is worth mentioning that Puppet Master is now much more effective in patch 1.3 (although it sometimes fails for no good reason), as the puppet effect is NOT cancelled while the target takes damage. This means that if you nailed Godric's Angels for this spell, the Angels will be free-hit for all for about 6-7 turns, if Godric does not cleanse them! (see below) And AI Godric is usually not smart enough to cast what is best for him.
Make your best to Puppet Master the Angels, and kill the Paladins as soon as you can. On heroic, the Paladins get unlimited lay on hands to remove Puppet Master and Frenzy. Since your undeads die pretty fast and come back pretty ineffectively now, it might be just your Phoenix fighting, so keep Markal alive by raising spectres/ghosts and other units here and there. Hopefully, you will eventually outlast Godric and win this campaign. Contgratulations!

A human designed Godric is probably the most challenging fight you can get in the campaigns. Finally, make sure you have the patch because the fix to frenzy makes a lot of difference, as before if you used frenzy in this fight, you had to use it on an archer unit, since all the melee units just defend.
| Comments (55) |
- by Rapier
Objective:
- Obtain staff of the Netherworld
- Obtain Cloak of Death’s Shadow
- Obtain Ring of the Unrepentant
- Markal and Isabel must survive
Carryover:
- Markal (Max Level: 26)
- Isabel (Max Level: 26)
Bonuses at start:
- 5 Vampire Lords
- 5000 Gold
- Curse of the Netherworld
Markal's specialty is utilized to its fullest extent in this mission. This is also probably the only mission that playing heroic will grant you an easier gameplay (pre-patched game only, though), because you will receive much larger neutral undead stacks all over the places, ranging from hordes of Vampire Lords to Packs of Bone Dragons.
After Godric, you get Isabel to help you in this mission. If you have spent some effort to develop her in the first campaign (for example, ATK + DEF > 50, Expert Light magic with Master of Wrath, Expert Luck, Expert Attack with Retribution, etc.), she actually owns this mission single-handedly even on heroic. Since patch 1.3 weakened Markal significantly, you might actually need her to fight some tough battle where your Raise Dead simply can't keep up.
This is also the first Necro mission that offers you a decent set of starting bonuses for different strategies in the necropolis campaign. If you didn’t obtain Curse of the Netherworld spell on an earlier map, you might want to take it because there are several goal-oriented heroes that have large armies for you to fight. Also, patch 1.3 boosted the power of this spell a little, so it is not a bad alternative of Raise Dead, which are rendered pretty useless in big battles now. If you did take Curse of the Netherworld, then take the Vampire lords if you wish to rush at the start, or take the gold if you prefer a slightly slower build up. By the way, on heroic, in more recent patches the scripted AI wizards tend to drop you the Armagaddon spell non-stop, so you have to finish them off as fast as possible.

You start on a small island, which includes the town of Lorekeep, a Necropolis now at level 11, and you can get upgraded skeletons and zombies from the start. Isabel starts on the same island, in front of a new town Newpost, sadly it starts at level 1 and is a haven (the only one on the map) so it’s not particularly useful except for making money. If you should get attacked on the island though, Newpost can get a castle and Lorekeep can only get a citadel.
There are various undead stacks to collect, so you can gather a quick army. There are quite a few on your starting island, and more on the northern continent, where your enemies are plenty as well. A good place to pick up undead is the area east and west of Ziyad’s landing point. (Ziyad is the wizard town directly above Lorekeep). You can get bone dragons, vampires, ghosts and archliches.
Ziyad, the rightmost mage town, and the closest to where Markal starts, is probably the only plausible place to rush to. It comes with the additional benefit of giving you the Staff of the Netherworld (-20% initiative to enemies) when you take it. This has the added advantage of allowing you to convert three of the mage towns on the map into Necropolis towns, making this the best way to compete with orange. When you make a landing close to the city, the wizard staged around this city will rush back to defend. It is possible to take the city before the wizard comes back. Otherwise, you will have to do a castle siege against the wizard army, and possibly suffer at least one Armaggadon; three actually sounds normal! If you have built up Isabel well, then you can actually score a much better victory with her. But remember to give the staff to Markal. This staff was named something else, but fixed to its original name in patch 1.3. The conversion happens when you visit the new Academy town with Markal (with the staff in his possession), and leave the town. You have to pay 10,000 gold as well.
Important: Everything inside the town will be lost when the curse happens. So never leave any army or hero in there. If you leave Isabel in the city, she will disappear and you lose the mission automatically!
When you convert a town it starts at level 1. However, there are plenty of mines around and you should not have to worry. You can also leave them as academies, as they’re quite high level. (but then you cannot learn dark magics from the mage guild; they are not offered in Academy towns.) Once you have the staff you get a secondary objective, which is to convert the three mage towns into necropolis. You do not get great rewards by doing this, but it has obvious benefits to your fighting orange. So even if you lose a town back to them, they can only hire low level undeads! A secondary objective that triggers on the next day is you have is to gather 1000 skeletons, which is optional. It is quite hard not to get 1000 skeletons, though, as you fight so many enemies here and there. You also get one of the best cut scenes of any army when you do it.
As soon as you take your first Academy town, a green Sylvan army spawns. It becomes a secondary objective that Isabel is meant to complete -- destroying the boat of elven troops. Although the custscene implies that Isabel has to do it, it’s perfectly fine to attack them with Markal, which is probably eaiser before patch 1.3. Their goal appears to be to take Newpost and Lorekeep. Also, during the battle against them the dynamic battle mode is turned on (you have limited time to make moves).
The second artefact, the cloak of death’s shadows can be found in the top of the three mage towns. The westmost town doesn’t contain anything, and taking it is just to prevent it from trying to kill you. You can regardless corrupt it into a necropolis to suit Markal's twisted mind.
The final artefact is in the top right corner of the map. You have to travel through three garrisons to get there; however, the third garrison is the final large fight, so if you can survive it you should be safe. To complete the level you will need to have 20 bone / spectral dragons on you. You can either bring it with you, or collect it afterwards.
The level isn’t quite as easy as that however, because Orange spawns goal oriented heroes, from a monolith one-way exit, roughly halfway between the two mage towns that contain artefacts. Their goal is to kill Markal if they get a chance. They never attack the Lorekeep / Newpost island you start on when Markal isn’t on it. On heroic, the army that spawns with them are pretty tough -- so you better quickly gather undeads around to fight them, and you can always give the undeads to Isabel and watch the massacre. You get no skeleton archer this way, but you may also save 2/3 of the undead army from Armagaddon.
By the way, the Sylanna's Ancient (level-up tree) is still in the same place where you can find it in the last mission -- just south of Lorekeep. It is going to be there again in the campaign finale. What a forgetful tree!
Final Note: Some players reported that even after they collected the bone dragons, they cannot complete the mission. If that does not work, try to give all necromancer artifacts to Markal as early as possible, and install the latest patch (and restart the mission).

Heroic Considerations
When I played it I went for the wrong town first, and I believe this added two months of game time because of not having an army large enough to defeat Jhora. Be very careful when casting direct damage spells, because most of the heroes have magic mirror, and magic resistance, and you might be better off just attacking, even though Markal is a spellcaster. Alternatively cast raise dead and try to take no losses as you start with a single necropolis and orange has 4 higher level academies at the start. Finally, if you go for a rush, don’t skip undead stacks that you see, even if it takes you a turn to pick them up off an island, it’s the best way to stay competitive at the start until you can transform some of their towns.
| Comments (54) |
- by Rapier
Objective:
- Find and Defeat Cyrus.
- Markal and Isabel must survive.
Carries Over:
- Markal (Level Cap: 30)
Bonuses at start:
- 20 Spectres
- 4 Liches
- Puppetmaster
Frankly, if you haven’t got Puppetmaster by now, you did something wrong or you were very unlucky in the previous scenarios, so all you get from the lv 5 mage guilds were Curse of the Netherwind. If that happens, you should definitely take the spell now, to make your life much easier later.
If you already have the spell, maybe the Liches are your best choice, as they do damage more often, and are less likely to die than the spectres (where you rely on their evasion). It doesn’t really matter which you take though, you start with 20 bone dragons, 900 skeletons, and 100 skeleton archers anyway, so you have no problem with such an army.

This is a semi-maze map, and there is no town. You have to run around collecting tents and skeleton archers, so that you can pass through border guards. Beyond different colors of guards you will find new keymaster tents, and new Magi Huts to show you where to go. Sometimes there are monoliths to help you get there faster. It’s impossible to actually get lost, and you’re not on a time limit. Whether intentionally or not, Nival made the final boss of this mission very weak. In more recent patches his stat points become ZERO throughout (plus a few artifacts).
Try to kill every stack you see. You shouldn’t have much trouble taking them down with your 20 bone dragons (as Markal says in map 3, they should tip the balance). Near the start some Titans will appear in front of you. More will come later, but all of them are weak and there is only one group of Titans that is quite powerful, and it is an optional battle.
You can skip the resources, perhaps except the gold and a few mercury jars. Don't miss the artefacts, obviously. There are several places to recruits troops along the way, and of course, neutral undead still join you. I would take exp whenever you get a treasure chest, just because it’s difficult to hit the level cap on this map, even with Expert Enlightenment. In fact, it is quite impossible reach level 29 on this map.
From your starting point, go west and then north. Follow the road, and after collecting the first keymaster tent, you want to head down the right path after going through the monolith two way. If you turn north at the first intersection, you will reach a dead end but you can collect more experiences, war machines, artifacts and skeleton archers. If you head as east as you can, you can then go north to find the red border guard, and then follow that route to the next tent and Magi Hut.
After going through the monolith one way by the blue tent, you have two choices now. If you head to the right and down, you can collect two groups of plague zombies. However, let me tell you that there are better undead stacks waiting to join you, and eventually you will need to drop a stack - and that's usually the most-useless zombies. So I would kill them now for the experiences. On the road on the left you can fight some stacks for more skeleton archers.
If you carry on travelling south you’ll get to the blue boarder guard. If go left first, you can get some extra exp, another artefact and a bone dragon post. Also, at the trading post sell everything that isn’t mercury for gold.
Now back track and head right, and you’ll come to the next boarder guard almost straight away, the only thing to say about this part is that the death knights might not join you. Apparently they don’t always (though they should). On heroic you get about 28, which is a pretty good number (for a tier 6 stack).
Form this point you don’t really need directions, just head down the routes that you haven’t already explored to find border guards and tents and follow the route around until you get teleported into the centre where the stairway is.
The stairway leads to a single area, with Cyrus waiting for you. Just before you take the stairway, two more stacks of Titans spawn. On your back is a tough stack (55 Titans on heroic), but it is optioanl. On your front is a much weaker stack.
The Cyrus fight shouldn’t be too hard as you can get to a mana well right before it, and should have collected a substantial number of undead. This fight is a lot easier than the mages you have to fight in map 3, and you should be going in with at least equal if not a better army than Cyrus starts with.

| Comments (6) |
- by Rapier
Spoiler
In the final map (The Lord of Heresh) Godric is against you. It uses a carryover Godric so if you don’t want that fight to be difficult, avoid levelling up Godric or giving bonuses to him.
But it is a fun challenge to maximize Godric whenever you can, and fight him on heroic later. There is always a way to get him. For example, the Mark of Necromancer gives you unlimited mana!
| Comments (2) |
- by Rapier
Objectives:
- Find and Restore Lorekeep
- Markal and Godric must survive
Carries Over:
Markal and Godric (Max Level: 20)
At the beginning of the scenario, you must choose a bonus from one of these three:
- Lich: 2
- Wight: 1
- Sack of Endless Gold

I took the Wight, although whether you go with the Wight or the Liches is down to player preferences and the skills you have. As you don’t get access to an undead town for some time on this map the sack of endless gold might help you build up a haven army if you’d rather do that.
At the start of this scenario you get two heroes, and one very low level Haven town. There are four Orange heroes patrolling the ocean, each with a quite-substantial army. There are two possible places for them to land. One is now blocked by a stack of Colossus just beside your town, and the Orange hero usually does not land here early. (Note: the AI can attack the stack of Colossus on their own and come after you, but it happens rarely. The rule of thumb is never stand close to the beach.) The other landing shore is to the very west of your island / continent, beside a Mage Vault.
The four Orange heroes will eventually come to you; the time they show up depends on difficulty. On heroic they will come as soon as the third week (or even quicker). This means that at least for now, you can leave the Haven town undefended, and flag as many mines as you can to build up some Haven military. You'll want to at least have access to Cavaliers to put up a good fight. A combination of all the undead, plus as many human stacks as you can fit in is probably the best route to take. Also, if you've spent some time building up Godric back in C1M5, then he can usually crush any Orange hero (including the boss of this mission) for you. Actually, on heroic the Orange heroes might be a little too difficult for the still-mediocre necromancer Markal. You can give all Markal's army to Godric to get rid off the Orange when they get close.
If you head east first, you can eventually pick up a stack of Wights that will make the subsequent neutral creatures rather easy. Still, try to flag the Saw Mill to the north and the Ore Pit to the west as soon as you can. There is a stack of tough Titans guarding the Unicorn's Bow (no out-of-range penalty for ranged units). Don't forget to pick this artifact up before fighting the mission boss. To the west, beside a windmill there is a stack of archers who tend to join you. Let them join and pass them to Godric.

One of the spells that has been improved through the patches is the "Fire Trap" spell. Now it works in a limited area, and if a tile is already occupied by a creature or another trap, then there are less possible tiles for the new trap to go. You can do some serious damage to large creatures this way!
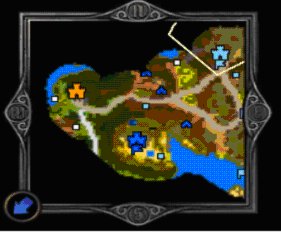
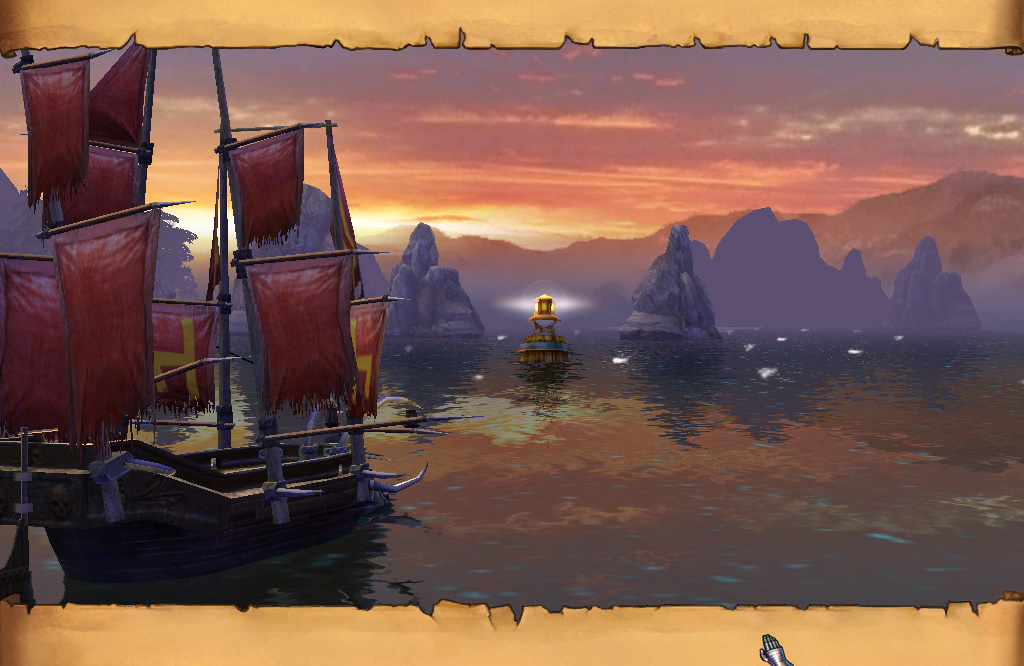
After fully exploring your base, two Orange hero should start to arrive. After defeating them, you can send Markal onto a boat and try to sail northeast. There are another two Orange patrol boats which follow a set path and won't deviate from it; you can avoid them entirely just be watching their route, or you can just destroy them. Occupy Lorekeep (NE town, see mini-map below).
There are two small islands that the orange patrol boats travel around; they have some stat increasing locations, so they’re worth stopping off for some time. The left of the two islands also contains a cartographer which will help you find all the useful locations on the map. The sea has quite a lot of floating logs. Patch 1.3 increased the wood requirement for Haven towns quite a lot, so you may find them very handy. If you cannot make the level cap later, there is a Siren to help you. You can also find a Sylanna's Ancient (level up tree) just beside the Saw Mill on the northern continent.
If you bought the map from the cartographer (4000G), you can see where Lorekeep is, and you can see where the undead are to collect if you need to bolster your forces. The best approach is through the Ghosts on the bottom right as it involves very few fights and gives you access to many undead. Also, there is a good stack of Liches west of Lorekeep.
The road to Lorekeep is guarded by quite a large stack of mages. There is no way around them (as another mage blocks off the alternative route), so you have to charge them head on. You should be fine with mass slow and raise dead.
Once you take Lorekeep you get a new objective to build it up to a Citadel (2nd-level wall). When this is completed the Titans guarding the monolith one-way entrance will run in fear - you should now have an army sufficiently large to walk through it and decimate the final Wizard and take the town of Hikm. If you’ve collected all the undead on the main island where Hikm and Lorekeep are located you should have no trouble. A fine mixture of Necro and Haven army led by a level-20 Godric (actually he is level 34, if you leveled up to the cap in C1M5) would be an overkill.
Heroic Considerations
Playing this map on heroic is much the same as playing it on the other difficulties, the stacks that Markal can pick up are larger so it’s still possible to keep up with Orange and not be outnumbered. My only advice is to make sure you get every single stat upgrade, and take the time to build up both town's mage guilds (Lorekeep is unfortunately capped at level 2) so you have access to as many spells as possible. Don't miss out the Witch Hut in the NW region. Additionally there's some (useful) spoiler information here.
| Comments (28) |
- by Robenhagen
Objective:
- Find Tieru
- Agrael must survive
Carries Over:
- None (Max Level: 40)
Walkthrough:
At the beginning of the scenario, you must choose a bonus from one of these three:
- Succubus Mistress: 4
- Hell Hound: 12
- Sextant of the Sea Elves
Take anything you prefer. The sextant can be quite useful, since there's a good deal of sailing in this scenario, making this artifact perfect for a high-score rush. On the other hand, you only have a fixed number of troops available in the scenario (unless you're prepared to spend weeks waiting for the few dwellings to respawn), so choosing either the succubi mistresses or the hell hounds also seems a good call. Personally, I chose the succubi mistresses, since they fit well with the way I like to play.
There are no other players - only neutral stacks, so you can take what time you need to complete. A word of warning is that you'll need to fight a rather-large (size depend on difficulty level) stack of emerald dragons at the end - and this stack grows like all other stacks, so the longer you take, the harder the fight is going to get. The mysterious fog mentioned is really just the fog of war. The problem with it is that it doesn't disappear when you're in a boat, so you need to be on solid ground to remove it.
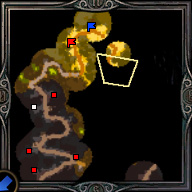
Head to the island just north of you and visit the Redwood Observatory to clear some fog. Also visit the Hut of the Magi to clear even more, then go back to your ship. Sail to the island east of you and fight the hunters to enter yet a Redwood Observatory. There are plenty of treasure chests on the map, which is a good source of experience points, but you should take the gold every now and then, you'll need it. Use the Subterranean Gate Entrance to enter the underground. Head north, past the dark raiders, until you get to an intersection, continue north along the tunnel as it turns south. At the end you'll get to a set of stairs. If the neutral stacks here seems to large for you, get the free stack of cerberi on the west first. Flag the Inferno Military Post and the Howling Kennels. These are the only two creature buildings in this scenario. By the time you get here, you are more or less by the end of the week, so you can just wait till the next week to hire yet another round of creatures. Go back underground and follow the tunnel back to the intersection and head down the passage leading west. At the end, head up the stairs and visit the Hut of the Magi on the northern part of the island. Go to the Shipyard and build a ship.Sail to the eastern shore of the island that is immediately to the south west (you can see a pack of treants guarding some pit fiends). Get the pit fiends to join you and then sail to the volcanic island with the Inferno dwellings to get some more troops for your ranks. It would be useful to wait to yet another new week to hire 2 rounds of creatures. Now you are set for the rest of the mission - it's time to head back west. There's one island you still haven't visited in the west, and it holds a Hill Fort, where you can upgrade your troops (bring enough gold). If you don't have enough gold then skip the Pit Fiend upgrade as they don't really make a big difference. After this, you will probably never spend any money, so you can start to convert all treasure chests into experiences - and hope that you will ain one level before the end. Now you are done with the SW portion. To the far east is an island with a visible Subterranean Entrance Gate - sail to it (on the way you can actually see Tieru on one of the central islands, if you pan the camera).

Start exploring the island by going south. At some point you'll get to a stack of emerald dragons. This stack of dragon is actually about 3/4 of the size of the final "boss" of this mission. You can fight them, but you will need some good skill and Agrael build to pull out unharmed. If you defeat this stack of emerald dragon, you can learn a second-level spell "Vessel of Shalassa", which enables you to summon a ship to the nearby shore. So go to the shore nearby and summon your ship to visit the Cartographer. The Cartographer sells you the sea map for 4000G. This map remove all the fog of war over the water for 4000 gold. Whatever you choose, you can still complete the scenario without the map. If you have the map, though, you can actually complete the mission much faster.
If you bought the sea map, you have now free access to all water, but you cannot land in most places because the islands are still covered by fog! Besides the islands you already visited, there is an island that is located on the center-east, appearing mostly brown on the mini map. If you have visited all Huts of Magi available so far, then the shore of this island has been revealed to you, and you can land there. You will soon face the "boss", the emerald dragon stack mentioned earlier. By coming this early you should be able to defeat it with whatever you have now. However, you will miss 3 stat points, a few artifacts, quite a lot of free creatures and tens of thousands of experiences that you would obtain by taking the alternative long route. In fact, you will not see Agrael (the Demon Lord) later, so you can actually rush straight to the ending and enjoy a much-higher score!
If you don't have the sea map, head back up to the northern part of the island and enter the underground. Enter the Stables and head north. Now look carefully for a unpaved trail to the east, past the dark raiders to get some treasure and a LARGE stack of cerberi. (On heroic you get more than 100 cerberi here, making the rest of the scenario extremely easy.)
P.S.: Since these dogs are all you need to win, you can rush here as soon as you can, and then make a direct shot to Tieru!
Go back the way you came and follow the northern tunnel you passed on the way here. When the tunnel splits take the western path to get more treasure, then go back and follow the eastern tunnel to reach a set of stairs.
Explore the island to get more cerberi and succubi mistresses to join you. You can also find a Mercenary Camp (+1 Attack). When you're done, head underground through the southern Subterranean Gate Entrance. Follow the tunnel north and get the pit lords to join you. The tunnel turns west and ends with a set of stairs. Head up and explore the island - start by going east to the Arena (ATK or DEF +2). Then turn to the southern part of the island to visit a Redwood Observatory. Finally head west to the Monolith Two Way and through it. Go past the Subterranean Entrance Gate to visit another Redwood Observatory. You can steal the resources behind the ancient treants without fighting them, but why would you want to? - Fight them! Go back and down the stairs, then follow the tunnel until it divides. Go east, past the hydras for some more treasure and then west to exit the underground.
Build (or summon) a ship and sail to the island just east of you, where more pit lords will join you. You should also visit the Hut of the Magi. There are now only two islands you haven't visited; Tieru's and the one you are going to next. Sail to the easternmost of the three central islands. This is the island where you could have landed if you obtained the Sea Map earlier. Not much to do, but enter the underground. Head north to get back above ground - you're now on the island that leads straight to Tieru. Head south to encounter this final stack of emerald dragons. If you come here REALLY late then you will see a huge stack, but otherwise they are just about the same size of the emerald dragons you fought along the way. (On heroic, patch 1.3, this stack starts with 9, and grows at a rate of 11% every week.) Once they're defeated, cross the bridge to meet Tieru and watch the surprising ending. Congratulations!

| Comments (18) |
- by Robenhagen
Objective:
- Capture Erewel
- Agrael must survive
Secondary Objective:
- Capture Ur-Nebryzias (later during the mission)
- Complete the dragon's quest (later during the mission)
Carries Over:
Agrael (max level: 30)
This mission has a similar layout to the previous. Agrael still starts in the SW portion of the map, has an easy access of a Sylvan town, and will be conquering towns at NW and NE. However, there is no Gilraen chasing you around, only low-level heroes with not-too-impressive armies. There is an underground level that connects different portions of the map, giving a potential shortcut to end the mission. You'll also get the only totally functional Inferno town in the campaign.
At the beginning of the scenario, you must choose a bonus from one of these three:
- Druid: 10
- Gold: 6000
- Wood: 40
Resources come in whole-sale quantity on this map. You will never be short of it, if you flag whatever mines you see. Take the 10 druids - the extra men will come in handy.

Pick up the wood and enter the Garden of the Wee Folk. Now, you can continue north along the path, but I find it much more rewarding to use an alternate route, by going east along the cobblestone road. Head east and flag all the mines you pass, as well as picking up treasure and resources - the first stack of master hunters will join you. On day 2 there's a cut scene with an unpleasant surprise for you - the Sylvan forces are deserting you and you'll slowly lose them. If you have Diplomacy you can probably get some extra Sylvan stacks to join you along the way. If you find certain stacks too tough, simply avoid them for now. The master hunters south of the Ore Pit will also join your rank.
Master hunters come with the "warding arrow" ability that sometimes triggers upon arrow impact, and pushes the target's initiative back. This is one of the reasons that you really want to split your master hunters into multiple stacks. Your attack are also more effective this way, by not over-killing just one stack, instead killing all stacks before they hit you.
Continue until you get to the Sylvan town Hallin, owned by the green player. Visit the Hut of the Magi next to it to see two different Subterranean Gate Entrances and you get a glimpse of the Inferno town Ur-Nebryzias. Capture Hallin and enter - unfortunately you can't build a Tavern, so you can't get an extra hero... yet. Now depends on the patches and difficulty level, the AI has a different degree of effectiveness. It is possible that some roaming AI hero will claim this town while you are miles away, so you can focus on the economic buildings first. You will be benefited by building the Hunter's Cabin in the near future, too (more on this later). Pick up a first aid tent if you have the war machine skill; they're mighty cheap in the Sylvan towns. Continue east, flagging all the mines.
Now you are ready to go underground to claim your Inferno town. You can follow the road east, until the road turns north and is blocked by lots of ancient treants. Avoid them by going straight east - through the forest towards the Subterranean Gate Entrance. Enter it when you get there. Once undergound follow the path to the north west. When it divides, head east towards Ur-Nerbryzias. On the way you should flag the mines. Capture the town to complete your secondary objective.
Alternatively, you can go west from Hanllin, and turn north. There is a Sulfur Pit along the way, which is quite useful to you as Inferno towns needs a lot of sulfur. Turn west afterwrads, and you will also end up underground. Head east to defeat a group of Deep Hydra (very slow, therefore very easy), flag mines, and take the town Ur-Nerbryzias.
This Inferno town has a Tavern, so get some extra heroes. The daily desertion of Sylvan units only happens on Agrael, so you can give all Agrael's Sylvan units to a new hero just before pressing End Turn, and at the beginning of the next turn return them to Agrael. You can flag the remaining mines in this area by moving Agrael together with a new hero.
Now quickly build your Inferno town up, focusing on troops and a capital. Upgrade hell hounds to cerberi as they are much more useful. Nightmares are also nice as you have 3 extra every week from the creature building just south of the town. Pit fiend/lord is a big money burner. Go for them only if you have enough cash. Capture the Howling kennels and the Inferno Military Post. Later on, hire another new hero here whose job is to purchase new hell hounds, hell chargers and pit fiends from these two dwellings every week.
You can give your remaining Sylvan forces to a new hero (preferably Sylvan to avoid the -2 morale penalty) and send him/her back to Hallin, and start exploring the map with the troops from Hallin.
It is time for Agrael to head up north from Ur-Nebryzias and turn north west immediately after fighting the wights. At some point you should spot a large stack of spectral dragons; approach them (but DO NOT attack them) to trigger a cut scene with the shadow dragons (!) and get another secondary objective: Complete the dragon's quest. You must obtain 100 hunters and/or master hunters for the dragons (this is why the Hunters Cabin is important early on). This objective, however, is one you shouldn't haste to complete - you won't need to complete it before you're absolutely ready for the final show down. It's also worth noticing that any Sylvan forces under Agrael's command still flees each day, so you should use somebody else to move the 100 hunters to the spectral dragons (hand them over to Agrael to let him complete the quest though).

It's now time to explore the remaining underground; you can find a couple of interesting things - besides treasure. A set of stairs to the south west, where you were supposed to enter the underground. Two set of stairs to the north east - the one furthest to the east leads to the Sylvan lands, but you should exit through the other one first to fight some ancient treants and get a huge gold/xp boost. Then return to Ur-Nebryzias and recruit all the demon troops you can afford, then head to the other set of stairs to the north east (the ones next to a garrison).
You're now on Sylvan territory, but why should you care? Head north east to the Sylvan town Giladan and capture it. The green player should have a fairly powerful hero in the area, that you need to deal with. Then start exploring the area, there's a good deal of mines and hunters lodges that will help you get your 100 hunters (it's shouldn't be a problem, since you don't need them right away). You can also find a good deal of power-ups that you should make sure Agrael visits. There are also a couple of Keymaster Tents (Blue and Green). A little south west of Giladan are some master hunters guarding a stack of Arch Devils, who'd join you if the master hunters weren't in the way. Just west of there is a Sylanna's Ancients tree (+1 level). North west of Giladan is a heavely defended garrison owned by the green player. If you complete the dragon's quest, you won't need to come this way. Still, it's good experience (I find it hard to reach level cap on this map), but at least for now you should just let it be. To the far west is yet another Sylvan town, Aglan, which you should capture as well.

When you're done exploring the forest, complete the dragon's quest, if you haven't already. You can also choose to attack the spectral dragons, but I wouldn't advice it, since it causes you to fail your secondary objective (this means that you'll have to go through the garrison north west of Giladan, and yet another even more heavily defended one to get to Erewel, and it will make you miss some useful creature boosts). The dragons disappear upon completion of the objective and you're free to pass. On the other side of the garrison, a dark path leads to the west and an area containing an Arena and two Marletto Towers. Continue north east, past the stairs and past some Wraiths to get to one more Marletto Tower. Then venture back and up the stairs.
Start by going west and check out the Refugee Camp, continue on westwards to get a stack of succubus mistresses to join, there's also an Arena. Head back to the Refugee Camp and go east to find a stack of cerberi waiting to join. Follow the road, but at this point you can ignore flagging the mines, since the scenario is nearly over. If you haven't reached your level cap yet, you should head east past Erewel to fight some more creature stacks. To the far east you'll find the second defended garrison, which will make a good experience boost. You may also notice the Green Border Guard (there's only treasure behind it, so it's optional if you want to get it). Oh, and I never found any use for the Blue Keymaster Tent, but if any of you know, please post it as a comment and I'll add it here.
The final battle (Erewel) is quite hard, but start by having all your troops gate in extra creatures and you should be fine. Hopefully your Swarming Gate activates here! Note that emerald dragons are immune to Earth spells, so your Pit Lord's meteor shower will always be resisted by them. Also, do not rush in before the AI decides to rush out, or you will suffer very heavy casaulties. Afterwards you get your prize: The Ship - so you can sail on to the next scenario.

Note: If you are playing at a high difficulty level, you probably need to speed up the conquest a bit before the green player grows out of your control. You can charge directly to the NE Sylvan town with Agrael and a new hero, almost immediately after you take your Inferno town. You can always summon upgraded Inferno creatures somewhere along the way. After taking this NE town, hire a hero to flag the mines, and send Agrael to capture nearby Sylvan heroes. There are always a few, who will turn themselves up in the next turn or two. None of them are powerful enough to cause any significant damage to you. Next, rush straight west to the NW Sylvan town. Don't miss the Archdevils along the way. There is also a Sylanna's Ancient (level up tree) in the middle, useful if you have trouble hitting the level cap later on. You should be able to take this NW town easily as well. Now you are rich, and there is no enemy sneaking upon you. This map is all yours to explore until you crush the boss effortlessly.
| Comments (41) |
- by Angelspit
Objectives:
Level Cap: 22
Carries Over: Isabel
View a screenshot of the underground #1 (1 MB)
View a screenshot of the underground #2 (400 K)
View a screenshot of the underground #3 (500 K)

The Trap is a long trek along a path nearby some Inferno terrain, and this is your first mission with a very big map. There are plenty of places to explore, but unfortunately Isabel will probably hit her leveling cap long before the end of the scenario. You don't need to fight everyone unless you want to. Also, Isabel will start to learn magics (up to level 3) in this mission. You can learn spells by visiting spell shrines along the road, as well as from your mage guilds to be built later in the mission. In the latter case, the heroes have to visit the town themselves.
You start at the SE corner of the map with a sizeable army that includes imperial griffins and cavaliers. The cavalier bonus is probably the best, as you will use them a lot in the first half of this mission.
Follow the road NW, visit the windmill, and fight any stack that blocks your way. Just SW of a stable you can visit a Witch Hut (1), which sometimes teaches you a useful skill. (Otherwise, feel free to restart the mission as it is still early.) NW of the Witch Hut is a lumber mill that is worth flagging now.
Further down the paved road you will see a new kind of stat bonus, a Planetarium (spell power +1). Spell power affects the effectiveness (damage or duration) of your spells. There is another knowledge +1 bonus up a slope not very far ahead. Try to recruit the peasants from their huts as you proceed. If you feel confident, you can make another detour north to flag an alchemy lab (mercury +1/day).
It is important to keep your troops alive in the first half of the mission, or maybe I should say under all circumstances. In the picture below, Isabel challenges some marksmen and archers that block the Witch Hut at (1), with her imperial griffins and cavaliers only. I didn't deploy the other units as they will die from the arrows.


Fortunately, Isabel in this case has learned the skill Divine Guidance (under Leadership), so she can push up the initiative of cavaliers. Now the cavaliers act before the archers, killing them off without any more damage!
This is just one of the many ways to avoid casualty during neutral creature battles. High HP and defense units are excellent damage sponges (as long as you don't lose any of them). Try to keep an open mind and try out different strategies. It is always better to kill the enemies before they even touch you. A well-planned and coordinated offense is the best defense.
Back to the walkthrough: keep following the road, and you will need to fight some succubus mistresses (2), a shooter unit which could cause some damage to your troops. This is a good opportunity to test how much you have grasped the concept of troop conservation. Can you pull through without loss on heroic?
Keep traveling north until you arrive at Brightwood (3). The Castle is lightly defended, so you should have no problem capturing it. You should receive a new objective, which is to upgrade Brightwood's magic guild. You can now start to build up the town, while sending Isabel to flag mines in the vicinity. With the starting army, you should be able to flag most mines, starting from the ore pit NE of the stable all the way to the east end of the map (4). If you need a certain type of resource, there is a trading post conveniently located at (5).
In order to win this mission, you have to build up the mage guild up to lv 3. No matter whether you have picked magic skill(s) for Isabel, you can learn a utility spell called Summon Creature once you have mage guild level 3 and a lv 10+ Isabel. This spell enables Isabel to summon creatures inside the nearest town from anywhere on the map. You no longer have to come back to replenish the army, as long as you have enough mana to summon them!

After accumulating some troops, you can visit the garrison on the west of the town to trigger a cut scene and yet another objective. That objective will show up as secondary, but completing it is required to finish the scenario. Essentially, you need to visit a Seer's Tent just north of stairway A.
The entrance of the stairway A area is blocked by a rather large stack of griffins that won't join you unless you have a large army. You can also fight them to get through. After visiting the Seer's Tent, You will be asked to retrieve the Boots of Leviathan in the underground through stairway A.
The underground area is quite small, with three paths all leading to dead-ends. The only one you need to visit is the one guarded by bone dragons, in the NE direction. The artifact you are looking for is in a crypt at (6). The crypt is guarded by a rather large Necropolis army. Don't try to fight them unprepared.
Note: There is a new bug with patch 1.3. The icon of the Boots of Leviathan is missing, so it becomes a rather "invisible" artifact. It is still there and would functions normally when you equip it, though.
After taking the Boots of Leviathan, you are ready to win this mission. However, there are quite a few stat bonuses you probably haven't visited. First, you can pass the portal marked by the letter C, which connects to the C area of the underground. There are a few stat bonuses inside. After getting the Boots of Leviathan, you can walk down the river at (7). Isabel needs to wear the boots to cross water, and you usually need to have a day-full of movement points to start crossing. You can find several stat bonuses south of (7).
East of the portal C you can see two new types of buildings, a Hill Fort and an Artifact Merchant. The Hill Fort allows you to upgrade units (for example, archers to marksmen) for a slightly discounted price, and you do not need the corresponding upgrade building in the town to upgrade in a Hill Fort. The artifact merchant sells six random artifacts, and their stock changes from time to time. Generally speaking, your money is better invested in units than in artifacts, unless you see very useful ones (for example, Golden Horseshoe, Ring of the Broken Will, Lion's Crown, etc.).
When you feel ready, put on the boots and cross the water at (8). Go west a bit and you win the mission!
Note: By the way, the most famous Easter Egg of HoMMV is hidden on this map at (9)!

A little surprise awaits Isabel, Beatrice and friends.
- by Robenhagen
Objective:
- Capture the Heart of the Griffin
- Agrael must survive
Carries Over:
- Agrael (Max Level: 18)
Walkthrough:
At the beginning of the scenario, you must choose a bonus from one of these three:
- Gold: 2000
- Succubus: 8
- Phantom Forces (very useful before patch 1.3)

This is one more race-against-time for Agrael. Even with no one on your tail, you may as well lose the race by spending too much time off road. There's only one way for you to go in this map; a long road with lots of bends and curves.
Visiting the various Huts of the Magi along the road tells you where your opponent is, but it is not necessary as you can't do anything to slow him down. (On 1.3 heroic, the enemy hero finishes his track on the 11th day, so mostly you can take only 11 turns!)
This mission is quite short, and it is impossible to hit the level cap after patch 1.2, as no experience is given when you defeat the boss. The next mission is the hardest in the campaign, so you really want to accumulate more experiences in this scenario. Try not to miss any spell shrine, and convert treasure chests to experiences whenever you can. Also, fight as much as you can, as long as you do not lose to the boss in the end.
Troop conservation tactics has gone up a level when you learn the spell Phantom Force. This spell was widely regarded as the one of the most powerful spells in HoMM5, and it has been toned down in every subsequent game patch released by Nival. Patch 1.3 hits it the hardest, by increasing its mana cost to 300% -- to a whooping 18! If you are playing on pre-1.3, then definitely try this spell out. You will be surprised by how much you can accomplish. If you are playing patch 1.3, you'll probably run out of mana after 2-3 casts. Fortunately, there are a few mana wells along the track to cover you up.
Get the gold in front of you and the imps from the Imp Crucible, then follow the road east. There's no getting around the scouts, so you need to deal with them first. Next, kill the spectres to get their gold and learn a randomly-determined level-one spell. Just north of you are some hell hounds waiting to join you (all inferno creatures in this scenario are scriptted to join you). You can also buy some more at the Howling Kennels. On SE you can see skeleton archers guarding some cash and another free first-level spell. Head north west past the obsidian gargoyles to the treasure chest - it's guarded by assassins.
At the following bend, there's an Inferno Military Post with succubi and pit fiends. You can also learn a second-level spell here. Ignore the troublesome liches and attack the minotaur guard to get the gold. Follow the road around the bend to learn another second-level spell, and get to the Stable. At the next treasure chest, assassins join your ranks (if you fought the first bunch) and so does the stack of horned overseers. Ignore the Demon Tower (as your cash are better spent elsewhere) and go to the second Inferno Military Post. Ditch the assassins if you need to make room for all the troops there. You can get sulfur nearby to hire the devils if you want. Follow the road, grab yet another first-level spell, and head east. Don't forget to visit the Star Axis (spell power +1) on the way.
Finally you get to the desert. Fight the golems and head north to the Hill Fort guarded by some genies. Upgrade your men (succubi are supposedly female, though) and continue north to fight some tier-5 creatures, then head towards the monument. If Veyer beats you to the blue Haven hero, you lose this mission. Hopefully you have an earlier save if that happens.
The Haven army is quite easy to beat, but the Demon Lord Veyer, whom you'll have to fight immediately afterwards, is a bit harder. (p.s. No matter where Veyer is, he will be teleported to you immediately after you defeat the Haven army.) In earlier patches, if you lose the fight with Veyer, you'll still complete the mission (and if you win, you gain experiences from him.)

Final note: It is impossible to get the goodies on your opponent's trail, or to defeat Veyer first. The game triggers the boss fight as soon as you get close to the blue hero. When you get close to the blue hero, Veyer seems to give up and just stand around, doing nothing.
| Comments (28) |
- by Robenhagen
Objective:
- Find a route to Sheogh
- Agrael must survive
Carries Over:
- Agrael (Max Level: 10)
Walkthrough:
The tutorial is over; we will have some real challenge soon. Before we start this exciting campaign, let's briefly discuss what skills are useful for your main hero - Agrael. If you want to survive heroic, you better start planning early.
Agrael is a typical might hero. Most of his stats will be distributed to attack. The lack of spell power and knowledge makes him a rather-ineffective user of destructive magic and summoning magic. Therefore, if you want to pick up a magic school for Agrael, Light or Dark magic will be higher in priority. While picking up either Light or Dark, consider Master of Wrath / Mind, which has the best mass-effect spells in the game. You can forget about Sorcery as you can pick up Phantom Force as a free spell in mission 2.
A handful of passive skills are useful for Agrael. Logistics, which brings the feat Swift Gating, will be given automatically early in the campaign. You may also want to pick up Luck (with Swarming Gate), and probably Leadership (with Master Gating). Agrael also starts with Attack. If you pick up the feat Tactics, then a couple of your units will be able to hit enemy's range units before they even act! You may also just pick up Enlightenment and enjoy the stat bonuses and the 50% extra mana with intelligence (might be really useful in patch 1.3, where Phantom Force requires a lot more mana to cast).
Another popular Agrael build is to follow the racial ultimate skill -- Urgash Call's skill set (Logistics, Luck, Dark, Attack). Even if you are lucky enough not to be forced to pick up useless feats, you will probably hit it in mid-late mission 4, or even mission 5. The hardest part of this Demon Lord campaign is actually mission 3 and early mission 4, so by the time you get Urgash Call, it is not very meaningful.
At the beginning of the scenario, you must choose a bonus from one of these three:
- Necklace of the Lion (+1 morale)
- Cerberus: 8
- Hell Charger: 3
The hell chargers and the cerberi are both pretty useful.

This scenario is all about speed - so you have little time to explore the entire map. This is not intended as a complete guide, but rather just a walkthrough. If you want to explore more of the map, feel free to do so. Either way, you'll need a significant army at the end of the scenario, so it's important that you preserve your troops through good tactics. Most Inferno creatures can, depending on your Demon Lord's Gating skill, gate in more troops - that is one way of maximizing the potential of your army. When gaining a level, take the Gating skill upgrades.
Follow the road south until you see some priests guarding the Boots of the Swift Journey. Kill the priests and pick up the boots and the campfire. On heroic the boots might be simply too costy to you, but you should do fine without it anyways. Visit the Hut of the Magi; you'll see a Red Keymaster Tent. This is your first target. Continue south to the Witch Hut and learn Logistics (very useful throughout the campaign). If you head south from there you will be able to gather some free demons and imps.
At the start of day 3, Godric (and his insanely large army) appears at your starting point. You can, of course, not allow yourself to get caught by Godric. Rutger, who appears in the north western corner, has a smaller army and is possible to defeat - but that will cost you a lot. You should try to keep yourself as far away from them as possible. If they get too close to you, try to seek refuge in a Sanctuary, and run towards the opposite direction once they gave up waiting.
Continue eastwards to the war dancers and past them, along the grassy path in the forest. At the other side, next to the Redwood Observatory, is a stack of hell hounds waiting to join you. Head down the south western path towards the Archers Tower and turn east and then south to enter the Stables. South of the Stables is a Crystal of Revelation, kill the skeleton archers and head east to get some cerberi (your inferno army power house!) to join you. You should also have time to visit the Dolmen of Knowledge and get the treasure chest guarded by the squires.

Head back, past the Stables, and turn east along the road. Turn south on the other side of the mountains, towards the footmen. Eliminate them and continue south past the Sanctuary to fight the minotaurs. Get the Red Keymaster Tent and the treasure chest. Go through the portal, through the Red Border Guard and down through the Subterranean Gate Entrance. You can pick up a powerful artifact (+4 attack) just east of the stairway, if you are willing to lose some units to the tough creatures guarding it.
Once undergound, kill the plague zombies and take their gold. Turn north west and get the troops from the Demon Tower. At this point your credit balance is important. I had about 4500 gold and was able to buy all the available troops from here on. If you have less than 4500 gold, you should consider not buying the demons as there are better creatures ahead. Head north and kill the vampires so you can snatch their gold. Continue north to another Demon Tower and get some cerberi to join you. Keep heading north until you get to some Howling Kennels. Buy all of them and head south west to an Imp Crucible. From here on it's straight south, ignoring the fire elementals, until you get to a Hill Fort guarded by some wights. Kill them and upgrade as many of your troops as possible.
Follow the tunnel as it bends to the south west, past the water elementals and the Artifacts' Merchant (the scenario is nearly over and the artifact doesn't carry over). Kill the spectral dragons and get experience from the treasure chest (you won't need any more gold in this scenario). Only thing left to do is to head up the stairs and hope you've brought enough troops. Good luck.

| Comments (35) |
Page 9 of 23