Walkthroughs
- by Harukaba
Yog must deliver the Celestial Necklace of Bliss and Lion's Shield of Courage to Falor and Terwen to win the scenario. However, if Yog is defeated in combat or loses either artifact, the scenario is lost. Yog is limited to level 21 but will carry his experience and skills on to the next scenario.
Starting Bonus: Badge of Courage or 3 Ogres or 8 Orc Chieftains.
Maps


Click on a map to see a larger version.
Green - Friendly Town
Red - Enemy Town
Grey - Neutral Town
Yellow - Underground Passage
A# - Allied Towns
O# - Opponent Towns (a,b,c,d,e,f,g indicates which enemy)
N# - Neutral Towns
M# - Mirror Entrances (a) and exits (b). two-way unless stated
E# - Exit (a) entrance and (b) exit
S# - Seer (a) and the location of the item (b)
G# - Guard Tents (a) and the location of the Guard Tower (b)
J - Jail
X - Ambush
Starting Out
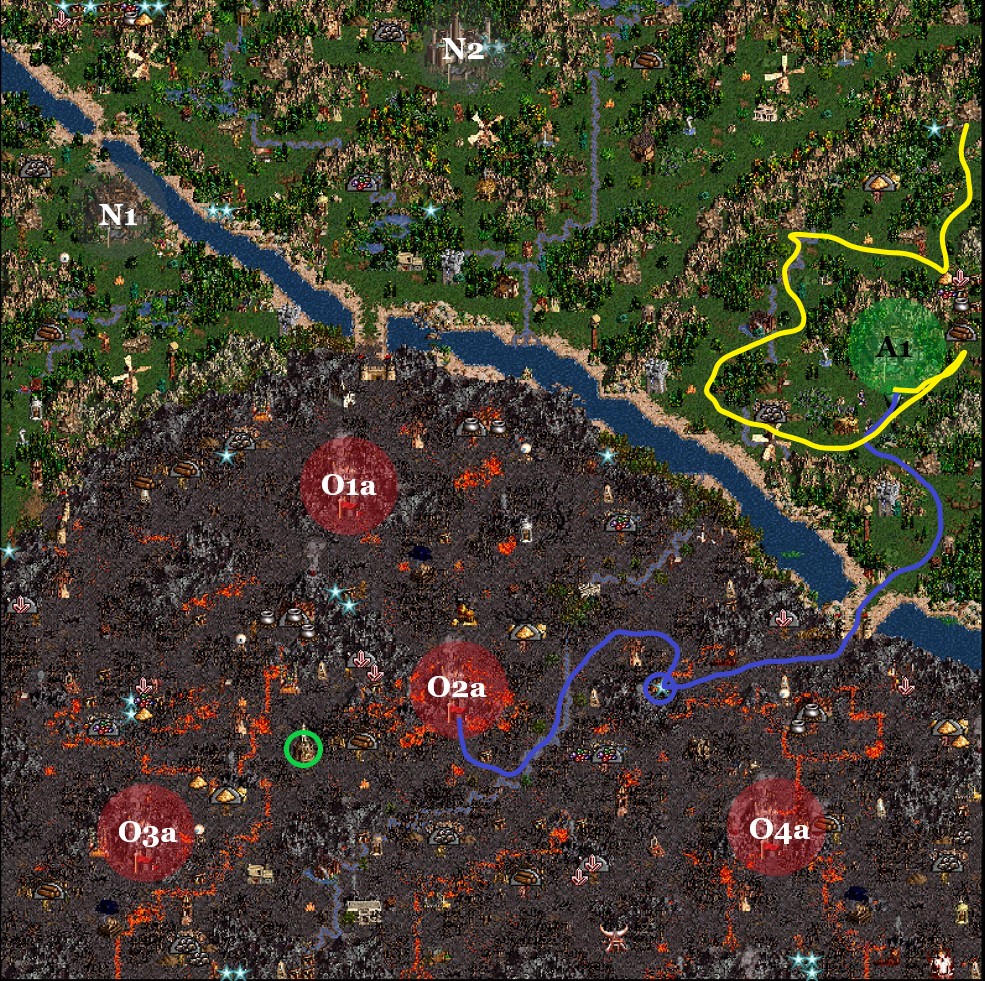
This is a small map which will reward you for being aggressive and taking out the enemy as soon as possible. The enemy has access to a one-way gate at M1a which will put them right between A1 and N1. Take the 8 Orc Chieftains as your bonus as they will help you immensely in taking out the enemy.
First Leg
Have Yog visit A1, hire all of the troops available and a secondary Stronghold hero to give Yog some more troops. Head south on the teal path and take over N1. Build creature generators in A1 and visit the recruiting locations for more troops. You can build a lighthouse in N1 so you can make it over the water in one turn and also build a Blacksmith to give Yog a Ballista, especially if he has the Artillery skill. Once you have enough heroes (it's a good idea to use both Stronghold and Castle troops), get on a boat and follow the orange path to take over O1a which is hopefully empty. Continue along the orange path, eliminating enemy heroes as you come across them, until you make it to O2a. There is an enemy hero with Expert Tactics with Attack and Defense in the low teens but once you defeat him, it's only a matter of hunting down the few remaining enemy heroes. Once the enemy is defeated, you can concentrate on finding your way to Falor and Terwen.
Second Leg
There are three Guard Tents that you have to visit before reaching your goal, which is also protected by Archangels so it's a good idea to collect a few troops before facing them. Have Yog visit the Places of Learning, battle wandering stacks for experience and build up the three Castles to give Yog a good force. Be sure to visit the Griffin Conservatory for a chance at some Angels which will help you out greatly. It is probably difficult to gain levels at this point but there are two Trees of Knowledge that you should visit, especially after gaining as much experience as you can through battles.
Finishing Up
Once you're happy with how many troops you have, visit G2a, head to the island in the center of the island, go through G2b, and head underground. Visit G3a which is protected by seven ArchAngels, and have your secondary hero visit G3b which is east of A1 and then visit G1a. Have Yog go south, battle the nine ArchAngels, and to G2b. Beyond that is the goal and victory.
- by Harukaba
Take the Sandals of the Saint and the Armor of Wonder to Alendora to win the scenario. However, if Yog is defeated in combat or you lose either component of the Angelic Alliance, the scenario is lost. Yog is limited to level 18 but will carry his experience and skills on to the next scenario.
Starting Bonus: 10 wood or Ring of the Wayfarer or 3500 gold.
Maps


Click on a map to see a larger version.
Green - Friendly Town
Red - Enemy Town
Grey - Neutral Town
Yellow - Underground Passage
A# - Allied Towns
O# - Opponent Towns (a,b,c,d,e,f,g indicates which enemy)
N# - Neutral Towns
M# - Mirror Entrances (a) and exits (b). two-way unless stated
E# - Exit (a) entrance and (b) exit
S# - Seer (a) and the location of the item (b)
G# - Guard Tents (a) and the location of the Guard Tower (b)
J - Jail
X - Ambush
Starting Out
While your goal is to simply deliver two parts of the Angelic Alliance to Alendora, it's a good idea to first defeat the Tan enemy since they start out with three towns and a fourth within easy reach. I recommend taking the 3500 gold as your bonus so you can hire another hero and bolster your starting forces.
The Angelic Alliance not only dramatically increases all four of your primary abilities, but also casts Expert Prayer when you first get initative. The only threat you have to face are spells from enemy heroes, and since quite a few of them have some powerful spells, it's worth it if you are aggressive and take out the Tan enemy before it gets too dangerous.
First Leg
Give all of the troops to Yog from the secondary hero and A1 and I suggest building a Hall of Vallaha and having Yog visit it as the +1 Attack never hurt and you're probably not going to come back to A1. Have the secondary hero flag the available mines while Yog travels along the pink path to N1. Be sure to stop by the War Machines Factory to buy a Ballista since it will be extremely powerful, especially if you have the Artillery skill. Once you've taken over N1, build creature generators and hire them all and continue on the pink path once you have hired the level 1-4 creatures. This is possible on day 7 so you can defeat O1a before they have a chance to hire the troops from that town. Then hire all troops from O1a that are left and return to N1.
You can either go north to take over O3a, return to N1 to get more troops, and then go south to take over O2a or reverse this and take over O2a and then take over O3a. Either way is acceptable although I recommend taking O2a before O3a. Just make sure to not leave any enemy heroes when you leave one town to take over another as there is an enemy hero with primary statistics in the low teens which you want to look out for. If you work fast, you can eliminate the Tan enemy in a little over two weeks.
Second Leg
S5 demands 15 Chaos Hydras before allowing you to pass and start on your quests so I recommend having Yog explore, flag mines, and visit Places of Learning. Be sure to follow the orange path to visit the Library of Enlightenment and the University. Also be sure to visit the two-way mirror M1a to appear at M1b. You can't get into N2 because the Guard Tower at S2a demands the Clover of Fortune which is to the east at S2b and very well-hidden. Once you get it, you can fight very light forces at N2 to take it over. The benefit is that N2 is fully built up which will help you in acquiring 15 Chaos Hydras. Once have all 15, head up to S5 which is southwest of O3a.
Finishing Up
There is a jail located at J which you can free if you'd like, not that it matters since the hero doesn't travel with you but it's a nice gesture regardless. Take Yog and have him travel to the island in the middle of the water and get all four artifacts. The Guard Towers only let Yog through and the fources guarding them will be a piece of cake if you bring a good-sized force along. Once you're through, sail south again and dock north of N2 and visit S1a to receive the Orb of Inhibition. Take it to S3a by going through M1b to arrive at M1a and going east and south. You will then recive the Sword of Hellfire which S4a wants which is northwest which is blocking E1a. Head underground for the last Seer which is protected by about 35 Chaos Hydras and a Guard Tower which only lets Yog through. Break apart the Angelic Alliance by option-clicking it and give the Sandals of the Saint and the Armor of Wonder to Alendora to win the scenario.
- by Harukaba
Get Yog to Ulgak, the capital of Krewlod, to offer his services to Duke Winston Boragus and win the scenario. However, if Yog is defeated in combat, the scenario is lost. Yog is limited to level 15 but will carry his experience and skills on to the next scenario.
Starting Bonus: Citadel or 10 Crystal or Ogre Fort.
Maps


Click on a map to see a larger version.
Green - Friendly Town
Red - Enemy Town
Grey - Neutral Town
Yellow - Underground Passage
A# - Allied Towns
O# - Opponent Towns (a,b,c,d,e,f,g indicates which enemy)
N# - Neutral Towns
M# - Mirror Entrances (a) and exits (b). two-way unless stated
E# - Exit (a) entrance and (b) exit
S# - Seer (a) and the location of the item (b)
G# - Guard Tents (a) and the location of the Guard Tower (b)
J - Jail
X - Ambush
Starting Out
Take the Citadel as your starting bonus as it will help you get a Capitol earlier and it will hep you defend A1 in case any enemy hero decides to attack. This is another map with a fast start to pen the enemy in their starting town while Yog visits the Places of Learning and your towns hire troops for the final battles.
First Leg
First build a Hall of Valhalla in A1 and have Yog visit it for +1 to Attack. Hire another Stronghold hero to give Yog more troops and have him follow the purple path. The Orcs by the first Orc building have a good chance at either running or joining you so hire more Orcs and continue to E1a. Diplomacy will be helpful as there are many opportunities for joins. Have the secondary hero visit the available mines and defend A1 if need be.
Yog will appear underground by E1b and have him visit the gold mine near by. There's another wandering stack by the Refugee Camp that could join you and you might get good creatures at the camp. The wandering teacher always taught +1 to Attack so it's worth visiting him. Don't let yourself get distracted and continue to E2a. You will appear on the surface again by E2b. Head south and take over N1 which should have very few troops defending it. Remember to hire every creatures available, build another Hall of Valhalla and head north to N2. Be sure to stop by the blacksmith and hire a Ballista if Yog has any skill in it before taking over N2. Remember to hire every creatures available, build another Hall of Valhalla and continue on to E3a. You'll be underground again at E3b and you'll have to face some Wolf Riders before heading to E4a. You arrive on the surface again at E4b, head southwest and take over N3. Remember to hire every creatures available, build another Hall of Valhalla and continue south to N4. You might see some enemy heroes so defeat them before taking over N4. Remember to hire every creatures available, and build another Hall of Valhalla.
I recommend using A1, N1, N2, and N3 as gold/resource producing towns with the following build order: Town Hall, Marketplace, Resource Silo, Blacksmith, Mage Guild Level One, City Hall. For N4, I'd recommend the following build order: Citadel, Orc Tower, Ogre Fort, Wolf Pen, Cliff Nest, Cyclops Cave, Castle, Mage Tower Level 1, Upgraded Ogre Fort, Upgraded Cliff Nest, Upgraded Cyclops Cave, Marketplace, Resource Silo, Blacksmith, City Hall. This list assumes nothing is already built and if you have resource problems I recommend not building the Wolf Pen, Cliff Nest, and Upgraded Cliff Nest until you do.
Second Leg
I recommend having Yog stand by the Garrison leading to O1a since there is a Magic Pond just a few steps away that the enemy will use. There seems to be one enemy hero with high stats and many troops that you want Yog to defeat. Once you've done that, all of the heroes that the enemy sends out will just be scouts. Once you have enough troops, give Yog the Ogre Magi and Behemoths/Ancient Behemoths and hire a secondary hero to give all of the other troops to. Have this secondary hero stand where Yog was and have Yog travel back on the purple path visit all of the Places of Learning, fight battles to gain ranks, and flag mines so you can continue building up N4 and hire more troops. Only Yog will move on to the next map so don't bother grooming any other heros. S1 will trade 50 Orcs (not Orc Chieftans) for 15 Cyclops which is a good deal so have Yog bring them along if you want to make the trade. Make sure to hire other heroes to visit Witches Huts so you don't give Yog a bad secondary skill on accident. Once you're finished with building up Yog, have him return to N4.
Finishing Up
Give Yog any new troops, have him visit the Marletto Tower northeast of E5a for +1 Defense and then have him enter into E5a to get access to O1 without having to go through the Garrisons. You're now underground again by E5b, explore the area and follow the path north and west to find about 24 Behemoths protecting E6a. With your troops, you should have little trouble defeating them and in making your way up to E6b. You'll be right outside E6b and attack O1a, which should be as heavily defended as the other neutral towns were.
| Comments (2) |
- by Harukaba
Escape from Bracada and capture the Krewlodian town of Groa to win the Scenario. However, if Yog is defeated in combat or fails to capture Groa in 5 months, the scenario is lost. Yog is limited to level 9 but will carry his experience and skills on to the next scenario.
Starting Bonus: Spirit of Oppression or Pendant of Negativity or 3 Nagas.
Maps
 Click on a map to see a larger version.
Green - Friendly Town
Red - Enemy Town
Grey - Neutral Town
Yellow - Underground Passage
A# - Allied Towns
O# - Opponent Towns (a,b,c,d,e,f,g indicates which enemy)
N# - Neutral Towns
M# - Mirror Entrances (a) and exits (b). two-way unless stated
E# - Exit (a) entrance and (b) exit
S# - Seer (a) and the location of the item (b)
G# - Guard Tents (a) and the location of the Guard Tower (b)
J - Jail
X - Ambush
Starting Out
Yog is your first truly might hero with no capacity to learn any magic skills at all. I recommend you learning Ballistics, Offense, Defense, Resistance, Archery, Logistics, Tactics, and Diplomacy as your secondary skills. You can avoid all Places of Learning that increase your Power or Knowledge but make sure to visit everything that increases your Attack and Defense. Ballistics is essential as you can do a great deal of damage with the Catapult and it will enable you to be much more aggressive.
First Leg
Take the three Nagas as your starting bonus and follow the purple path to capture N1 before you are eliminated from the game. Only stop by the Refugee Camp in the middle of the map to bolster your troops. Have your buddy visit G1a so you can travel through G1b and get to N1. Since N1 doesn't have a Fort, build a City Hall and Resource Silo there. You can get some Genies by visiting the Genie dwelling south of N1 but you'll have to fight some guards first. There are also some Wizards guarding your buddy by G1a that if you defeat, you can get his Boots of Speed which will enable you to travel farther in one day. This isn't essential and I'd rather wait than risk losing any troops.
Hire as many troops that N1 has and now make your way back to O1a via the purple path. Visit the Learning Stones along the way and visit the Refugee Camp again as it will probably be the next week and there will be new troops for you to hire. You will probably be level 2 or 3 by the time you reach O1a. Aine will always travel directly south of O1a although some scouts might be hired and they will follow the purple path as well. However, Yog can easily defeat them and take over O1a.
This email address is being protected from spambots. You need JavaScript enabled to view it. emailed me with an alternative to the above strategy and it can be effective with a bit of luck. Take the three Nagas as your bonus, head south to the Parapet and buy the Gargoyles, and then stop just ouside of O1a. If you're lucky Aine will attack you and you will be able to defeat her army of 30 Master Gremlins and 1 Titan. Aine will cast Lightning and is only able to do so 3 times before her spell points run out. If she casts them on units other than your Nagas you will have a much better chance of winning. Also important are the Nagas getting across the battlefield and attacking the Titan as soon as possible. If you can get a free turn through high morale victory is nearly assured. I tried this tactic on Easy and Normal with only a bit of problems. On higher difficulties Aine is much less likely to attack you so you will be better off with the strategy of running to N1 and defeating Aine later as attacking her when she's in the castle is doomed to failure.
Second Leg
Build a Castle in O1a and then as many creature generators as possible in the first week. In the second week, build a Capitol and more creature generators. In the third week, hire the creatures and follow the blue path so you can defeat Aine. She should only be level 2 or 3 and have relatively few troops. Once you have defeated her, continue along the blue path so you can reach G3a. Unfortunately, there are about 18 Naga Queens guarding it which is why you waited to hire as many troops as possible. Once you're victorious and have flagged G3a, head back on the blue path and to O1a to hire more troops.
Now your goal is to completely eradicate the Red enemy by heading through any of the three Garrisons that you opened by visiting G3a along the orange path. O2a will probably have a Castle so try to attack it on either day 7 or day 1 before they have a chance to hire troops. If you hadn't already defeated the Red heroes, go west of O2a and hire a boat and continue along the orange path. With luck, the Red enemy hasn't taken over N2 and it's a simple matter of defeating the remaining heroes. Just make sure that you don't let an enemy slip around you and make their way to O2a and O1a. Once the final Red hero is defeated, you can now focus on making your way to N3 and victory.
Finishing Up
I recommend treating N2 just like N1 and build a City Hall and a Resource Silo there. Have Yog flag mines and visit Places of Learning and produce as many creatures in O1a as you can since there is a Garrison with many Tower creatures, most notably 10 Titans. Be sure to have Yog visit G2a and the University that's north of it since you might learn a valuable secondary skill. Once you have enough troops, take a boat and cross the water and start heading on the green path. The Garrison battle will be tough but with proper tactics, you will emerge victorious.
There are few Places of Learning so if you follow the green path you will visit them all. Make sure to visit the Arena, School of War, and the two Marletto Towers along the way. Also visit some of the wandering stacks as many will choose to join you, especially if you have Diplomacy. This will help you replace the forces you lost in the Garrison battle.
There is a force of Ancient Behemoths before G2b that you have to defeat; one stack with 18 and the other with 17. Your ranged attackers will once again come in handy and send in lesser troops to take the retaliations. After they are defeated, go through G2b and now you must face another battle to take over N3. It has a Castle and quite a few Thunderbirds but if you work fast, you will not be defeated.
| Comments (2) |
- by ithacor
Create Armageddon’s Blade to win the scenario. If Xeron is defeated in combat the scenario is lost. Xeron will be allowed to advance to 24th level and carry over his experience, skills, and spells to his next scenario CAUTION: you will be playing against your Xeron build in his next scenario.
Starting Bonus: 5 Pit Lords or Loins of Legion or Upgraded Kennels


Click on a map to see a larger version.
Green - Friendly Town
Red - Enemy Town
Grey - Neutral Town
Yellow - Underground Passage
A# - Allied Towns
O# - Opponent Towns (a,b,c,d,e,f,g indicates which enemy)
N# - Neutral Towns
M# - Mirror Entrances (a) and exits (b). two-way unless stated
E# - Exit (a) entrance and (b) exit
S# - Seer (a) and the location of the item (b)
G# - Guard Tents (a) and the location of the Guard Tower (b)
J - Jail
X - Ambush
Starting Out
The enemy has six cities to your four, but the starting enemy heroes are weaker than your starting heroes and you start with better armies and better built cities. As in the previous scenario your territory is rich in resources and external dwellings. I recommend an aggressive building program followed by a multi-hero assault on enemy territory in late week 2 or early week 3.
All three of the bonuses are useful, but the Loins are significantly slower than the other options. I recommend the Pit Lords if you plan to farm your Hell Hounds into Demons, or the Upgraded Kennels if you prefer to have Cerberi.
In addition to Xeron, you start with Rashka, Calid, and a random Inferno hero all at level 12. It may be worth restarting until you like your 4th hero and your skills. Rashka usually has Expert Scholar and Wisdom, enabling him to pick up Xeron’s L1-4 spells and transfer them to your other heroes.
All four of your cities have Castle Gates for easy movement of heroes and troops around your area.
First Week
Rashka should buy a spellbook, visit Xeron to learn spells, and then visit your other two heroes to distribute them (your 4th hero may also need to purchase a spellbook). This can also be used to rearrange your troops. I recommend building a Marketplace in Scorch (A4) and a Blacksmith in Dagger Peak (A3), and hiring a hero from the Tavern. Have Rashka buy the 2 Efreets in Scorch and visit the other heroes. Xeron should end up with the 2 Efreets, your 4th hero should get the Pit Lords, Demons, Hell Hounds/Cerberi, and Magogs, and Calid should get the Pit Fiends, Gogs, and Imps.
Xeron should gate to Scorch and move along the orange path flagging mines. Your 4th hero should kill the Air Elementals guarding the large pile of resources east of Dagger Peak, then head north to flag mines, take out a Fire Elemental stack guarding some artifacts, and then continue north to flag the Demon Gate, Fire Lake, and Hell Hole. Send your tavern hero to grab the resources and artifacts that the 4th hero opens up, then have them head south towards the unguarded large pile of resources southeast of Dagger Peak.
Calid should move along the yellow path flagging mines. Have him focus on the mines and ignore everything else, and plan to hire another hero from the Tavern to follow behind picking up resources and flagging the Windmill and the various dwellings.
After distributing troops, Rashka should grab the treasure chest near Vandal Hall (A2) and then plan to buy the Devil in Scorch. This purchase may need to wait until day 2. Once he has the Devil, send him back to Vandal Hall and flag the ore pit and sawmill on the red path and grab the nearby wood piles.
If Xeron has Dimension Door or Fly, consider bypassing the big Psychic Elemental stack southwest of Azrael Field and flagging the Forsaken Palace with the help of some spells to take out the Devils. Otherwise, he and Rashka can flag the mines and dwellings between Dagger Peak and Scorch.
These paths are set up to earn you enough wood and gold to build a City Hall in Dagger Peak day 2 along with a Blacksmith in Scorch and a Marketplace in Azrael Field (A1), followed by a City Hall in Scorch on day 3 plus a Blacksmith in Azrael Field so you can finish building City Halls by day 4, giving you a strong economy to fund troop purchases.
To bolster your army you want Citadels in Vandal Hall and Scorch and Fire Lakes in Vandal Hall and Dagger Peak by the end of the week. If possible, also build a Citadel in Dagger Peak and a Castle in Scorch. When you have enough wood get a Marketplace in Vandal Hall, and consider a Kennels in Scorch. Extra gold can be invested into Hell Holes and Cages. When planning, know that you will lose 4 wood, 4 ore, 2 of each of the rare resources, and 2000 gold at the start of day 6.
Second Week
Plan to upgrade the Fire Lake and Hell Hole in Vandal Hall. Buy all the Efreets and upgrade them to Efreet Sultans and buy the Devil(s) in Scorch. Pool your armies and artifacts to take out the Psychic Elementals and flag the Forsaken Palace if needed, then prepare to invade enemy territory.
Give Xeron the Devils and Efreet Sultans and send him along the dark blue path. Try to scout to see if the Equestrian Gloves are still available on the southern branch—they’re well worth the slight detour if the AI hasn’t found them yet.
Pick another hero to take the rest of your troops plus whatever reinforcements you can afford along the purple path - O6a starts with a Magic University so this hero will have an easy chance to pick up whatever magic skills you want. O4a and O5a start with L3 Mage Guilds, making them good candidates to search for key level 4 spells.
Once you’ve bought your troops, build priorities are a Fire Lake in Azrael Field and Citadels wherever needed. Try to build a Forsaken Palace in Vandal Hall, and build Castles in Scorch and Vandal Hall. In Conflux towns I recommend only building up the mage guilds, with the exception of O2a which is worth full development since it’s the only town that can build Firebirds.
Week Three and Beyond
Your first two invading armies should be capable of sweeping away any resistance the AI can muster in the first month without reinforcements, so plan to have one of your other high level heroes pick up the third week’s Efreets and Devils and invade along the light blue path. You may need to send a fourth hero with your new Gogs/Pit Lords/Demons to help hold the central territory while your first two heroes push westward. After you take over the six enemy towns, focus on exposing the map and hunting down any stray heroes. You can’t defeat the enemy thanks to the inaccessible O7a, but that city only exists to ensure the guard on S1a sticks around if you take over the other towns. Once the overworld is clear of enemy presence you can relax and take the rest of the map at your leisure.
G1a is needed to access the underground gate. G2a, G3a, G4a, and G5a are all needed to access S1a and G6a. The enemy hero guarding S1a has a very powerful army including 25 Phoenixes, 35 Magic Elementals, and hundreds of lower level troops. S1a will ask for 30000 gold in return for a Sphere of Permanence. Take this along with the Sword of Hellfire, Breastplate of Brimstone, and Shield of the Damned past O6b to S2a to build Armageddon’s Blade and win the map.
Alternate Plans
It is possible to sideline Xeron if you want to avoid building him up. Have Rashka take over Xeron’s role (and his artifacts!), a tavern hero take on Rashka’s role, and use Xeron as one of your side heroes picking up resources. It’s also possible to win with an immediate breakthrough of the mid or south garrisons (the north garrison has a much stronger guard) and invasion of enemy territory, but the lack of strong following heroes can make it difficult to contain the enemy heroes.
- by ithacor
Gather the Sword of Hellfire, Breastplate of Brimstone, and Shield of the Damned to win the scenario. However, if Xeron is defeated in combat the scenario is lost. Xeron will be allowed to advance to 12th level and carry over his experience, skills, and spells to his next scenario.
Starting Bonus: Speculum or Equestrian’s Gloves or Necklace of Swiftness
 Click on a map to see a larger version.
Green - Friendly Town
Red - Enemy Town
Grey - Neutral Town
Yellow - Underground Passage
A# - Allied Towns
O# - Opponent Towns (a,b,c,d,e,f,g indicates which enemy)
N# - Neutral Towns
M# - Mirror Entrances (a) and exits (b). two-way unless stated
E# - Exit (a) entrance and (b) exit
S# - Seer (a) and the location of the item (b)
G# - Guard Tents (a) and the location of the Guard Tower (b)
J - Jail
X - Ambush
Starting Out
The enemy has four cities to your three, and starts with three heroes that are too strong for your starting army to handle. Fortunately, these heroes are guarding the three artifacts you need to win the scenario (behind the G2b guards underlined in red) and they cannot stray too far from them for at least the first month. Your territory has a wealth of mines and external dwellings that can allow you to keep up with early enemy production.
The bonus choice is a close call between the Equestrian’s Gloves or the Necklace of Swiftness. I recommend the Necklace because it boosts Cerberi to speed 10 on native ground. This is a major tactical advantage against the many swarms of Sprites infesting your territory.
Xeron can be built up in this map to make the next map easier, but it may be worthwhile to avoid building him up since you will fight against your Xeron build in the last two maps of this campaign. If you decide to build him up I recommend trying for Expert Wisdom by level 12 since the map offers 7 chances at good level 5 spells. It may be worth restarting until you like the skills that Xeron and Ash begin with.
Note that your three cities all begin with Castle Gates so you can easily shuttle heroes and troops between the three locations.
First Leg
Start by having your heroes visit the towns to pool their armies and to learn spells from the mage guilds. Upgrade the Kennels in Blackpool (A3), buy all of the Hellhounds and Cerberi in your towns, upgrade these plus your starting Hellhounds to Cerberi, and give all of your Cerberi and Devils to your main hero along with your bonus artifact. This hero should move along the blue path, clearing the way for a scout hero to tag G1a and then claim the gold mine behind the eastern G1b. Have another scout hero depart from Havoc Peak (A2) to pick up the resources behind the western G1b.
Buy a fifth hero in Mourningdale, buy as many Gogs as you can afford, and take the rest of your troops along the purple path to claim two Hell Holes and a Forsaken Palace. Have the last hero follow them to flag the Sawmill then split off on the yellow path to grab the loose gold piles. Have the purple hero move to the yellow hero and hand over the troops to ensure you capture the Fire Lake during the first week. If you kept your losses to a minimum, the purple hero can keep the Pit Fiends, half of the Gogs, and some Imps, and use them to clear the lightly guarded mines circled on the map while leaving enough for the other hero to take the Fire Lake. Your main hero should prioritize at least one Sulfur Mine after finishing the blue path.
- Build priorities in week 1: City Halls in Havoc Peak (A2) and Mourningdale (A1), a Citadel and Fire Lake in Blackpool, a Hell Hole and Citadel in Mourningdale, and Cages in all three towns. If you have sufficient resources (mainly Ore) try to build a Fire Lake in Mourningdale and a Citadel in Havoc Peak.
- Build priorities in week 2: finish building Citadels and Fire Lakes everywhere, plus a Resource Silo, Castle, and Forsaken Palace in Blackpool.
Second Leg
In week 3 (or week 4 at the latest), upgrade the Fire Lake in Blackpool, upgrade all of your Efreets to Efreet Sultans, and give your Gogs, Cerberi, Efreet Sultans, Devils, and whatever other troops you can afford to your main hero. You should be strong enough to take out Fiur and claim O1a and O2a along the green path. Have a secondary hero grab the Shield of the Damned for your main hero. O1a has a Magic University built; I recommend using it to teach Earth Magic to your main hero.
Erdamon hangs out near the Breastplate of Brimstone a little north-west of O2a. If your losses so far have been minimal you can challenge him straight away. Otherwise you can resupply from the Conflux towns and/or have your secondary heroes bring some reinforcements before you attack him. He carries a Tome of Earth Magic that can let you easily resupply with Town Portal if you have Advanced Earth Magic. If necessary you can use G3a to pass G3b to reach G4a so you can access the massive pile of resources behind G4b.
Finishing Up
If you don’t plan to build up Xeron at all, you can strike directly towards the final G2b (guarded by Ciele) and grab the Sword of Hellfire to win the map. It is not necessary to have the artifacts together or to have them on Xeron. As soon as any of your heroes picks up the third artifact the map ends—unless one or more of the artifacts is held by a hero in a town garrison, in which case the scenario ends when you end a turn with all three artifacts on non-garrison heroes. If you do want to build up it is easiest to take out Tan entirely, which gives you 7 mage guilds that can all be built to level 5. Leave an artifact on the ground (or in a garrison) until you are ready to end the map.
Even if you plan to leave Xeron weak it may be worthwhile to build him to Advanced Wisdom and to build L4 mage guilds everywhere. One of the fixed heroes on the next map has excellent chances to start with Expert Scholar and Advanced Wisdom, allowing them to learn the spells from Xeron and teach them to your other starting heroes.
- by ithacor
Defeat all your enemies to win the scenario. However, if Gelu is defeated in combat the scenario is lost. Gelu will be allowed to advance to 12th level and carry over his experience, skills, and spells into his next scenario.
Starting bonus: 20 Marksmen or 15 Grand Elves or 10 Sharpshooters.
 Click on a map to see a larger version.
Green - Friendly Town
Red - Enemy Town
Grey - Neutral Town
Yellow - Underground Passage
A# - Allied Towns
O# - Opponent Towns (a,b,c,d,e,f,g indicates which enemy)
N# - Neutral Towns
M# - Mirror Entrances (a) and exits (b). two-way unless stated
E# - Exit (a) entrance and (b) exit
S# - Seer (a) and the location of the item (b)
G# - Guard Tents (a) and the location of the Guard Tower (b)
J - Jail
X - Ambush
Starting Out
I recommend you take the 10 Sharpshooters. The other options are weaker until you have enough gold for Gelu to convert them into Sharpshooters (5000 for the Marksmen, 2625 for the Grand Elves), and it is difficult to accumulate that gold without compromise in other areas. Gold is such a scarce resource on this map that I recommend taking gold from all Treasure Chests.
Try to get Gelu to expert Wisdom since six of the seven towns on this map can build a level 5 Mage Guild. Gelu can only learn one new skill besides Wisdom if you want to ensure this happens by level 12.
The map has numerous Scholars. Most of these give extra stats so you should try to visit them with Gelu. The one north of A1 teaches Luck and the one northwest of O3a teaches Pathfinding. I recommend avoiding these Scholars with Gelu; neither skill is very valuable in this campaign.
First Leg
You start with one town to the enemy’s four, and your town is more restricted in its max development than any of the enemy towns. Enemy territory also has more mines, better artifacts, and plenty of loose resources. Therefore you must make a timely push into enemy territory or you will be overwhelmed by the enemy’s superior production.
To your advantage, your starting town is nicely built up and you have access to a powerful starting army. Send Gelu directly to town, picking up the 30 Elves. Move the 60 Elves off of Gelu into the town garrison so you can upgrade them to Grand Elves, buy a Spellbook for Gelu, and recruit another hero. Upgrade that hero’s troops and have them pick up the Archers, Marksmen, Sharpshooters, and Grand Elves to save Gelu’s movement.
I recommend splitting these troops as follows: Gelu keeps 20 Silver Pegasi, 10 Sharpshooters, and 60 Grand Elves, and is given the 30 Archers and 20 Sharpshooters picked up on the map. Gelu should upgrade the 30 Archers to Sharpshooters for 9000 gold. The 2nd hero keeps 10 Grand Elves, 20 Marksmen, and whatever troops they started with. This gives Gelu an army strong enough to defeat almost anything on the map with minimal losses (split the Grand Elf and Marksmen stacks for extra flexibility), and the 2nd hero an army strong enough to clear the starting area.
Send Gelu down the blue path through the garrison to pick up the Boots of Speed (blue circle) while the 2nd hero uses the yellow path to flag the Sawmill and Ore Pit. Gelu’s next objective is to capture O2a while the 2nd hero breaks into the area north of A1. Hire a 3rd hero in O2a, leave their troops in the city garrison for a little protection, and send them to the nearby Cartographer (green circle) to expose the map.
Building priorities are to get a City Hall in A1 and to build a Citadel, Demon Gate, and Hell Hole or Fire Lake in O2a.
Second Leg
With full knowledge of enemy hero locations and the movement boost from Boots of Speed, Gelu should be able to capture O1a and O3a while killing off enemy heroes. Hire some extra heroes to pick up loose resources, flag mines, and defend your towns. A secondary army assembled from your Inferno towns and/or your initial town can help with cornering any remaining enemy heroes. Once this is done use the secondary army to trap the enemy in O4a.
Finishing Up
With the map under control you are free to level up Gelu, visit places of learning to increase his stats, and build up your mage guilds to teach him powerful spells. Be sure to build Orders of Fire in all of your Inferno towns for extra Spell Power. Have secondary heroes visit the Witch’s Huts to see if any of them teach skills you want to learn with Gelu, and consider building a Magic University in N2 to teach Earth, Air, and/or Water Magic to Gelu. Once you are satisfied with your Gelu, take O4a to win the map.
- by ithacor
Defeat all your enemies to win the scenario. However, if Catherine is defeated in combat the scenario is lost. Catherine will be allowed to advance to 18th level and carry over her experience, skills, and spells into her next scenario.
Starting bonus: 30 Pikeman or 20 Archers or 8 Griffins.
 Click on a map to see a larger version.
Green - Friendly Town
Red - Enemy Town
Grey - Neutral Town
Yellow - Underground Passage
A# - Allied Towns
O# - Opponent Towns (a,b,c,d,e,f,g indicates which enemy)
N# - Neutral Towns
M# - Mirror Entrances (a) and exits (b). two-way unless stated
E# - Exit (a) entrance and (b) exit
S# - Seer (a) and the location of the item (b)
G# - Guard Tents (a) and the location of the Guard Tower (b)
J - Jail
X - Ambush
Starting Out
Catherine starts at level 12 with 5-8 skills learned. She will always know Archery, Logistics, Diplomacy, and Leadership. Ballistics, Offense, and Estates are common 5th/6th skills and I have occasionally seen her start with various other skills including Wisdom, Armorer, and First Aid. It is probably worth restarting the scenario until you have a Catherine without First Aid and with the capability to have both Wisdom and at least one school of magic. The Conflux towns can build Magic Universities so you can pick up the school of your choice. If possible, try to get Catherine to Expert Wisdom so she can benefit from the L5 mage guilds in the Inferno towns.
Sorsha and Cuthbert start at level 4, but their starting skills are far less important than Catherine’s.
I recommend taking the 20 Archers for your bonus. They offer the strongest contribution to your starting army. Both you and the enemy start with powerful heroes, three moderately developed towns, and substantial numbers of troops. The enemy will almost certainly capture two of the neutral towns on their first turn putting you at a disadvantage until you claim at least one for yourself.
First Leg
All three of your heroes should visit their starting towns. Catherine and Sorsha should buy spellbooks, Sorsha should pick up the 50 Crusaders in Pandathalyn (A3), and Cuthbert should pick up the 100 Marksmen in Marshallston (A1). Now it’s time to invest the rest of your starting gold. I recommend upgrading Catherine’s Archers to Marksmen and having Catherine clear the Familiars to her southwest, the Horned Demons near her starting position, and move towards the Imps to her east. Hire another hero from the Tavern in Defiance (A2), leaving a Castle hero for Cuthbert, and have that hero go where the Familiars were to pick up the three Treasure Chests for gold, the Bow of Elven Cherrywood, and the Bowstring of the Unicorn. If you avoid picking up anything else here (for now) except what is necessary to reach the Chests/artifacts, this hero will be able to deliver the artifacts to Catherine at the start of her second turn.
Sorsha does not need to hire or upgrade any troops. The 50 Crusaders are easily capable of clearing everything in her starting area except the large Efreet stack guarding a treasure horde. In Marshallston, hire the starting Castle hero from the Tavern, give their troops to Cuthbert, and have them visit the Redwood Observatory. If possible (it will depend on the Treasure Chests), buy a City Hall in Pandathalyn and a Marketplace in Marshallston, and then spend any remaining gold on upgrading Cuthbert’s starting archers to Marksmen and hiring additional Marksmen and Griffins from Marshallston. Sorsha and Cuthbert can start clearing their areas while Catherine heads east and south to capture Goldenton (N3) and track down Olema, who has the strongest enemy starting army. Goldenton is a good place to upgrade Catherine’s Swordsmen to Crusaders.
I recommend giving Cuthbert reinforcements because Fiona is likely to invade his area before the end of the first week unless Catherine is able to quickly come north (this depends on what Olema does). His 100 Marksmen alone are too vulnerable to defeat Fiona, but he can win handily if they are supported by the troops you can recruit from Marshallston and the surrounding dwellings. Use his extra hero to help with flagging dwellings and transporting troops around.
If Catherine can quickly defeat Olema she can head north to help capture Endelstadt (N2). Otherwise she should stay in the Goldenton area and Cuthbert should prep to make a push on Endelstadt in early week two after receiving reinforcements from Marshallston. Building priorities are to get City Halls wherever you can and Citadels in Marshallston and Pandathalyn. It is possible to purchase a Portal of Glory in Defiance in week 1, but I recommend waiting until week 2 for that. Instead, build a Castle, Stables, and Training Grounds in Marshallston and save some gold to maximize Cuthbert’s week 2 army.
Second Leg
Once you control all five Castle towns you can relax somewhat: you are out producing the enemy and the two central towns naturally guard the main routes across the map. Send scouts to explore, pick up treasures and flag dwellings, and try to get some visibility on the northern passage so an enemy army can’t sneak across to Marshallston. The southern passage isn’t a problem since enemy heroes going that route have to pass near Goldenton to reach Pandathalyn. Use secondary heroes to shuttle troops from your starting towns to your main heroes and the forward Castles.
If you’ve preserved a decent amount of your starting armies and destroyed the enemy starting armies I recommend hiring reinforcements from Endelstadt and Goldenton and making an immediate push into enemy territory with Catherine and either Cuthbert or Sorsha wielding their combined armies. Two week’s worth of Inferno troops can’t stand up to dozens of Crusaders and Marksmen backed up by substantial numbers of Pikemen/Halberdiers, Cavaliers/Champions, Royal Griffins and maybe Zealots. Otherwise, consolidate your side of the map and work on flagging mines, and consider invading Nothenden (N1), Southerdale (N4), or defeating the Efreets near Pandathalyn to access the substantial treasure horde they are guarding. The combined growth from 3-4 towns over a couple of weeks should build up a strong force you can use to invade by week 3 or 4. All three of the Inferno towns start with the same development so the order you attack them is a matter of convenience.
Finishing Up
To build up Catherine for later maps in this campaign I recommend trapping the enemy in O2a. A hero positioned in front of that town completely blocks enemy heroes from exiting, making it safe for secondary heroes to deliver reinforcements to ensure the enemy stays trapped. Catherine is now free to visit stat boosting buildings (make sure to visit the Library of Enlightenment), pick up Earth Magic from the Conflux towns, and build up and visit all of your Castle and Inferno mage guilds for powerful spells (the Conflux guilds are limited to level 1). If Catherine is still short of level 18 she can visit the Tree of Knowledge and Altar of Sacrifice. When you’re ready, conquer E2 to win the map or, if you’re daring, let an enemy hero out so Catherine can get another +1 Power from the Order of Fire and one more chance at a good level 5 spell before you finish them off.
Page 23 of 23