Mission 4 - Dragons
Map Size: Normal
Carry Over: Ylaya, Isabel
Level Cap: 26
Difficulty Index: 3/5
Primary Objectives:
- Ylaya, Raelag and Isabel must survive
- Keep the town from being seized by the enemy
- Defeat the army of Thralsai
- Ylaya must find the Dragons' hideout and enlist their support

This is a busy mission. There are waves after waves of enemy heroes, and the mission boss, which spawns at a given date, carries the largest army ever seen in HoMM5. You will be working against time to visit all the stat bonuses.

In order to prevail in the mission, you will also gather a huge army. If you follow the plot and find the Dragons (a secondary objective), you will be granted a LARGE stack of Black Dragons, which pretty much guarantees your victory.
Also, Ylaya is joined by two familiar heroes - clanlord Raelag and Queen Isabel. It seems that they have developed some... advanced relationship since the end of the original game. Raelag and Isabel joins as lv 25 heroes, with set stat points and skill choices. In order words, they are no longer the Raelag and Isabel you used to know.
If you built a powerful Isabel and Raelag in the original game, you may be extremely disappointed at the first sight. My Raelag lost 39 stat points, and Isabel lost 32 points. They also picked up a few completely redundant / useless skills, and missed one of the most useful skills for their class (happens to be Luck in both cases). Also, Raelag does not know Meteor Shower and Implosion, the two mostly used spells of a Warlock!
To compensate for your miserable loss, there are some little benefits of the new Raelag and Isabel. First, the new Raelag can actually cast a couple of spells that is outside his skill set (Frenzy, Resurrection and Summon Phoenix - he only has advanced Summoning Magic). Resurrection is especially useful, but since he does not have any skill point in Light Magic, the effect is rather limited.

Er... why did they wear full armor in their love nest?

Isabel's special ability also changed to a "Dragon's Blessing", replacing her 250G/day bonus. Her troops now receives an automatic Expert-level bless (always max damage) on the battlefield. But you probably won't use Isabel at all, since the Warlocks are just way better.
Although the mission objective does not specify, you are actually under a time limit. In my game, the mission boss Thralsai spawns on Day 3, Week 3, Month 2 (Day 44), and reaches the town on Day 1, Week 4, Month 2 (Day 50). This means that you have exactly 50 turns to prepare for the final battle, plus to send the two girls (Ylaya and Isabel) to visit as many stat boosts as possible. It is not very easy to visit all stat bonuses before Day 50, since they are scattered all over the place, and traveling on snow slows your heroes down.
Note: Raelag will not show up in the campaign finale, so you don't have to worry about him.
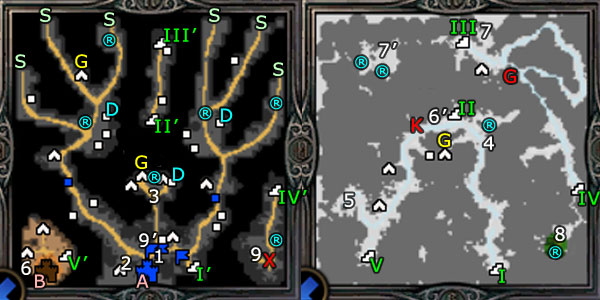
To spice up the 50 turns you have, enemy heroes from the Soulscar clan (Green Player) will attack you, six at a time, every 8-9 days, starting on Day 1 Week 2. Depending on your game, you will have to defeat 2 to 4 waves of them (it seems that the faster you push out, the sooner they stop coming). Their spawn spot is marked by the light green Gs.
These heroes are not powerful individually. Their spell book is very limited - most of the time they just cast Ice Bolt. Their army only consists of about one-week growth of creatures of Tier 1-6 (on lower difficulties the number and tier-level is even lower). These heroes spawns with stronger army later, though.
If these green heroes spot a nearby weak hero, they will attack. Otherwise they will rush straight to your town (A). If you lose the town, you lose the mission.

Don't hire from caraven when your hero is in town, or is about to Town Portal. They will get stuck at the gate and waste the turn.
Also, these green heroes will try to join army. The ones without army will retreat and disappear, and you will have to deal with a more powerful hero with double, even triple army size. If you fight them with Isabel, you will lose a lot of troops to their spells. On the other hand, Ylaya and Raelag can dispatch them easily with area-attack spells and some resurrection at the end. These hereoes are very juicy in experience as well.

Besides the Green player there is also a Brown AI, as a Fortress faction. Their hideout, the only other town (B) of this mission, must be accessed through the surface. The Brown AI is completely dormant, and even if you assault their town, you will be facing an army without hero. It is for your benefit to attack them. You not only gain 2000G per day from the Town Hall, but also harvest a complete set of Dwarven King artifact! In this mission you will have more troops to hire than you can afford, so gold is very much needed in this mission. You may as well take Town B as soon as possible.
There are a lot of creature buildings in this mission. Since they all increase the creature growth rate of your Dungeon town, your town will have some monstrous creature growth at the end. There is really no need to rush flagging all the creature buildings, since you won't have enough cash to hire them all anyways. Actually, as a hindsight I think it is better NOT to bother with the dragon building at all, because (1) You will pick up a large stack of them; (2) You will still use up your cash from buying and upgrading Teir 1-6 creatures. I have marked with light blue Ds the high-tier creature buildings (tier 4-7).
At the start of the mission, pick the Gold Bag artifact. After 50 days it nets you 12500 G, which is way better than the cash bonus (but it is still not a lot). Your starting location is just outside your headquarter, Town A. There are a lot of different ways to play this mission. In the following walkthrough I will just make an example, which focus on efficient stat-bonus visiting within the time limit.
=1= Make Raelag attack the gargoyle building, flag the Orepit, and pick up the artifact at (2). It boosts fire spell damage by 50%, which is very handy later. Give that artifact to Ylaya.
=2= Give Isabel's Haven units to Ylaya, and all Dungeon units from Raelag and Ylaya to Isabel. Ylaya can survive with that tiny Haven army, while Isabel cannot do well without good troops. Raelag will be left with almost nothing, but soon he will pick up a lot.

=3= Immediately send Raelag out to the surface through stairway I'. Your top priority is to capture the Gold Mine (yellow G) to the north, and the Dwarven town (Town B). The extra 3000G per day is a great help. Hire a low-level hero to clean up resources after Raelag (ideally a Dwarven hero, since the surface is covered with snow), and another to clean up after Ylaya and Isabel. There are a lot of resources on the ground, and it is not worth your main hero's time to collect them.
Neutral, smaller Dungeon stacks, usually offers to join Raelag. Don't miss the useful artifact Boots of the Open Road (no movement penalty) at (4). Just north of (4) you can loot some great Dwarven Treasure and pick up lots of resources on the ground. Also, make sure you touch the Red Keymaster Tent (red K) - it will save you quite a few days later. Flag the Sawmill and Ore Pit on Raelag's way down.
Note: You can make Raelag visit the map maker at (5). However, since the map is now revealed to you and I will go over everything you need to know, you may as well save that 4000G to hire more units.
=4= At the same time, send Ylaya directly north, to capture a good cluster of mines. Send Isabel east, to flag some creature buildings. Let Isabel collect the Garrison units (yes, you can swap them down to become yours). Don't challenge the black dragon. They will weaken the first wave of Green heroes quite a bit. Send Ylaya and Isabel to the left next, pass the garrison (swap units again) and flag creature buildings and visit both stat boosts.
=5= When the first wave of Green heroes arrive, massacre the left, and town portal Ylaya back to defend the town from the Green heroes who made it through the black dragons. (Hopefully you have visited all stat bonuses on the left.)

=6= Make Isabel visit the Arena directly north. March both Ylaya and Isabel to the east, and turn right (east) at the first branch to visit the Knoweldge + 1 bonus.
=7= At this time Raelag should have captured the Dwarven town (B). Pull Raelag back via the one-way portal (6) beside the Dwarven town, and run him back to defend from (6'). At the same time, send Ylaya and Isabel out to the surface.
Raelag will be your defender from now on. His power is more than enough to handle all of the subsequent Green heroes. Just give him Deep Hydras and Minotaurs. It is much easier than what Raelag has seen in The Conquest (C4M3), but you have a crappy build here so the challenge still exists. From now on I will omit Raelag and just talk about what to do with the girls.
Note: Pass the Boots of Open Road to Ylaya. You can sacrifice Isabel's chance of stat bonuses since she won't be used (Freyda is better) in the campaign finale anyways.
=8= On the surface, march Ylaya and Isabel all the way north. Just north of (4) is a stat boost. Enter the stairway (II), which is connected to (II'). Go north along the underground passage you emerge at (III). There is a stack of Fire Dragon right in the east. Defeat it, and you can access a two-way portal (7) that brings you to a small area (7') with two stat boosts.

=9= Return Ylaya and Isabel to the main road, and go east. You can unlock the Red Gate (red G), revealing a good shortcut. Keep going SE, and you will see a stairway (IV) guarded by Fire Dragons. There is a hidden trail in the forest to the south leading to a small grassland area (8), with a Sylana Ancient (level up tree) and a Library of Enlightenment (Spellpower and Knowledge +2). Great!
=10= If you go down the stairway (IV), you can pick up the LARGE stack of dragons (marked with red X). After the cutscene, the mission boss Thralsai instantly spawns at the NW corner of the map, if he has not already. You can take the one-way portal (9) just beside the Dragons back to your headquarter, or cast Town Portal.
=11= Before Thraslai reaches your town (he is usually distracted by various buildings), you have a few days to visit one more stat boost (that's why I left the mercenary camp unvisited in the first place). Buy out whatever you can afford, equip the best artifact you own, and you should be able to knock out Thralsai easily!
This Thralsai battle is a huge army clash. Thraslai's army varies with difficulty. From the mission script Thraslai will have the following number of troops ranging from easy to heroic:
- 515-840 Assassins
- 235-410 Blood Fury
- 155-280 Minotaur Guards
- 75-125 Grim Raider
- 44-86 Deep Hydra
- 58-88 Shadow Matriarch
Congratulations!
